从 0 搭建换脸 Pipeline:inswapper + GFPGAN + ONNX 跨平台部署实战

从 0 搭建换脸 Pipeline:inswapper + GFPGAN + ONNX 跨平台部署实战

javpower
发布于 2026-05-08 18:57:03
发布于 2026-05-08 18:57:03
从 0 搭建换脸 Pipeline:inswapper + GFPGAN + ONNX 跨平台部署实战
一张源脸、一张目标图,5 秒出结果。本文手把手拆解一条生产级换脸 Pipeline 的完整实现,从架构设计到踩坑细节,看完你能自己搭一套。
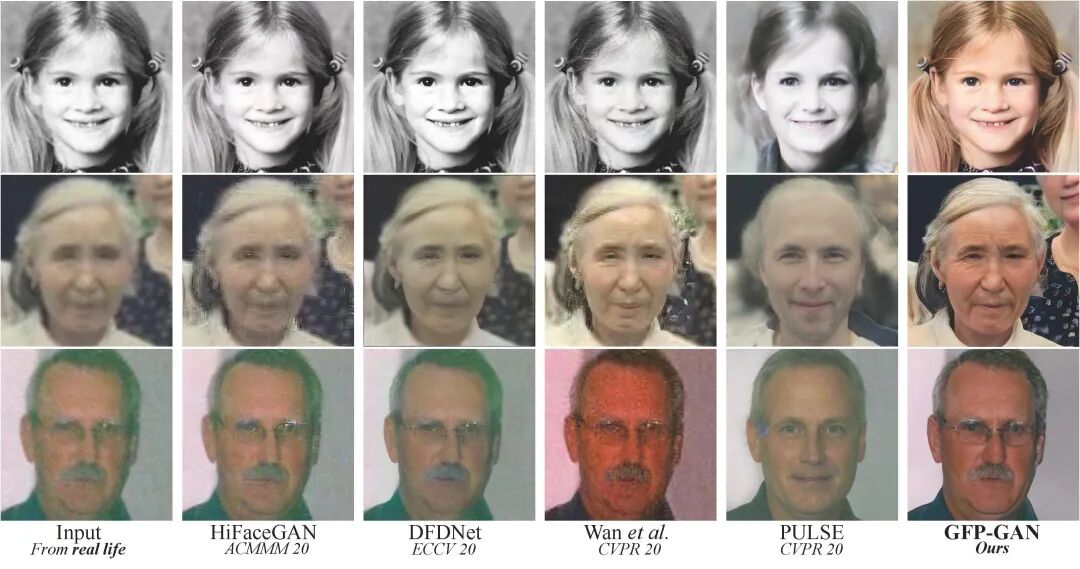
GFPGAN 人脸增强效果对比
01 | 先看效果,再聊架构
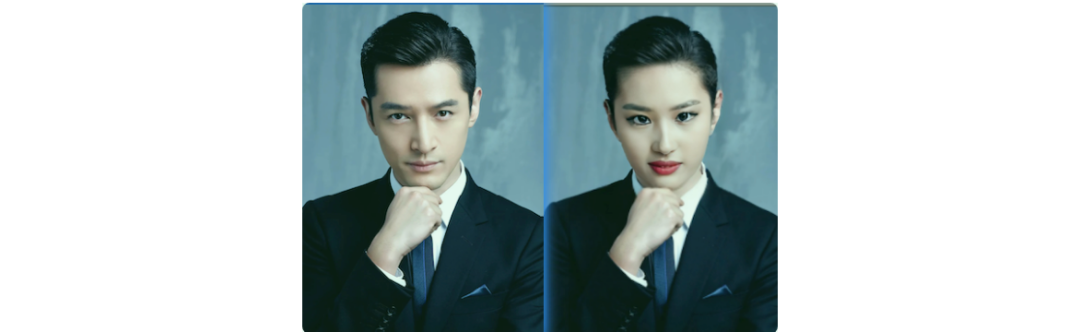
最终能力:
- 图片换脸:
source.jpg→target.jpg→result.png - 视频换脸:逐帧处理,支持进度条
- 实时摄像头:720p@8fps(M1/M2)
- 多脸支持:一张图里 N 张脸全换
- 人脸增强:换完自动修复清晰度
技术栈一句话:InsightFace 检测 + inswapper 换脸 + GFPGAN 增强 + ONNX 统一推理。
02 | Pipeline 全流程
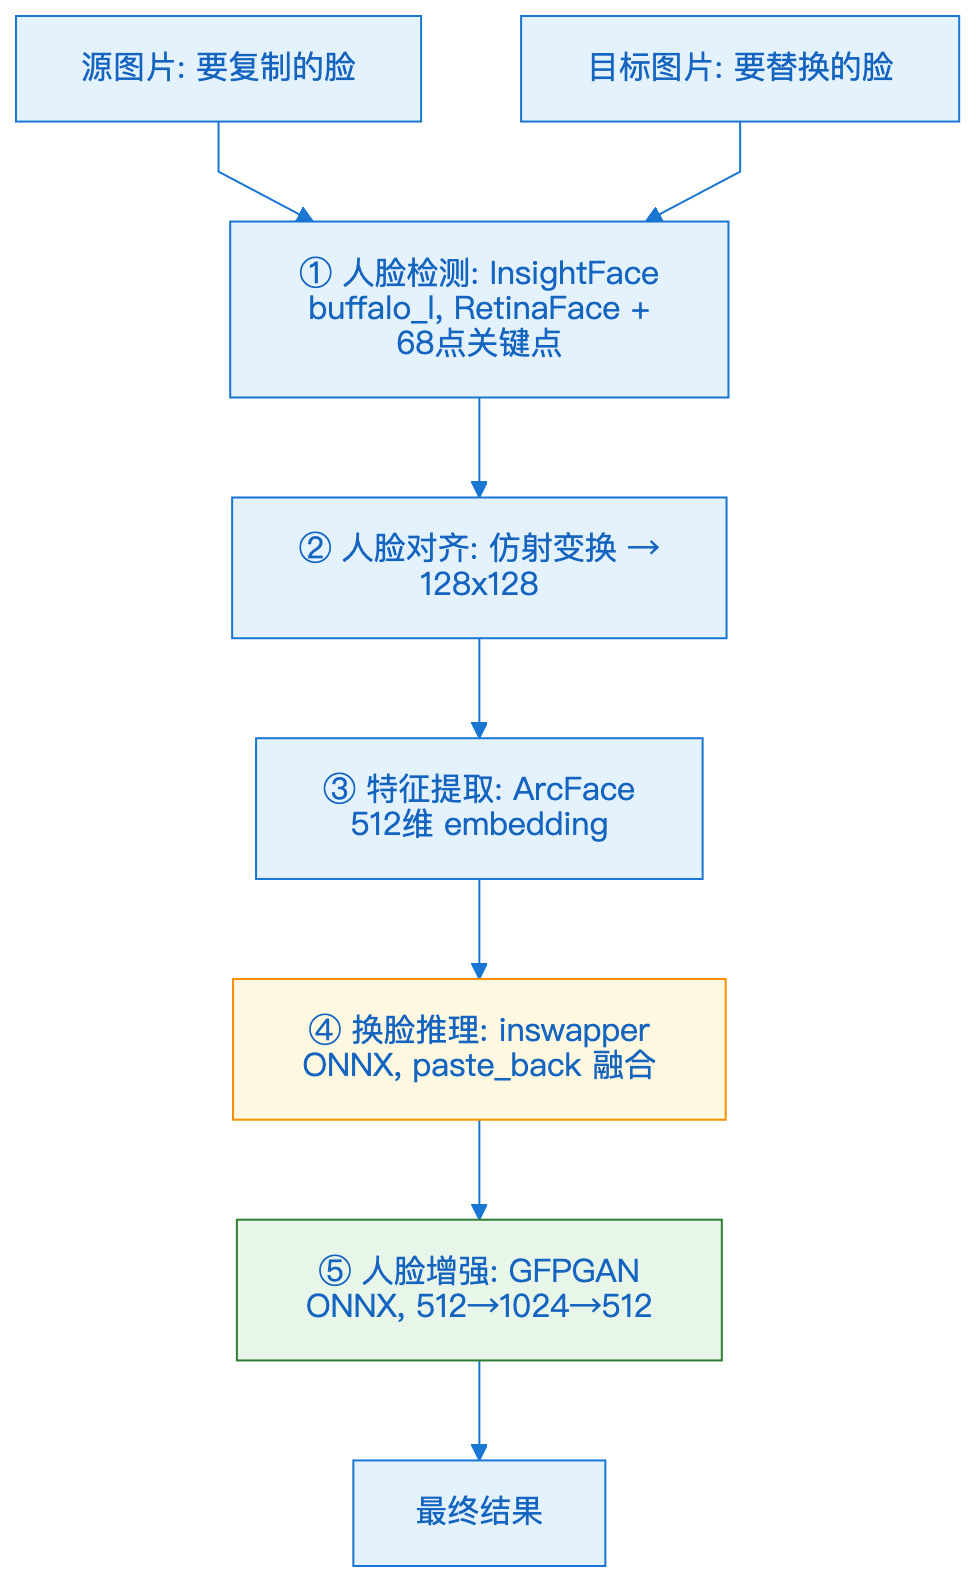
换脸 Pipeline 全流程架构图
换脸 Pipeline 全流程架构图
核心思路:不训练任何模型,纯推理。所有模型都是 ONNX 格式,一套代码跑 CUDA / MPS / CPU。
03 | 模块一:人脸检测与特征提取
3.1 InsightFace buffalo_l 做了什么
buffalo_l 不只是检测器,它是一个人脸分析全家桶:
子模块 | 输入 | 输出 | 用途 |
|---|---|---|---|
RetinaFace 检测 | 原图 | bbox + 5点关键点 | 定位人脸 |
ArcFace 识别 | 对齐后的人脸 | 512维向量 | 身份编码 |
68点关键点回归 | 原图 | 68个landmark | 精细对齐 |
性别年龄 | 原图 | gender + age | 可选过滤 |
3.2 初始化代码
from insightface.app import FaceAnalysis

class FaceDetector:
    def __init__(self, model_name="buffalo_l", device="cuda", det_size=(640, 640)):
        self.device = device
        self.det_size = det_size

        # 根据设备选择 ONNX Runtime Provider
        if device == "cuda":
            providers = ['CUDAExecutionProvider', 'CPUExecutionProvider']
            ctx_id = 0
        elif device == "mps":
            providers = ['CoreMLExecutionProvider', 'CPUExecutionProvider']
            ctx_id = 0
        else:
            providers = ['CPUExecutionProvider']
            ctx_id = -1

        self.app = FaceAnalysis(name=model_name, providers=providers)
        self.app.prepare(ctx_id=ctx_id, det_size=det_size)
有个细节:
ctx_id在 MPS 模式下也要设为0,而不是-1。-1表示纯 CPU,0表示用第一个 GPU 设备(包括 MPS)。
3.3 检测结果结构
faces = app.get(image)

for face in faces:
    face.bbox              # [x1, y1, x2, y2] 人脸框
    face.kps               # (5, 2) 五点关键点:左眼、右眼、鼻尖、左嘴角、右嘴角
    face.embedding         # (512,) ArcFace 特征向量
    face.det_score         # 检测置信度 0~1
    face.pose              # (3,) 头部姿态 [pitch, yaw, roll]
    face.normed_embedding  # (512,) 归一化后的 embedding
注意:
embedding是身份的核心表示。换脸的本质就是:用源脸的embedding去驱动目标脸的生成。
04 | 模块二:换脸引擎 inswapper
4.1 inswapper 的工作原理
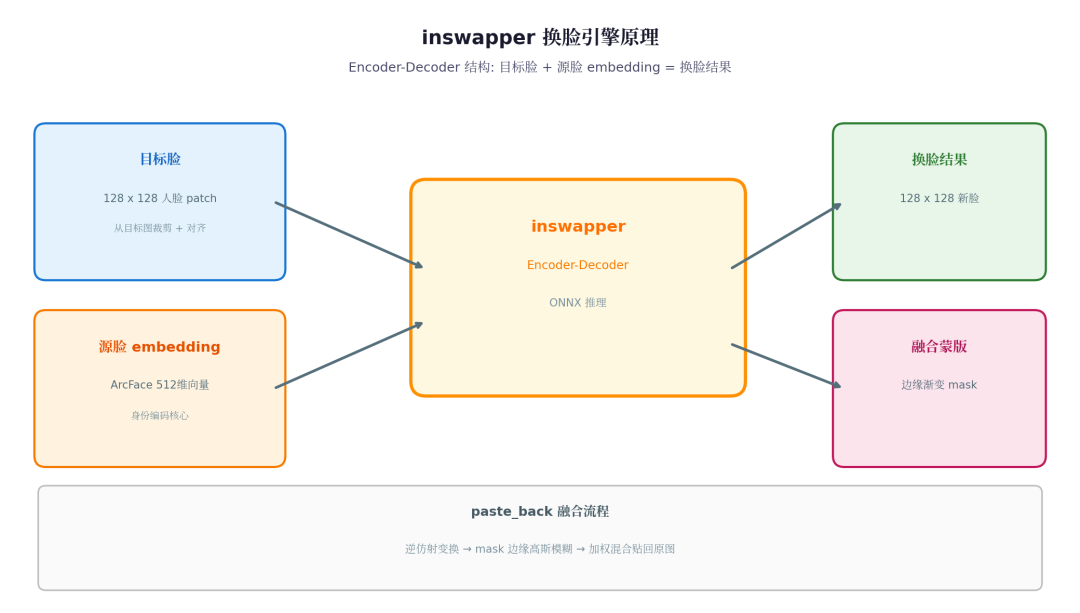
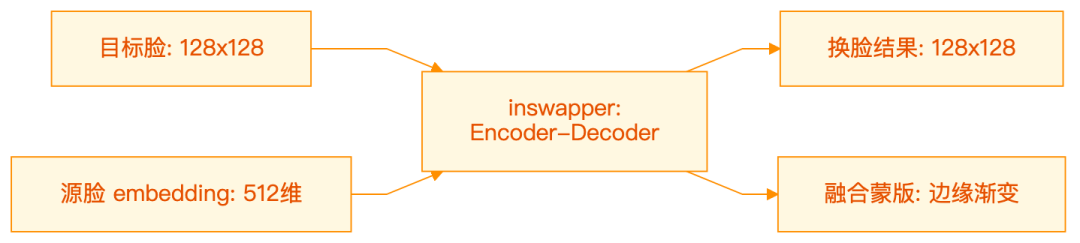
inswapper 换脸引擎原理
inswapper 换脸引擎原理
inswapper 是一个 128x128 的 encoder-decoder 网络,输入有两部分:
- 目标脸:128x128 的人脸 patch(从目标图裁剪+对齐)
- 源脸 embedding:512维向量(ArcFace 提取)
输出也有两部分:
- 换脸结果:128x128 的人脸 patch
- 融合蒙版:用于边缘渐变的 mask
4.2 核心调用
import insightface

# 加载模型
swapper = insightface.model_zoo.get_model(
    "./models/inswapper_128_fp16.onnx",
    providers=['CoreMLExecutionProvider', 'CPUExecutionProvider']
)

# 换脸
result = swapper.get(
    target_img,      # 原始目标图(不是裁剪后的人脸)
    target_face,     # 目标人脸信息(bbox, kps, embedding)
    source_face,     # 源人脸信息(主要是 embedding)
    paste_back=True# 关键:自动将换脸结果贴回原图
)
4.3 paste_back 到底做了什么
当 paste_back=True 时,模型内部的流程是:
- 根据
target_face.kps(5点关键点)计算仿射变换矩阵 - 从目标图裁剪出 128x128 的人脸 patch
- 送入 inswapper 推理,得到换脸后的 128x128 patch + mask
- 用 mask 做边缘渐变
- 逆仿射变换,将 patch 贴回原图的对应位置
# paste_back 的核心逻辑(简化版)
def paste_back(target_img, swapped_face, mask, M_inv):
    # M_inv 是逆仿射矩阵
    h, w = target_img.shape[:2]

    # 将换脸结果逆变换回原图坐标
    warped_face = cv2.warpAffine(swapped_face, M_inv, (w, h))
    warped_mask = cv2.warpAffine(mask, M_inv, (w, h))

    # mask 边缘做高斯模糊,实现渐变融合
    warped_mask = cv2.GaussianBlur(warped_mask, (3, 3), 0)

    # 加权混合
    result = target_img * (1 - warped_mask) + warped_face * warped_mask
    return result.astype(np.uint8)
关键点:mask 的质量直接决定了融合效果。inswapper 输出的 mask 在边缘有渐变,所以不需要额外的 Poisson 融合就能有不错的效果。
4.4 大脸处理:上采样再换脸
inswapper 的输入固定是 128x128,如果目标图里的人脸很大(比如 > 256px),直接裁剪缩放到 128 会损失细节。
解决方案:目标人脸 > 128px 时,先将整张图上采样 2 倍,再检测+换脸,最后缩回来。
def swap_multiple_faces(self, source_img, target_img, source_index=0, max_faces=10):
    source_faces = self.face_analyzer.get(source_img)
    target_faces = self.face_analyzer.get(target_img)

    source_face = source_faces[source_index % len(source_faces)]
    output = target_img.copy()

    for i, target_face in enumerate(target_faces[:max_faces]):
        x1, y1, x2, y2 = target_face.bbox.astype(int)
        face_h, face_w = y2 - y1, x2 - x1

        if face_h < 128or face_w < 128:
            # 小脸:直接换
            swapped = self.swapper.get(output, target_face, source_face, paste_back=True)
        else:
            # 大脸:上采样 → 换脸 → 缩回
            upscaled = cv2.resize(output, (output.shape[1]*2, output.shape[0]*2))
            upscaled_faces = self.face_analyzer.get(upscaled)
            if len(upscaled_faces) > i:
                swapped = self.swapper.get(upscaled, upscaled_faces[i], source_face, paste_back=True)
                output = cv2.resize(swapped, (target_img.shape[1], target_img.shape[0]))

        if swapped isnotNone:
            if isinstance(swapped, tuple):
                swapped = swapped[0]  # paste_back=True 返回 (result, mask)
            output = swapped

    return output
05 | 模块三:GFPGAN 人脸增强
换完脸的人脸通常偏模糊(128x128 放大后),需要后处理增强清晰度。
5.1 为什么用 ONNX 版本而不是 PyTorch 版本
踩过坑的人都知道:
版本 | 优点 | 坑 |
|---|---|---|
PyTorch GFPGAN | 效果好,社区支持 | 和 ONNX inswapper 同时加载容易出边框 artifact |
ONNX GFPGAN | 推理稳定,内存低,MPS 兼容好 | 输入输出尺寸固定(512→1024) |
结论:既然 inswapper 已经是 ONNX,GFPGAN 也用 ONNX,统一推理后端,避免框架混用的坑。
5.2 GFPGAN ONNX 的处理流程

5.3 实现代码
import onnxruntime as ort
import cv2
import numpy as np

class FaceEnhancer:
    def __init__(self, model_path, device="cpu"):
        self.model_path = model_path
        self.input_size = 512

        # 选择 Provider
        if device == "mps":
            providers = ['CoreMLExecutionProvider', 'CPUExecutionProvider']
        elif device == "cuda":
            providers = ['CUDAExecutionProvider', 'CPUExecutionProvider']
        else:
            providers = ['CPUExecutionProvider']

        self.session = ort.InferenceSession(model_path, providers=providers)

    def enhance_frame(self, frame, faces):
        """对一帧中的所有人脸做增强"""
        for face in faces:
            frame = self._enhance_single_face(frame, face)
        return frame

    def _enhance_single_face(self, frame, face):
        """单脸增强的核心逻辑"""
        x1, y1, x2, y2 = face.bbox.astype(int)

        # 1. 裁剪人脸区域,带一点 margin
        margin = 0.2
        face_w, face_h = x2 - x1, y2 - y1
        x1 = max(0, int(x1 - face_w * margin))
        y1 = max(0, int(y1 - face_h * margin))
        x2 = min(frame.shape[1], int(x2 + face_w * margin))
        y2 = min(frame.shape[0], int(y2 + face_h * margin))

        face_img = frame[y1:y2, x1:x2]

        # 2. 仿射对齐到标准模板(512x512)
        # 用 5 点关键点做对齐
        M = self._get_affine_matrix(face.kps, self.input_size)
        aligned = cv2.warpAffine(face_img, M, (self.input_size, self.input_size))

        # 3. 预处理:BGR→RGB,归一化,NCHW
        blob = self._preprocess(aligned)

        # 4. ONNX 推理
        output = self.session.run(None, {"input": blob})[0]

        # 5. 后处理:去归一化,RGB→BGR,缩回 512
        enhanced = self._postprocess(output)
        enhanced = cv2.resize(enhanced, (self.input_size, self.input_size))

        # 6. 逆仿射变换,贴回原图
        M_inv = cv2.invertAffineTransform(M)
        # 计算输出尺寸(原图中人脸区域的大小)
        out_h, out_w = y2 - y1, x2 - x1
        warped = cv2.warpAffine(enhanced, M_inv, (frame.shape[1], frame.shape[0]))

        # 7. 用 mask 混合(边缘渐变)
        result = frame.copy()
        mask = self._create_blend_mask(out_h, out_w)
        result[y1:y2, x1:x2] = (
            frame[y1:y2, x1:x2] * (1 - mask) +
            warped[y1:y2, x1:x2] * mask
        ).astype(np.uint8)

        return result

    def _preprocess(self, img):
        """预处理:BGR→RGB,归一化到 [-1, 1],转 NCHW"""
        img = cv2.cvtColor(img, cv2.COLOR_BGR2RGB)
        img = img.astype(np.float32) / 127.5 - 1.0
        img = img.transpose(2, 0, 1)  # HWC → CHW
        img = np.expand_dims(img, 0)  # 添加 batch 维度
        return img

    def _postprocess(self, output):
        """后处理:去归一化,RGB→BGR"""
        output = output[0].transpose(1, 2, 0)  # NCHW → HWC
        output = (output + 1.0) * 127.5
        output = np.clip(output, 0, 255).astype(np.uint8)
        output = cv2.cvtColor(output, cv2.COLOR_RGB2BGR)
        return output
注意:GFPGAN ONNX 的输入输出尺寸是固定的(512→1024),所以在推理后要 resize 回目标尺寸。这个缩放过程会损失一些细节,是当前方案的一个 trade-off。
06 | 辅助模块
6.1 BiSeNet 人脸解析(精细遮罩)
BiSeNet 可以把人脸分成 19 个区域(皮肤、眉毛、眼睛、鼻子、嘴唇、头发等),用于生成更精细的融合遮罩。
from facexlib.parsing import init_parsing_model

class FaceParser:
    SKIN_INDEX = [1, 2, 3, 4, 5, 6, 10]  # 皮肤相关区域
    FACE_INDEX = [1, 2, 3, 4, 5, 6, 7, 8, 9, 10, 11, 12, 13]  # 整张脸

    def __init__(self, device="cpu"):
        self.model = init_parsing_model(model_name='bisenet', device=device)

    def parse(self, img):
        """返回每个像素的类别标签(0-18)"""
        # 预处理:resize → RGB → 归一化 → NCHW
        img_resized = cv2.resize(img, (512, 512))
        img_rgb = cv2.cvtColor(img_resized, cv2.COLOR_BGR2RGB)
        blob = (img_rgb.astype(np.float32) / 255.0).transpose(2, 0, 1)
        blob = np.expand_dims(blob, 0)

        # 推理
        import torch
        tensor = torch.from_numpy(blob).float()
        with torch.no_grad():
            output = self.model(tensor)

        # 取 argmax 得到每个像素的类别
        parsing = output[0].squeeze(0).cpu().numpy()
        parsing = np.argmax(parsing, axis=0)

        # resize 回原图尺寸
        return cv2.resize(parsing.astype(np.uint8), (img.shape[1], img.shape[0]),
                         interpolation=cv2.INTER_NEAREST)

    def get_face_mask(self, parsing, bbox=None, margin=0.2):
        """提取人脸区域的 mask,可选 bbox 约束"""
        h, w = parsing.shape
        mask = np.zeros((h, w), dtype=np.float32)

        for idx in self.FACE_INDEX:
            mask[parsing == idx] = 1.0

        # 如果有 bbox,只保留 bbox 内的区域
        if bbox isnotNone:
            x1, y1, x2, y2 = bbox.astype(int)
            face_w, face_h = x2 - x1, y2 - y1
            x1 = max(0, int(x1 - face_w * margin))
            y1 = max(0, int(y1 - face_h * margin))
            x2 = min(w, int(x2 + face_w * margin))
            y2 = min(h, int(y2 + face_h * margin))

            bbox_mask = np.zeros((h, w), dtype=np.float32)
            bbox_mask[y1:y2, x1:x2] = 1.0
            mask = mask * bbox_mask

        # 高斯模糊边缘
        mask = cv2.GaussianBlur(mask, (7, 7), 3)
        return np.clip(mask, 0, 1)
使用场景:当你需要更精细的融合(比如只换皮肤区域,不碰眼睛嘴唇),BiSeNet 的 parsing mask 就派上用场了。
6.2 色彩校正(默认关闭)
当源脸和目标脸的光线/色调差异大时,换完脸会显得"假"。色彩校正用直方图匹配来对齐颜色。
class ColorCorrector:
    def __init__(self, method="histogram_matching"):
        self.method = method

    def seamless_color_correct(self, swapped_img, target_img, face_mask):
        """在 face_mask 区域内做颜色校正"""
        # 将换脸结果的颜色分布匹配到目标图
        result = swapped_img.copy()

        for c in range(3):  # BGR 三通道
            src_channel = swapped_img[:, :, c]
            ref_channel = target_img[:, :, c]

            # 只在 mask 区域内计算直方图
            mask_bool = face_mask > 0.5
            if mask_bool.sum() == 0:
                continue

            # 直方图匹配
            matched = self._histogram_matching(src_channel, ref_channel, mask_bool)
            result[:, :, c] = np.where(mask_bool, matched, src_channel)

        return result
为什么默认关闭:色彩校正可能引入新的颜色偏差,特别是在 mask 边缘。如果源脸和目标脸光线差异不大,不校正反而更清晰。
6.3 Poisson 融合(默认关闭)
OpenCV 的 seamlessClone 可以做泊松融合,理论上边缘过渡更自然。但实际测试发现:
- 可能导致边缘虚化
- 和 inswapper 的 paste_back 效果重叠
- 计算开销大
所以默认关闭,用 inswapper 自带的 mask 融合就够了。
07 | Pipeline 串联
7.1 配置系统设计
用 YAML 做配置,每个模块独立开关:
# config.yaml
pipeline:
device:mps                    # cuda / cpu / mps

face_swap:
    max_faces:10                # 最多换几张脸

face_enhancer:
    enable:true                 # GFPGAN ONNX 增强
    model:"gfpgan-1024.onnx"
    model_path:"./models/gfpgan-1024.onnx"

restoration:
    enable:false                # PyTorch GFPGAN(和 enhancer 冲突,别同时开)

color_correction:
    enable:false                # 色彩校正

image_upscale:
    enable:false                # Real-ESRGAN(MPS 有 bug)

face_parsing:
    enable:true                 # BiSeNet 人脸解析
7.2 Pipeline 类设计
@dataclass
class PipelineConfig:
    enable_swap: bool = True
    enable_restoration: bool = True
    enable_color_correction: bool = True
    enable_face_enhancer: bool = False
    enable_face_parsing: bool = False
    device: str = "cuda"
    max_faces: int = 10

    @classmethod
    def from_yaml(cls, config_path: str) -> 'PipelineConfig':
        """从 YAML 文件加载配置"""
        with open(config_path, 'r') as f:
            config = yaml.safe_load(f)

        pipeline = config.get('pipeline', {})
        return cls(
            enable_restoration=pipeline.get('restoration', {}).get('enable', True),
            enable_color_correction=pipeline.get('color_correction', {}).get('enable', True),
            enable_face_enhancer=pipeline.get('face_enhancer', {}).get('enable', False),
            enable_face_parsing=pipeline.get('face_parsing', {}).get('enable', False),
            device=pipeline.get('device', 'cuda'),
            max_faces=pipeline.get('face_swap', {}).get('max_faces', 10),
        )


class FaceSwapPipeline:
    def __init__(self, swapper_model_path, detector_model, config):
        self.config = config
        self.swapper_model_path = swapper_model_path
        self.detector_model = detector_model

        # 所有模块延迟初始化
        self.face_swapper = None
        self.face_enhancer = None
        self.color_corrector = None
        self.face_parser = None
        self._initialized = False

    def initialize(self):
        """首次调用时才加载模型"""
        if self._initialized:
            return

        # 换脸引擎(必须)
        self.face_swapper = FaceSwapper(
            model_path=self.swapper_model_path,
            device=self.config.device,
            det_model=self.detector_model
        )

        # GFPGAN 增强(可选)
        if self.config.enable_face_enhancer:
            self.face_enhancer = FaceEnhancer(
                model_path=self.config.face_enhancer_model_path,
                device=self.config.device
            )

        # 色彩校正(可选)
        if self.config.enable_color_correction:
            self.color_corrector = ColorCorrector()

        # 人脸解析(可选)
        if self.config.enable_face_parsing:
            self.face_parser = FaceParser(device=self.config.device)

        self._initialized = True

    def process_image(self, source_img, target_img, source_index=0, swap_all=True):
        """完整的图片换脸流程"""
        if isinstance(source_img, str):
            source_img = cv2.imread(source_img)
        if isinstance(target_img, str):
            target_img = cv2.imread(target_img)

        ifnot self._initialized:
            self.initialize()

        # Step 1: 换脸
        if swap_all:
            result = self.face_swapper.swap_multiple_faces(
                source_img, target_img, source_index, self.config.max_faces
            )
        else:
            result, _, _ = self.face_swapper.swap_single_face(source_img, target_img)

        # Step 2: 色彩校正(可选)
        if self.config.enable_color_correction and self.color_corrector:
            faces = self.face_swapper.face_analyzer.get(target_img)
            for face in faces:
                mask = get_face_mask_from_landmarks(face.landmark, result.shape[:2], face.bbox)
                result = self.color_corrector.seamless_color_correct(result, target_img, mask)

        # Step 3: GFPGAN 增强(可选)
        if self.config.enable_face_enhancer and self.face_enhancer:
            enhanced_faces = self.face_swapper.face_analyzer.get(result)
            if enhanced_faces:
                result = self.face_enhancer.enhance_frame(result, enhanced_faces)

        return result
设计要点:
- 延迟初始化:模型文件大(几百 MB),启动时全部加载会很慢。首次调用
process_image时才加载。 - 模块独立:每个功能一个类,通过 config 控制开关。想加新模块,写一个类 + config 里加一个开关就行。
- 设备抽象:所有模块统一接收
device参数,内部处理 Provider 选择。
08 | 视频和摄像头
8.1 视频处理
视频就是逐帧调用 process_image:
def process_video(source_path, video_path, output_path, pipeline):
    cap = cv2.VideoCapture(video_path)
    fps = cap.get(cv2.CAP_PROP_FPS)
    w = int(cap.get(cv2.CAP_PROP_FRAME_WIDTH))
    h = int(cap.get(cv2.CAP_PROP_FRAME_HEIGHT))
    total = int(cap.get(cv2.CAP_PROP_FRAME_COUNT))

    writer = cv2.VideoWriter(output_path, cv2.VideoWriter_fourcc(*'mp4v'), fps, (w, h))

    source_img = cv2.imread(source_path)

    for i in range(total):
        ret, frame = cap.read()
        ifnot ret:
            break

        # 复用同一个 pipeline,模型只加载一次
        result = pipeline.process_image(source_img, frame)
        writer.write(result)

        print(f"\rProcessing: {i+1}/{total}", end="")

    cap.release()
    writer.release()
8.2 实时摄像头
摄像头同理,只是输入从视频文件变成摄像头:
def process_camera(source_path, camera_id, pipeline):
    cap = cv2.VideoCapture(camera_id)
    cap.set(cv2.CAP_PROP_FRAME_WIDTH, 1280)
    cap.set(cv2.CAP_PROP_FRAME_HEIGHT, 720)

    source_img = cv2.imread(source_path)

    whileTrue:
        ret, frame = cap.read()
        ifnot ret:
            break

        result = pipeline.process_image(source_img, frame)
        cv2.imshow("Face Swap", result)

        key = cv2.waitKey(1)
        if key == ord('q'):
            break
        elif key == ord('s'):
            cv2.imwrite("capture.png", result)

    cap.release()
    cv2.destroyAllWindows()
09 | 踩坑记录
坑 1:PyTorch GFPGAN 和 ONNX inswapper 冲突
现象:同时加载 PyTorch GFPGAN 和 ONNX inswapper 后,换脸结果的人脸边缘出现明显的方框 artifact。
原因:两个框架的内存管理/计算图有冲突。
解决:GFPGAN 也用 ONNX 版本,统一推理后端。
坑 2:Real-ESRGAN 在 MPS 上的 tile bug
现象:Apple M 系列芯片用 Real-ESRGAN 超分时,输出图片尺寸不变,边缘出现 tile 拼接伪影。
原因:Real-ESRGAN 的 tile 处理在 MPS 上有已知 bug(GitHub #442)。
解决:暂时关闭 image_upscale,或强制用 CPU 模式跑 Real-ESRGAN。
坑 3:大脸换脸模糊
现象:目标图里的人脸很大(比如证件照),换完脸后清晰度明显下降。
原因:inswapper 输入固定 128x128,大脸缩放到 128 会丢失细节。
解决:先将整张图上采样 2 倍,换脸后再缩回来。虽然不是完美方案,但比直接缩放好很多。
坑 4:MPS 的 ctx_id
现象:Apple M 系列用 ctx_id=-1 时,InsightFace 跑在 CPU 上,没有用 MPS 加速。
原因:ctx_id=-1 表示 CPU,ctx_id=0 表示第一个 GPU 设备(包括 MPS)。
解决:MPS 模式下 ctx_id 设为 0。
10 | 性能实测
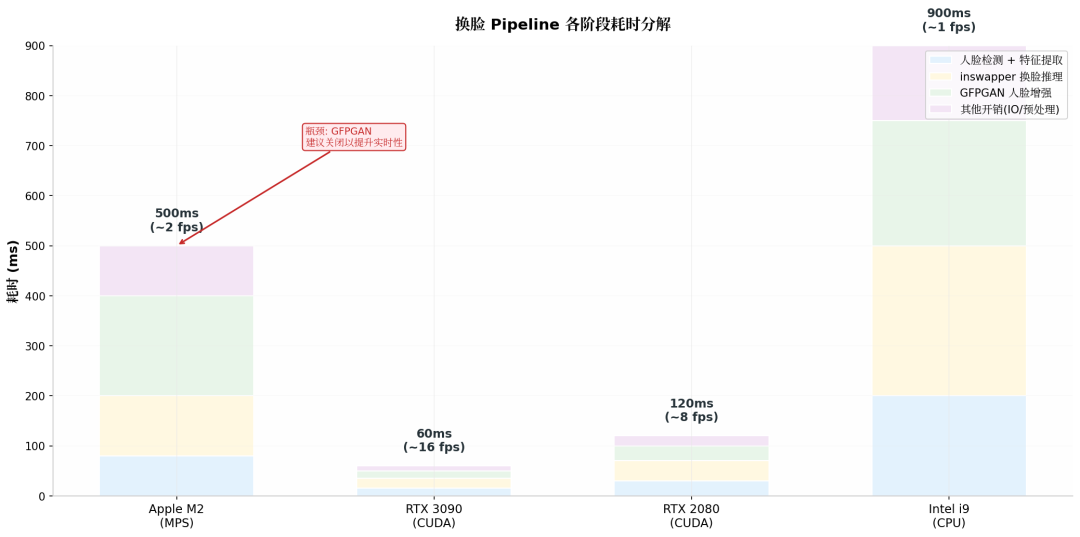
换脸 Pipeline 各阶段耗时分解
换脸 Pipeline 各阶段耗时分解
硬件 | 单张图片 | 摄像头 720p | 说明 |
|---|---|---|---|
Apple M1/M2 (MPS) | ~5s | ~8 fps | 瓶颈在模型加载,推理本身不慢 |
RTX 3090 (CUDA) | <50ms | ~20 fps | GPU 推理飞快 |
RTX 2080 (CUDA) | <100ms | ~10 fps | 够用 |
CPU (Intel i9) | ~3s | ~3 fps | 能跑,但不适合实时 |
优化建议:
- 首次加载慢是正常的,后续调用很快
- 如果不需要人脸增强,关闭
face_enhancer能省 30%+ 时间 - 视频处理可以用多线程:一个线程读帧,一个线程推理,一个线程写帧
11 | 选型决策
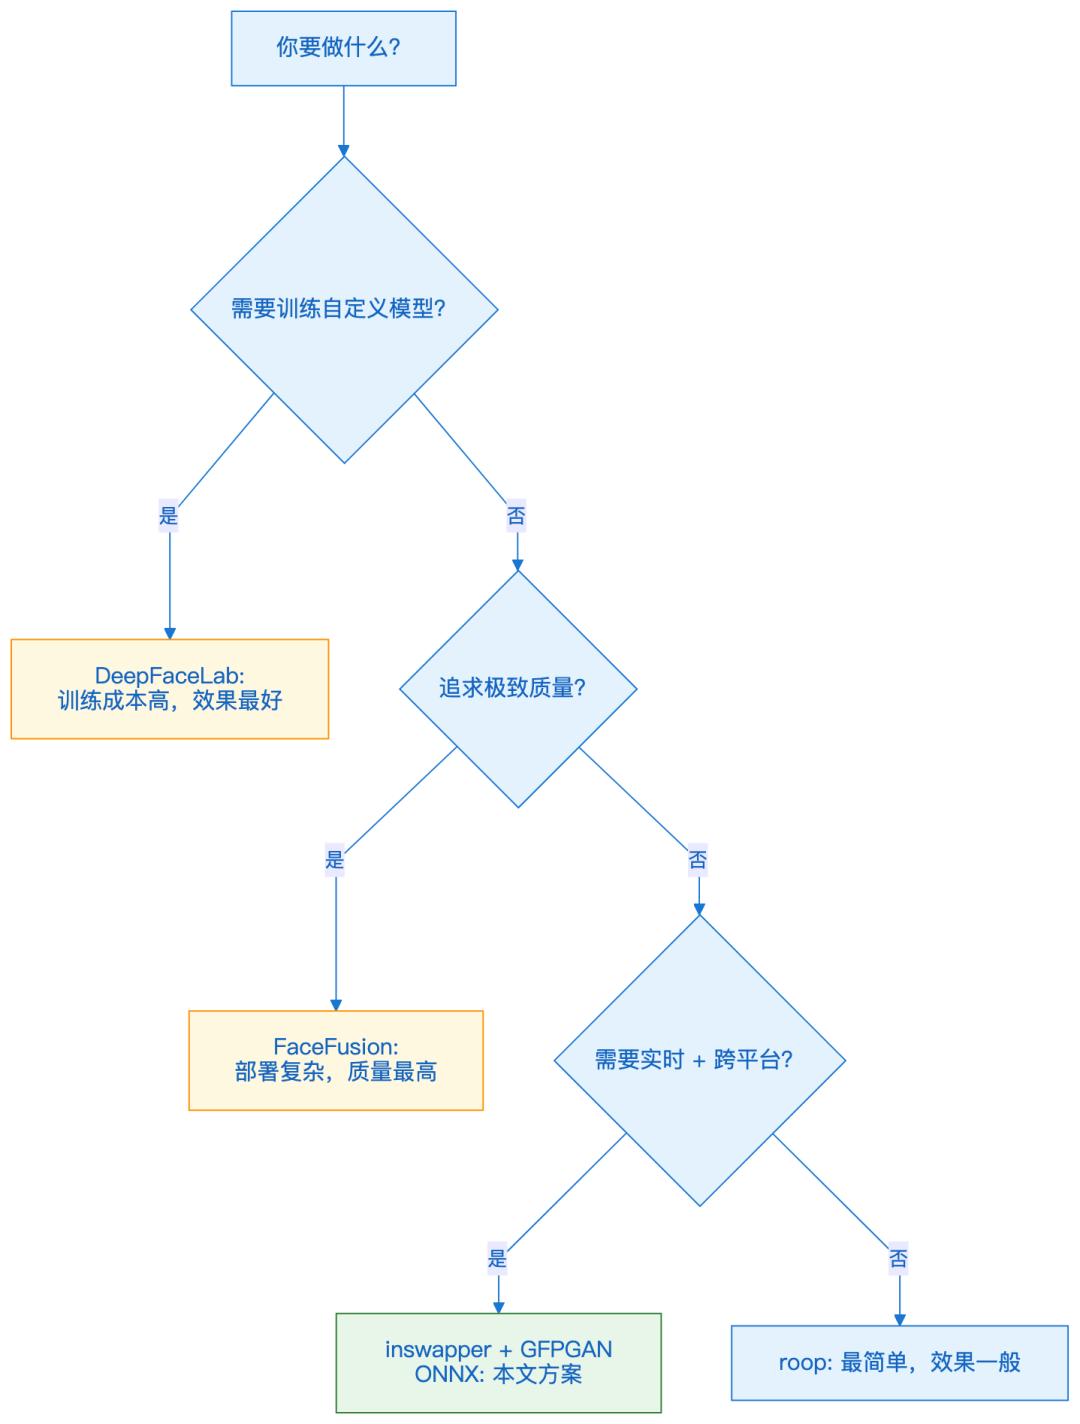
维度 | 本方案 | FaceFusion | roop | DeepFaceLab |
|---|---|---|---|---|
部署难度 | ⭐⭐ | ⭐⭐⭐⭐ | ⭐⭐ | ⭐⭐⭐⭐⭐ |
换脸质量 | ⭐⭐⭐⭐ | ⭐⭐⭐⭐⭐ | ⭐⭐⭐ | ⭐⭐⭐⭐⭐ |
实时性 | ⭐⭐⭐⭐ | ⭐⭐⭐ | ⭐⭐⭐⭐⭐ | ❌ |
人脸增强 | ✅ GFPGAN | ✅ 内置 | ❌ | ❌ |
跨平台 | ✅ CUDA/MPS/CPU | ⚠️ | ✅ | ❌ |
总结
核心思路:InsightFace 检测 → inswapper 换脸 → GFPGAN 增强,三步搞定,全部 ONNX 推理。
关键设计:
- 延迟初始化,按需加载模型
- 模块化设计,config.yaml 控制开关
- 统一 ONNX 后端,避免框架混用的坑
- 大脸上采样策略,避免 128x128 的细节损失
实操:
- 安装
insightface、onnxruntime、gfpgan、facexlib - 下载
inswapper_128_fp16.onnx、buffalo_l、gfpgan-1024.onnx - 按本文的代码结构搭 Pipeline
- 参考踩坑记录避坑
下一步可以做的:
- 尝试 BiSeNet 的 parsing mask 做更精细的融合
- 研究 Real-ESRGAN MPS bug 的 workaround
- 加入人脸姿态估计,过滤掉侧脸/遮挡的情况
- 多线程优化视频处理的吞吐量
本项目仅用于教育和研究目的。使用换脸技术时请遵守当地法律法规和伦理准则。
本文参与 腾讯云自媒体同步曝光计划,分享自微信公众号。
原始发表:2026-05-05,如有侵权请联系 cloudcommunity@tencent.com 删除
目录
腾讯云开发者

Copyright © 2013 - 2026 Tencent Cloud. All Rights Reserved. 腾讯云 版权所有
深圳市腾讯计算机系统有限公司 ICP备案/许可证号:粤B2-20090059  粤公网安备44030502008569号
腾讯云计算(北京)有限责任公司 京ICP证150476号 | 京ICP备11018762号