基于YOLO26的PCB表面缺陷检测系统(Python源码+数据集+Pyside6界面)
原创
基于YOLO26的PCB表面缺陷检测系统(Python源码+数据集+Pyside6界面)
原创
AI小怪兽
发布于 2026-06-02 10:37:45
发布于 2026-06-02 10:37:45
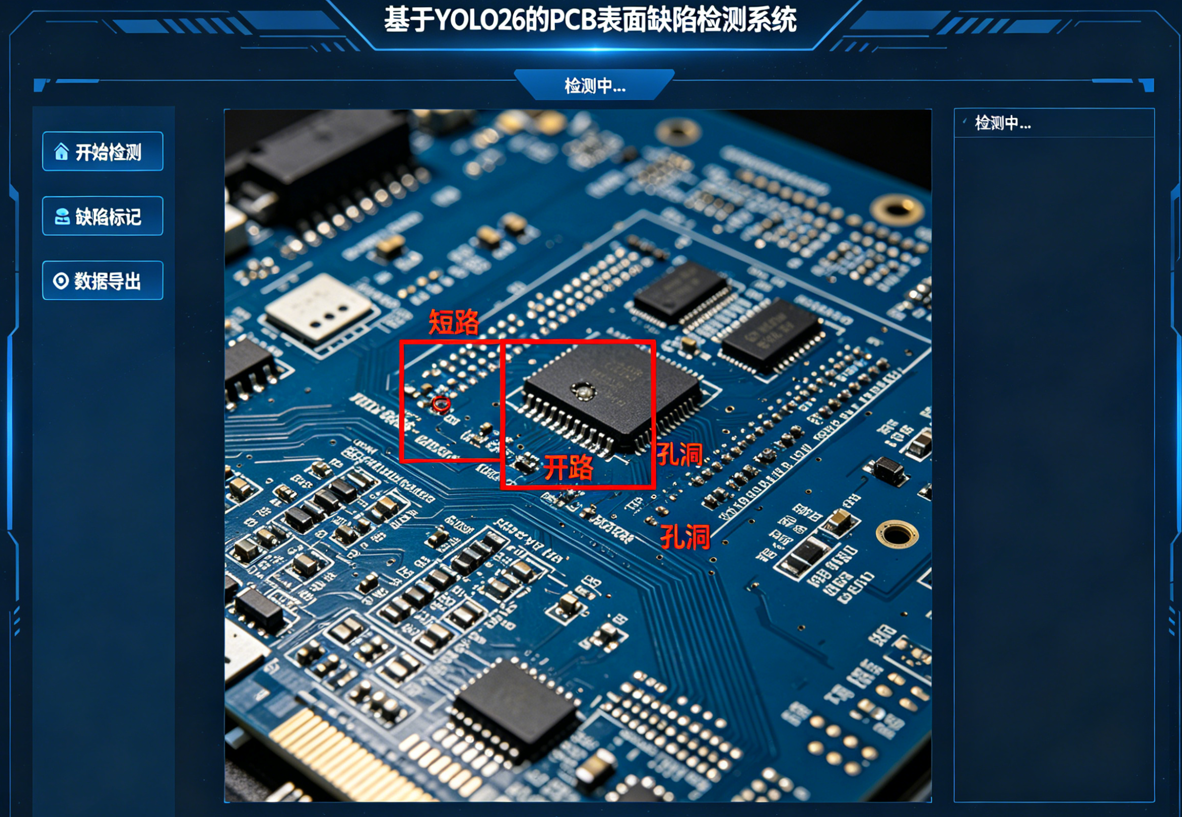
💡💡💡本文摘要:基于YOLO26的PCB表面缺陷检测系统,阐述了整个数据制作和训练可视化过程
博主简介
AI小怪兽 | 计算机视觉布道者 | 视觉检测领域创新者
深耕计算机视觉与深度学习领域,专注于目标检测前沿技术的探索与突破。长期致力于YOLO系列算法的结构性创新、性能极限优化与工业级落地实践,旨在打通从学术研究到产业应用的最后一公里。
🚀 核心专长与技术创新
- YOLO算法结构性创新:于CSDN平台原创发布《YOLOv13魔术师》、《YOLOv12魔术师》等全系列深度专栏。系统性提出并开源了多项原创自研模块,在模型轻量化设计、多维度注意力机制融合、特征金字塔重构等关键方向完成了一系列突破性实践,为行业提供了具备高参考价值的技术路径与完整解决方案。
- 技术生态建设与知识传播:独立运营 “计算机视觉大作战” 公众号(粉丝1.6万),成功构建高质量的技术交流社群。致力于将复杂算法转化为通俗易懂的解读与可复现的工程代码,显著降低了计算机视觉的技术入门门槛。
🏆 行业影响力与商业实践
- 荣获腾讯云年度影响力作者与创作之星奖项,内容质量与专业性获行业权威平台认证。
- 全网累计拥有 7万+ 垂直领域技术受众,专栏文章总阅读量突破百万,在目标检测领域形成了广泛的学术与工业影响力。
- 具备丰富的企业级项目交付经验,曾为工业视觉检测、智慧城市安防等多个关键领域提供定制化的算法模型与解决方案,驱动业务智能化升级。
💡 未来方向与使命
秉持 “让每一行代码都有温度” 的技术理念,未来将持续聚焦于实时检测、语义分割及工业缺陷检测的商业化闭环等核心方向。愿与业界同仁协同创新,共同推动技术边界,以坚实的技术能力赋能实体经济与行业变革。
1.YOLO26原理介绍
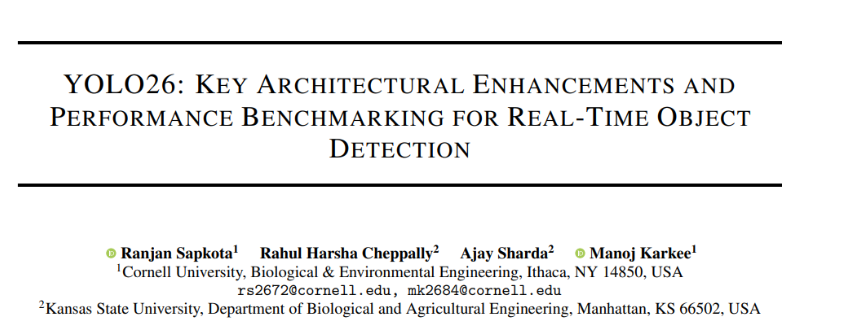
论文:https://arxiv.org/pdf/2509.25164
摘要:本研究对Ultralytics YOLO26进行了全面分析,重点阐述了其关键架构改进及其在实时边缘目标检测中的性能基准测试。YOLO26于2025年9月发布,是YOLO系列最新、最先进的成员,专为在边缘及低功耗设备上实现高效、精确且易于部署的目标而构建。本文依次详述了YOLO26的架构创新,包括:移除了分布焦点损失(DFL);采用端到端的无NMS推理;集成了渐进损失(ProgLoss)与小目标感知标签分配(STAL);以及引入了用于稳定收敛的MuSGD优化器。除架构外,本研究将YOLO26定位为多任务框架,支持目标检测、实例分割、姿态/关键点估计、定向检测及分类。我们在NVIDIA Jetson Nano与Orin等边缘设备上呈现了YOLO26的性能基准测试,并将其结果与YOLOv8、YOLOv11、YOLOv12、YOLOv13及基于Transformer的检测器进行比较。本文进一步探讨了其实时部署路径、灵活的导出选项(ONNX、TensorRT、CoreML、TFLite)以及INT8/FP16量化技术。文章重点展示了YOLO26在机器人、制造业及物联网等领域的实际应用案例,以证明其跨行业适应性。最后,讨论了关于部署效率及更广泛影响的见解,并展望了YOLO26及YOLO系列的未来发展方向。
关键词:YOLO26;边缘人工智能;多任务目标检测;无NMS推理;小目标识别;YOLO(You Only Look Once);目标检测;MuSGD优化器
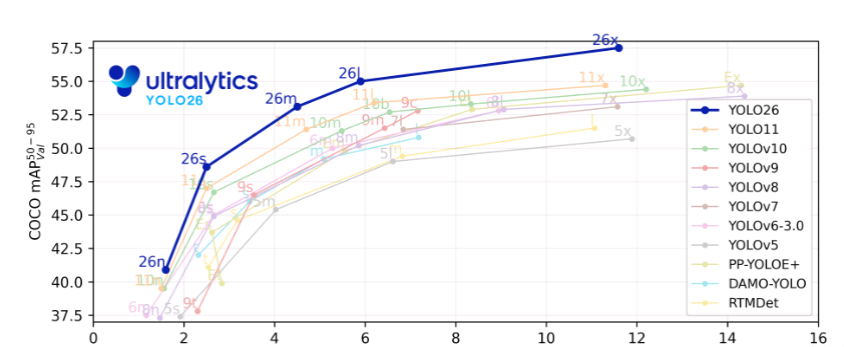
结构框图如下:
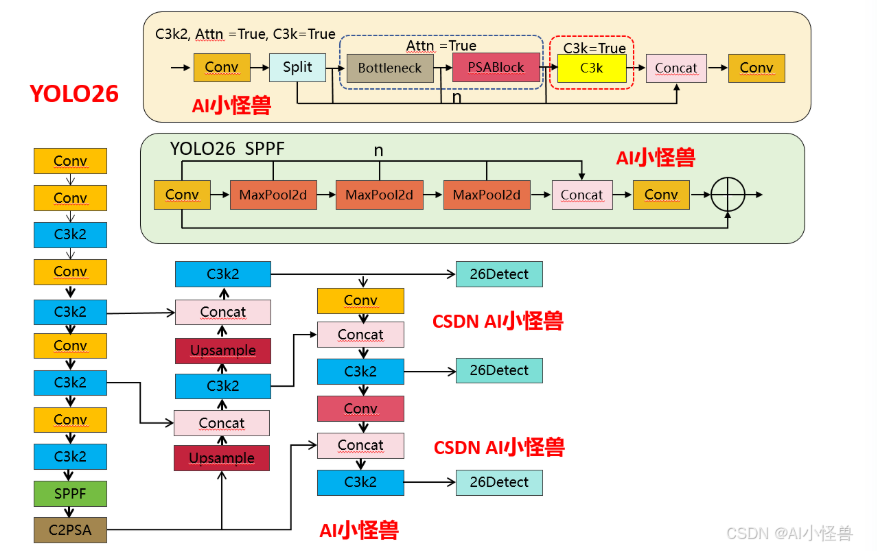
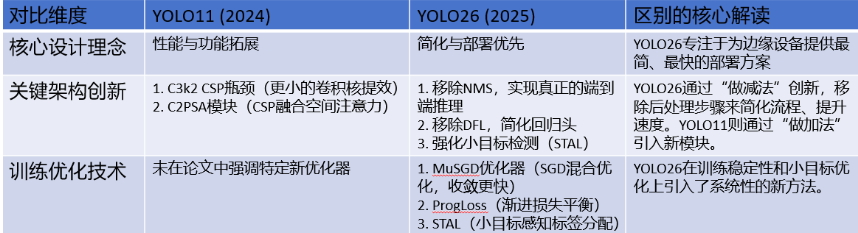
1.1 YOLO11 vs YOLO26结构差异性
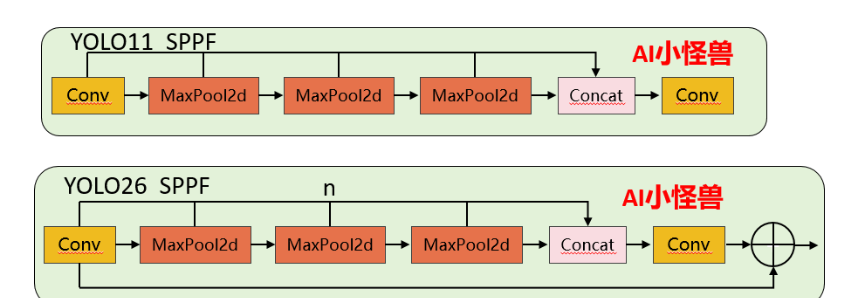
1.1.1 SPPF 核心差异对比
1)池化次数灵活性:YOLO11 的 3 次池化是硬编码的,要修改必须改源码;YOLO26 通过n参数可灵活调整(比如设为 2 次或 4 次),无需改核心逻辑。
2)Shortcut 设计:YOLO26 新增的残差连接能缓解深层网络的梯度消失问题,提升特征复用能力,而 YOLO11 无此设计。
3)激活函数控制:YOLO26 禁用 Conv1 的激活函数,让特征在池化前保持更 “原始” 的状态,是工程上对特征提取的优化。
源码位置:ultralytics/nn/modules/block.py
1.1.2 C3k2 核心差异对比
1)注意力机制的新增:YOLO26 的 C3k2 首次引入PSABlock(金字塔注意力模块),通过attn参数控制是否启用,这是两者最核心的功能差异 —— 启用后模块会先通过 Bottleneck 提取基础特征,再通过 PSABlock 增强关键区域的特征权重,提升小目标 / 复杂场景的检测效果。
2)分支逻辑的扩展:YOLO11 的分支仅受c3k控制,而 YOLO26 的分支逻辑优先级为attn > c3k,即只要attn=True,会优先启用注意力模块,忽略c3k的配置。

重复模块m (n次迭代):
┌─────────────────────────────────────────────────────────┐
│                                                         │
│  如果 attn=True:                                        │
│    Sequential(                                          │
│        Bottleneck(self.c, self.c),                     │  ←─ 先特征提取
│        PSABlock(self.c, attn_ratio=0.5, num_heads=...) │  ←─ 后注意力增强
│    )                                                    │
│                                                         │
│  否则如果 c3k=True:                                     │
│    C3k(self.c, self.c, 2)                             │  ←─ 同YOLOv11
│                                                         │
│  否则:                                                  │
│    Bottleneck(self.c, self.c)                         │  ←─ 同YOLOv11
│                                                         │
└─────────────────────────────────────────────────────────┘
YOLO26 C3k2代码:
源码位置:ultralytics/nn/modules/block.py
1.2 YOLO26核心创新点
YOLO26引入了多项关键架构创新,使其区别于前几代YOLO模型。这些增强不仅提高了训练稳定性和推理效率,还从根本上重塑了实时边缘设备的部署流程。本节将详细描述YOLO26的四项主要贡献:(i)移除分布焦点损失(DFL),(ii)引入端到端无NMS推理,(iii)新颖的损失函数策略,包括渐进损失平衡(ProgLoss)和小目标感知标签分配(STAL),以及(iv)开发用于稳定高效收敛的MuSGD优化器。我们将详细讨论每一项架构增强,并通过对比分析突显其相对于YOLOv8、YOLOv11、YOLOv12和YOLOv13等早期YOLO版本的优势。
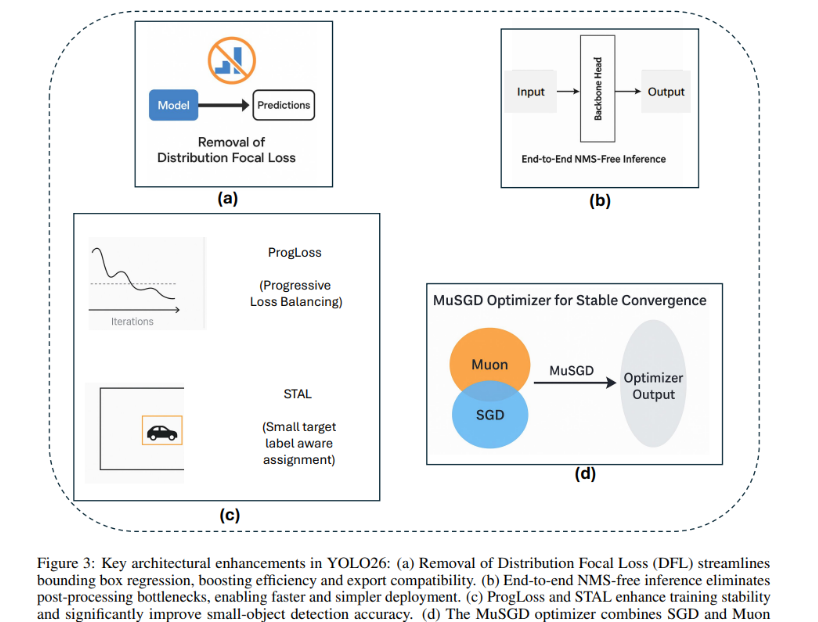
1.2.1 创新点1:移除分布焦点损失(DFL)
YOLO26最重要的架构简化之一是移除了分布焦点损失(DFL)模块(图3a),该模块曾存在于YOLOv8和YOLOv11等早期YOLO版本中。DFL最初旨在通过预测边界框坐标的概率分布来改进边界框回归,从而实现更精确的目标定位。虽然该策略在早期模型中展示了精度提升,但也带来了不小的计算开销和导出困难。在实践中,DFL在推理和模型导出期间需要专门处理,这使针对ONNX、CoreML、TensorRT或TFLite等硬件加速器的部署流程变得复杂。
源码位置:ultralytics/utils/loss.py
通过reg_max 设置为1,移除了分布焦点损失(DFL)
class BboxLoss(nn.Module):
    """Criterion class for computing training losses for bounding boxes."""

    def __init__(self, reg_max: int = 16):
        """Initialize the BboxLoss module with regularization maximum and DFL settings."""
        super().__init__()
        self.dfl_loss = DFLoss(reg_max) if reg_max > 1 else None
1.2.2 创新点2:端到端无NMS推理
YOLO26从根本上重新设计了预测头,以直接产生非冗余的边界框预测,无需NMS。这种端到端设计不仅降低了推理复杂度,还消除了对手动调优阈值的依赖,从而简化了集成到生产系统的过程。对比基准测试表明,YOLO26实现了比YOLOv11和YOLOv12更快的推理速度,其中nano模型在CPU上的推理时间减少了高达43%。这使得YOLO26对于移动设备、无人机和嵌入式机器人平台特别有利,在这些平台上,毫秒级的延迟可能产生重大的操作影响。
源码位置:ultralytics/utils/nms.py
1.2.3 创新点3:ProgLoss和STAL:增强训练稳定性和小目标检测
训练稳定性和小目标识别仍然是目标检测中持续存在的挑战。YOLO26通过整合两种新颖策略来解决这些问题:渐进损失平衡(ProgLoss)和小目标感知标签分配(STAL),如图(图3c)所示。
ProgLoss在训练期间动态调整不同损失分量的权重,确保模型不会过拟合于主导物体类别,同时防止在稀有或小类别上表现不佳。这种渐进式再平衡改善了泛化能力,并防止了训练后期的不稳定。另一方面,STAL明确优先为小目标分配标签,由于像素表示有限且易被遮挡,小目标尤其难以检测。ProgLoss和STAL共同为YOLO26在包含小目标或被遮挡目标的数据集(如COCO和无人机图像基准)上带来了显著的精度提升。
1.2.4 创新点4:用于稳定收敛的MuSGD优化器
YOLO26的最后一项创新是引入了MuSGD优化器(图3d),它结合了随机梯度下降(SGD)的优势与最近提出的Muon优化器(一种受大型语言模型训练中使用的优化策略启发而发展的技术)。MuSGD利用SGD的鲁棒性和泛化能力,同时融入了来自Muon的自适应特性,能够在不同数据集上实现更快的收敛和更稳定的优化。
源码位置:ultralytics/optim/muon.py
2.PCB表面缺陷检测系统
伪代码:
#!/usr/bin/env python3
# -*- coding: utf-8 -*-
"""
基于YOLO26的PCB表面缺陷检测系统
功能:训练、推理(图像/视频/摄像头)、缺陷尺寸测量、结果可视化、报告生成
依赖:ultralytics, opencv-python, numpy, torch, matplotlib, scipy, scikit-image
"""

import os
import argparse
import time
import json
import math
from pathlib import Path
from typing import Union, List, Tuple, Dict, Optional

import cv2
import numpy as np
import torch
from ultralytics import YOLO
from scipy.spatial.distance import cdist
from skimage.measure import label, regionprops

# ======================= 配置参数 =======================
DEFAULT_CONF = 0.25          # 置信度阈值
DEFAULT_IOU = 0.45           # NMS IoU阈值
DEFAULT_IMGSZ = 640          # 推理图像尺寸
MM_PER_PIXEL = 0.05          # 像素当量:每个像素对应的实际尺寸(mm),根据相机标定调整
OUTPUT_DIR = "outputs"       # 输出结果保存目录

# PCB缺陷类别(示例,根据实际数据集修改)
CLASS_NAMES = {
    0: "open_circuit",    # 开路
    1: "short_circuit",   # 短路
    2: "burr",            # 毛刺
    3: "dent",            # 凹陷
    4: "scratch",         # 划痕
    5: "hole"             # 孔洞
}
# 类别对应的颜色(BGR)
CLASS_COLORS = {
    0: (0, 0, 255),       # 红色
    1: (0, 255, 0),       # 绿色
    2: (255, 0, 0),       # 蓝色
    3: (0, 255, 255),     # 黄色
    4: (255, 0, 255),     # 品红
    5: (255, 255, 0)      # 青色
}


# ======================= 缺陷量化工具 =======================
class DefectMeasurer:
    """缺陷尺寸测量工具(基于分割掩码)"""

    @staticmethod
    def pixel_to_mm(pixels: float, mm_per_pixel: float = MM_PER_PIXEL) -> float:
        """像素距离转实际毫米"""
        return pixels * mm_per_pixel

    @staticmethod
    def compute_mask_properties(mask: np.ndarray, mm_per_pixel: float = MM_PER_PIXEL) -> Dict:
        """
        计算分割掩码的几何属性
        Args:
            mask: 二值掩码 (H, W), dtype=uint8 or bool
            mm_per_pixel: 像素当量 (mm/pixel)
        Returns:
            dict: 包含面积、周长、等效直径、质心等
        """
        if mask.dtype != bool:
            mask = mask > 0
        props = regionprops(mask.astype(np.uint8))[0] if np.any(mask) else None
        if props is None:
            return {}
        # 像素单位属性
        area_px = props.area
        perimeter_px = props.perimeter
        equiv_diameter_px = np.sqrt(4 * area_px / np.pi)
        centroid_px = props.centroid  # (row, col)
        # 转换为毫米单位
        area_mm = area_px * mm_per_pixel ** 2
        perimeter_mm = perimeter_px * mm_per_pixel
        equiv_diameter_mm = equiv_diameter_px * mm_per_pixel
        return {
            "area_px": area_px,
            "area_mm2": area_mm,
            "perimeter_px": perimeter_px,
            "perimeter_mm": perimeter_mm,
            "equiv_diameter_px": equiv_diameter_px,
            "equiv_diameter_mm": equiv_diameter_mm,
            "centroid_px": centroid_px,
            "bbox_px": props.bbox,  # (min_row, min_col, max_row, max_col)
        }


# ======================= 可视化与报告 =======================
class Visualizer:
    """检测结果可视化工具"""

    @staticmethod
    def draw_boxes(image: np.ndarray, boxes: np.ndarray, confs: np.ndarray,
                   cls_ids: np.ndarray, masks: Optional[np.ndarray] = None) -> np.ndarray:
        """
        在图像上绘制检测框、掩码、置信度、类别标签
        Args:
            image: 原始图像 (BGR)
            boxes: (N, 4) 边界框 [x1,y1,x2,y2] 整数坐标
            confs: (N,) 置信度
            cls_ids: (N,) 类别ID
            masks: (N, H, W) 二值掩码(可选)
        Returns:
            带标注的图像
        """
        result = image.copy()
        # 先画掩码(半透明填充)
        if masks is not None:
            overlay = result.copy()
            for i, mask in enumerate(masks):
                if mask is None or mask.sum() == 0:
                    continue
                color = CLASS_COLORS.get(cls_ids[i], (128, 128, 128))
                # 将mask转为3通道
                mask_3c = np.stack([mask]*3, axis=-1).astype(np.uint8) * 255
                colored_mask = np.zeros_like(overlay)
                colored_mask[mask] = color
                overlay = cv2.addWeighted(overlay, 0.6, colored_mask, 0.4, 0)
            result = overlay

        # 画边框和标签
        for i, (box, conf, cls_id) in enumerate(zip(boxes, confs, cls_ids)):
            x1, y1, x2, y2 = box
            color = CLASS_COLORS.get(cls_id, (128, 128, 128))
            cv2.rectangle(result, (x1, y1), (x2, y2), color, 2)
            label = f"{CLASS_NAMES.get(cls_id, 'unknown')}: {conf:.2f}"
            (tw, th), _ = cv2.getTextSize(label, cv2.FONT_HERSHEY_SIMPLEX, 0.5, 1)
            cv2.rectangle(result, (x1, y1 - th - 5), (x1 + tw, y1), color, -1)
            cv2.putText(result, label, (x1, y1 - 5), cv2.FONT_HERSHEY_SIMPLEX, 0.5, (0, 0, 0), 1)
        return result

    @staticmethod
    def save_report(detections: List[Dict], output_path: str, image_name: str):
        """
        保存检测报告为JSON文件
        Args:
            detections: 检测结果列表,每个元素包含 'cls', 'conf', 'bbox', 'mask_properties' 等
            output_path: 报告保存路径
            image_name: 图像文件名
        """
        report = {
            "image": image_name,
            "detections": detections,
            "summary": {
                "total_defects": len(detections),
                "defect_types": {}
            }
        }
        for d in detections:
            cls_name = d['class']
            report['summary']['defect_types'][cls_name] = report['summary']['defect_types'].get(cls_name, 0) + 1
        with open(output_path, 'w') as f:
            json.dump(report, f, indent=2)
        print(f"报告已保存至 {output_path}")


# ======================= 检测器主类 =======================
class PCBDefectDetector:
    """PCB缺陷检测器,基于YOLO26"""

    def __init__(self, model_path: str, conf_thres: float = DEFAULT_CONF,
                 iou_thres: float = DEFAULT_IOU, device: str = None):
        """
        初始化检测器
        Args:
            model_path: 模型权重路径 (.pt)
            conf_thres: 置信度阈值
            iou_thres: NMS IoU阈值
            device: 推理设备 ('cpu', 'cuda:0' 等)
        """
        self.model = YOLO(model_path)
        self.conf_thres = conf_thres
        self.iou_thres = iou_thres
        if device is None:
            device = 'cuda' if torch.cuda.is_available() else 'cpu'
        self.device = device
        self.measurer = DefectMeasurer()
        self.visualizer = Visualizer()

    def predict(self, source: Union[str, np.ndarray], save_dir: str = None,
                visualize: bool = True, measure: bool = True) -> List[Dict]:
        """
        对图像或视频源进行检测
        Args:
            source: 图像路径、视频路径、摄像头索引(如0) 或 numpy图像 (BGR)
            save_dir: 输出结果保存目录,None表示不保存
            visualize: 是否显示检测结果窗口
            measure: 是否进行缺陷尺寸测量
        Returns:
            检测结果列表
        """
        # 处理源类型
        if isinstance(source, str):
            if source.isdigit():
                source = int(source)  # 摄像头
            elif source.lower().endswith(('.mp4', '.avi', '.mov', '.mkv')):
                source = source  # 视频文件
            else:
                source = source  # 图像文件
        # 调用模型预测
        results = self.model.predict(
            source=source,
            conf=self.conf_thres,
            iou=self.iou_thres,
            imgsz=DEFAULT_IMGSZ,
            device=self.device,
            stream=False if isinstance(source, np.ndarray) else True,
            verbose=False
        )

        all_detections = []
        # 处理每帧/每图
        for result in results:
            img = result.orig_img  # BGR numpy
            boxes = result.boxes
            masks = result.masks  # 分割掩码 (如果有)
            if boxes is None:
                detections = []
                annotated = img
            else:
                # 提取数据
                xyxy = boxes.xyxy.cpu().numpy().astype(int)  # Nx4
                confs = boxes.conf.cpu().numpy()  # N
                cls_ids = boxes.cls.cpu().numpy().astype(int)  # N
                # 提取掩码(如果有)
                mask_array = None
                if masks is not None:
                    # masks.data shape: (N, H, W) 或 (N, 160, 160)
                    mask_array = masks.data.cpu().numpy()
                    # 如果掩码是缩小的,需要上采样到原始图像尺寸
                    if mask_array.shape[1] != img.shape[0] or mask_array.shape[2] != img.shape[1]:
                        mask_array = np.array([cv2.resize(m, (img.shape[1], img.shape[0])) for m in mask_array])
                # 构建检测结果列表并测量尺寸
                detections = []
                for i, (box, conf, cls_id) in enumerate(zip(xyxy, confs, cls_ids)):
                    det = {
                        "class": CLASS_NAMES.get(cls_id, "unknown"),
                        "class_id": int(cls_id),
                        "confidence": float(conf),
                        "bbox": box.tolist(),
                    }
                    if measure and mask_array is not None and i < len(mask_array):
                        mask = (mask_array[i] > 0).astype(np.uint8)
                        props = self.measurer.compute_mask_properties(mask, MM_PER_PIXEL)
                        det["mask_properties"] = props
                    detections.append(det)
                # 可视化
                if visualize:
                    # 提取掩码用于绘制
                    draw_masks = None
                    if mask_array is not None:
                        draw_masks = (mask_array > 0).astype(bool)
                    annotated = self.visualizer.draw_boxes(img, xyxy, confs, cls_ids, draw_masks)
                else:
                    annotated = img
                all_detections.append(detections)
            # 显示窗口
            if visualize:
                cv2.imshow("PCB Defect Detection", annotated)
                if cv2.waitKey(1) & 0xFF == ord('q'):
                    break
            # 保存输出
            if save_dir:
                os.makedirs(save_dir, exist_ok=True)
                # 如果source是文件名,提取名称
                if isinstance(source, str):
                    name = os.path.basename(source).split('.')[0]
                else:
                    name = f"frame_{int(time.time())}"
                img_path = os.path.join(save_dir, f"{name}_detected.jpg")
                cv2.imwrite(img_path, annotated)
                print(f"检测结果保存至 {img_path}")
                # 保存测量报告
                if detections:
                    report_path = os.path.join(save_dir, f"{name}_report.json")
                    self.visualizer.save_report(detections, report_path, name + '.jpg')
        if visualize:
            cv2.destroyAllWindows()
        return all_detections


# ======================= 训练函数 =======================
def train_model(config_yaml: str, model_name: str = 'yolo26s.pt', epochs: int = 200,
                imgsz: int = DEFAULT_IMGSZ, batch: int = 16, device: str = None):
    """
    训练YOLO26模型
    Args:
        config_yaml: data.yaml 路径
        model_name: 预训练模型名称,如 'yolo26n.pt', 'yolo26s.pt'
        epochs: 训练轮数
        imgsz: 输入图像尺寸
        batch: 批量大小
        device: 设备
    """
    model = YOLO(model_name)
    results = model.train(
        data=config_yaml,
        epochs=epochs,
        imgsz=imgsz,
        batch=batch,
        device=device,
        workers=8,
        lr0=0.01,
        weight_decay=0.0005,
        warmup_epochs=3,
        cos_lr=True,
        augment=True,
        seed=42,
        verbose=True
    )
    print(f"训练完成,最佳模型保存在: {model.trainer.best}")
    return model


# ======================= 主程序入口 =======================
def main():
    parser = argparse.ArgumentParser(description="基于YOLO26的PCB表面缺陷检测系统")
    subparsers = parser.add_subparsers(dest='mode', help='运行模式')

    # 训练模式
    train_parser = subparsers.add_parser('train', help='训练模型')
    train_parser.add_argument('--data', type=str, required=True, help='数据集配置文件 data.yaml')
    train_parser.add_argument('--model', type=str, default='yolo26s.pt', help='预训练模型')
    train_parser.add_argument('--epochs', type=int, default=200, help='训练轮数')
    train_parser.add_argument('--batch', type=int, default=16, help='批量大小')
    train_parser.add_argument('--device', type=str, default=None, help='设备(cpu/cuda)')

    # 检测模式
    detect_parser = subparsers.add_parser('detect', help='检测缺陷')
    detect_parser.add_argument('--source', type=str, required=True, help='输入源:图像路径/视频路径/摄像头索引(0,1...)')
    detect_parser.add_argument('--weights', type=str, required=True, help='模型权重路径')
    detect_parser.add_argument('--conf', type=float, default=DEFAULT_CONF, help='置信度阈值')
    detect_parser.add_argument('--iou', type=float, default=DEFAULT_IOU, help='NMS IoU阈值')
    detect_parser.add_argument('--save-dir', type=str, default=OUTPUT_DIR, help='结果保存目录')
    detect_parser.add_argument('--no-show', action='store_true', help='不显示检测窗口')
    detect_parser.add_argument('--no-measure', action='store_true', help='不进行尺寸测量')

    args = parser.parse_args()

    if args.mode == 'train':
        train_model(args.data, args.model, args.epochs, DEFAULT_IMGSZ, args.batch, args.device)
    elif args.mode == 'detect':
        detector = PCBDefectDetector(
            model_path=args.weights,
            conf_thres=args.conf,
            iou_thres=args.iou
        )
        # 处理源类型(数字字符串转整数表示摄像头)
        source = args.source
        if source.isdigit():
            source = int(source)
        detector.predict(
            source=source,
            save_dir=args.save_dir,
            visualize=not args.no_show,
            measure=not args.no_measure
        )
    else:
        parser.print_help()


if __name__ == '__main__':
main()2.1 PCB表面缺陷检测数据集介绍
PCB表面缺陷检测数据集
该数据集是为基于深度学习的印刷电路板表面缺陷检测而准备的。PCB 缺陷可能在制造过程中因铜残留、铜缺失、划痕、异物或其他工艺相关问题而出现。准确检测这些缺陷对于自动光学检测、质量控制以及减少制造废料至关重要。
原始数据集包含 10,259 张 PCB 缺陷图像和 20,276 个手动标注的边界框。图像是 PCB 内层/外层的局部裁剪区域,每个缺陷均用一个边界框标注。
数据集任务
该数据集可用于:
- 目标检测
- PCB 缺陷分类
- 工业视觉检测
- 小目标检测研究
- YOLO/COCO 格式的缺陷检测实验
每张图像可能包含一个或多个缺陷,不同缺陷类型可能出现在同一张图像中。
类别名称
该数据集包含 9 类 PCB 表面缺陷类别:
缩写 | 类别名称 | 描述 |
|---|---|---|
SH | Short(短路) | 两个或多个导体之间的意外连接,通常由残留铜引起 |
SP | Spur(尖刺) | 沿导体边缘的不规则突起,通常尖锐或呈针状 |
SC | Spurious Copper(杂铜) | 基材、孔或铜表面上的多余铜残留 |
OP | Open(开路) | 导体路径中断,阻碍电流流通 |
MB | Mouse Bite(鼠咬痕) | 导体边缘的小型凹陷、缺口或裂缝 |
HB | Hole Breakout(孔破) | 孔中心偏离焊盘,导致孔边缘周围铜缺失 |
CS | Conductor Scratch(导体划痕) | 铜线或铜表面上的线性或多线划痕 |
CFO | Conductor Foreign Object(导体异物) | 导体上的污垢、沉积物、气泡、污染或外来材料 |
BMFO | Base Material Foreign Object(基材异物) | 基材上或孔内的外来材料或污染物 |
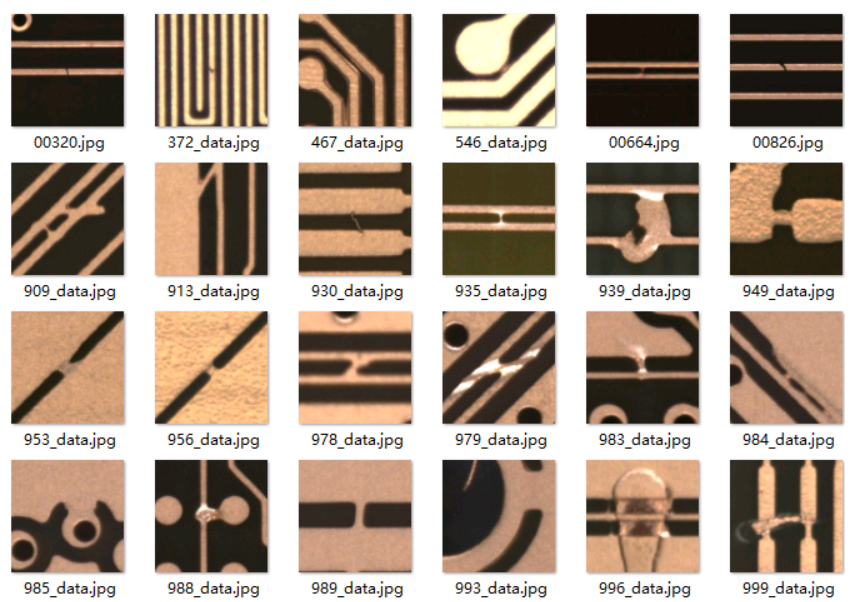
缺陷类型示例
展示了全部 9 类标注缺陷的示例:
- SH:导体之间的短路缺陷
- SP:尖刺状的尖锐铜突起
- SC:额外/不需要的铜区域
- OP:断裂或中断的铜迹线
- MB:导体边缘上的小咬痕状损伤
- HB:孔相对于铜焊盘的错位
- CS:穿过导体区域的划痕痕迹
- CFO:铜导体上的外来材料
- BMFO:PCB 基材区域上的外来材料
某些图像可能包含多个缺陷,每个缺陷实例均使用其自己的边界框单独标注。
nc: 9
names:
- SH
- SP
- SC
- OP
- MB
- HB
- CS
- CFO
- BMFO
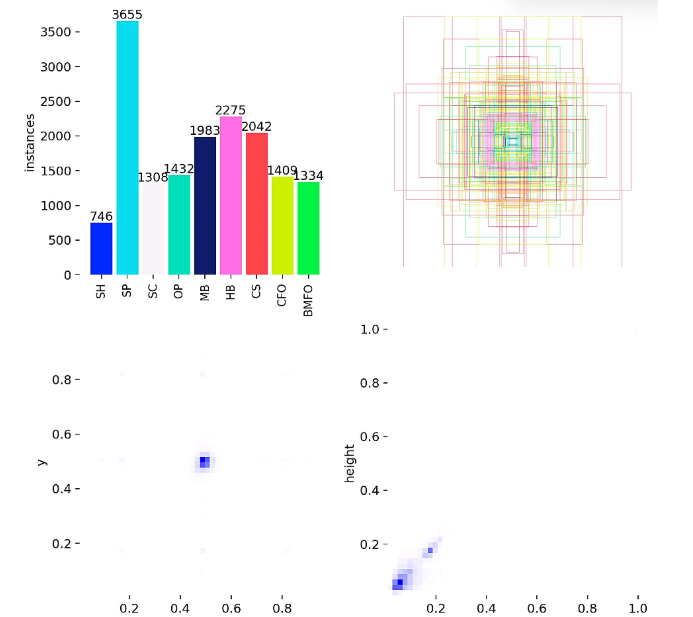
标签可视化分析
2.2 配置pcb.yaml
ps:建议填写绝对路径
path: D:/YOLO26/data/PCB/
train: images/train
val: images/val
nc: 9
names:
- SH
- SP
- SC
- OP
- MB
- HB
- CS
- CFO
- BMFO
2.3 如何训练
import warnings
warnings.filterwarnings('ignore')
from ultralytics import YOLO

if __name__ == '__main__':
    model = YOLO('ultralytics/cfg/models/26/yolo26.yaml')
    model.train(data='data/PCB.yaml',
                cache=False,
                imgsz=640,
                epochs=200,
                batch=8,
                close_mosaic=10,
                device='0',
                optimizer='SGD', # using SGD
                project='runs/train',
                name='exp',
                )
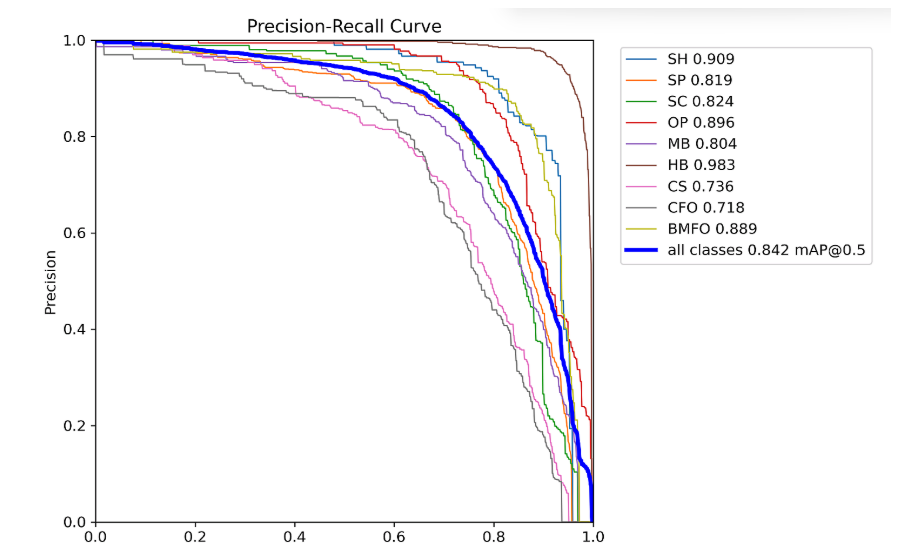
2.4 训练结果可视化结果
YOLO26 summary (fused): 122 layers, 2,376,591 parameters, 0 gradients, 5.2 GFLOPs
                 Class     Images  Instances      Box(P          R      mAP50  mAP50-95): 100% ━━━━━━━━━━━━ 65/65 3.6it/s 17.9s
                   all       2051       4092      0.826      0.771      0.842      0.509
                    SH        126        169      0.825      0.858      0.909      0.592
                    SP        430        929      0.821      0.736      0.819      0.381
                    SC        245        285      0.808      0.747      0.824      0.507
                    OP        274        338      0.837      0.817      0.896      0.545
                    MB        391        546       0.83       0.69      0.804      0.386
                    HB        271        608      0.935      0.944      0.983      0.822
                    CS        279        448      0.766      0.641      0.736      0.461
                   CFO        309        423      0.771       0.65      0.718      0.415
                  BMFO        305        346       0.84      0.855      0.889      0.473
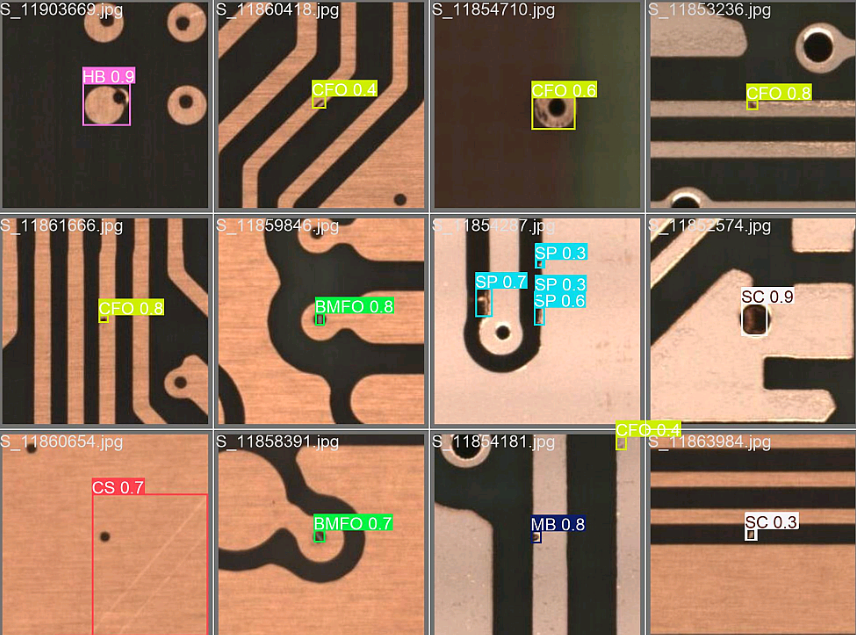
预测结果:
3. PCB表面缺陷检测系统设计
3.1 PySide6介绍
受益于人工智能的崛起,Python语言几乎以压倒性优势在众多编程语言中异军突起,成为AI时代的首选语言。在很多情况下,我们想要以图形化方式将我们的人工智能算法打包提供给用户使用,这时候选择以python为主的GUI框架就非常合适了。
PySide是Qt公司的产品,PyQt是第三方公司的产品,二者用法基本相同,不过在使用协议上却有很大差别。PySide可以在LGPL协议下使用,PyQt则在GPL协议下使用。
PySide目前常见的有两个版本:PySide2和PySide6。PySide2由C++版的Qt5开发而来.,而PySide6对应的则是C++版的Qt6。从PySide6开始,PySide的命名也会与Qt的大版本号保持一致,不会再出现类似PySide2对应Qt5这种容易混淆的情况。
3.2 安装PySide6
pip install --upgrade pip
pip install pyside6 -i https://mirror.baidu.com/pypi/simple
基于PySide6开发GUI程序包含下面三个基本步骤:
- 设计GUI,图形化拖拽或手撸;
- 响应UI的操作(如点击按钮、输入数据、服务器更新),使用信号与Slot连接界面和业务;
- 打包发布;
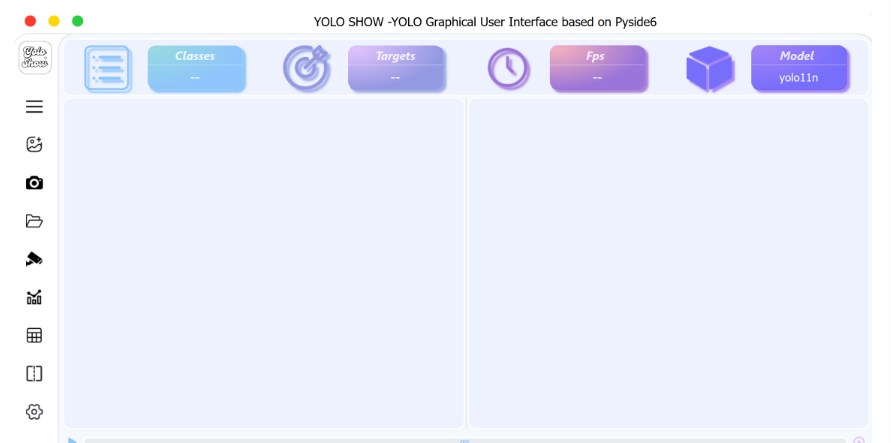
3.3 PCB表面缺陷检测系统设计
原创声明:本文系作者授权腾讯云开发者社区发表,未经许可,不得转载。
如有侵权,请联系 cloudcommunity@tencent.com 删除。
原创声明:本文系作者授权腾讯云开发者社区发表,未经许可,不得转载。
如有侵权,请联系 cloudcommunity@tencent.com 删除。
评论
登录后参与评论
推荐阅读
目录
腾讯云开发者

Copyright © 2013 - 2026 Tencent Cloud. All Rights Reserved. 腾讯云 版权所有
深圳市腾讯计算机系统有限公司 ICP备案/许可证号:粤B2-20090059 ![]() 粤公网安备44030502008569号
粤公网安备44030502008569号
腾讯云计算(北京)有限责任公司 京ICP证150476号 | 京ICP备11018762号