您的 Elastic 智能体、Google 的 ADK,以及零自定义 API:通过 A2A 构建“幸运星球”

您的 Elastic 智能体、Google 的 ADK,以及零自定义 API:通过 A2A 构建“幸运星球”

点火三周
发布于 2026-06-08 13:33:50
发布于 2026-06-08 13:33:50
您的 Elastic 智能体、Google 的 ADK,以及零自定义 API:通过 A2A 构建“幸运星球”
Agent Builder 现已正式发布 (GA)。您可以立即通过 Elastic Cloud 试用版 开始使用,并在此处查看 Agent Builder 的文档。
Elastic Agent Builder 提供了一个原生的 Agent2Agent (A2A) 端点:任何兼容 A2A 的框架都可以在无需编写任何自定义 REST 路由的情况下,协调您的 Elastic 智能体。为了证明这一点,我们构建了《幸运星球》(Lucky Planet)——一个多人游戏。在这个游戏中,Google 的 Agent Development Kit (ADK) 通过 A2A 驱动一个远程 Elastic 智能体,从 NASA 的实时数据集中随机挑选系外行星,并宣布获胜者。Elastic 智能体负责所有数据检索和游戏逻辑,而 ADK 和 Flask 前端则完全不涉及任何自定义 API。以下将详细介绍如何从零开始构建整个系统。
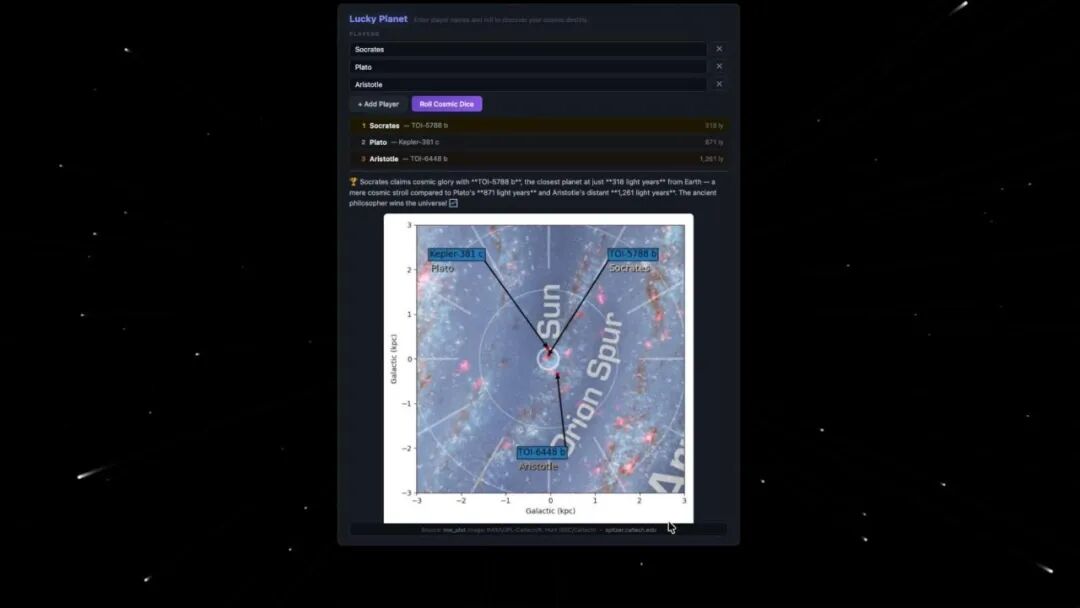
Screenshot of a web interface titled “Lucky Planet,” showing three players (Socrates, Plato, and Aristotle), each assigned an exoplanet. Below, a galactic map displays the Sun at the center of the Orion Spur with labeled points and connecting lines marking the planets’ positions and distances in kiloparsecs. Source credit: NASA/JPL‑Caltech, spitzer.caltech.edu.
Screenshot of a web interface titled “Lucky Planet,” showing three players (Socrates, Plato, and Aristotle), each assigned an exoplanet. Below, a galactic map displays the Sun at the center of the Orion Spur with labeled points and connecting lines marking the planets’ positions and distances in kiloparsecs. Source credit: NASA/JPL‑Caltech, spitzer.caltech.edu.
前提条件
要跟随本博客文章的步骤操作,您需要准备以下工具:
- • 本地计算机上运行的文本编辑器。
- • 本博客文章中的示例说明使用的是 Visual Studio Code。
- • 本地计算机上运行的 Python 3.10 或更高版本。
创建一个 Elasticsearch Serverless 项目
要使用 Agent Builder 构建智能体,我们需要一个 Elastic 部署或项目。因此,让我们先创建一个。Elastic Serverless 是最简单的入门方式。只需访问 Elastic Cloud 并注册即可。然后创建一个 Elasticsearch 项目。
Animated tour of the Elastic Cloud home dashboard in dark mode. It follows steps from beginning a project, confirming project settings, launching the project, confirming that it's ready, and opening it.
Animated tour of the Elastic Cloud home dashboard in dark mode. It follows steps from beginning a project, confirming project settings, launching the project, confirming that it's ready, and opening it.
导入 CSV 文件以创建 Elasticsearch 索引
首先,我们需要一些关于行星的数据。NASA 系外行星档案是获取银河系内太阳系外已发现行星数据的理想来源。您可以在浏览器中查看 NASA 行星数据。请将行星数据保存为 planets.csv 文件到您的本地计算机。
回到 Elastic Cloud,在 Getting Started(入门)页面,点击 Add data(添加数据)并选择 Upload a file(上传文件)。
将 Index name(索引名称)指定为“planets-raw”。点击 Select or drag and drop files(选择或拖放文件)链接,然后选择之前保存的 planet.csv 文件。最后点击 Import(导入)。
Animated tour of the “Getting started” interface for Elasticsearch in dark mode, showing how to add data.
Animated tour of the “Getting started” interface for Elasticsearch in dark mode, showing how to add data.
Agent Builder 与您的数据进行对话
从顶部导航菜单中选择 Agents(智能体)。Agent Builder 有一个名为“Elastic AI Agent”的默认智能体,您可以使用它与您的数据进行对话。输入提示,例如“What data do I have? Provide details.”(我有什么数据?请提供详细信息)。您应该会看到一个名为“planets-raw”的索引,以及一个包含字段名称、数据类型和描述的列表。
Animated tour of the “Add data” interface in Elasticsearch, showing the upload process for a file named planet.csv and a chat with Elastic AI Agent for data details.
Animated tour of the “Add data” interface in Elasticsearch, showing the upload process for a file named planet.csv and a chat with Elastic AI Agent for data details.
请注意,sy_dist 字段的描述是“距离恒星系统的距离(可能以秒差距为单位)”。
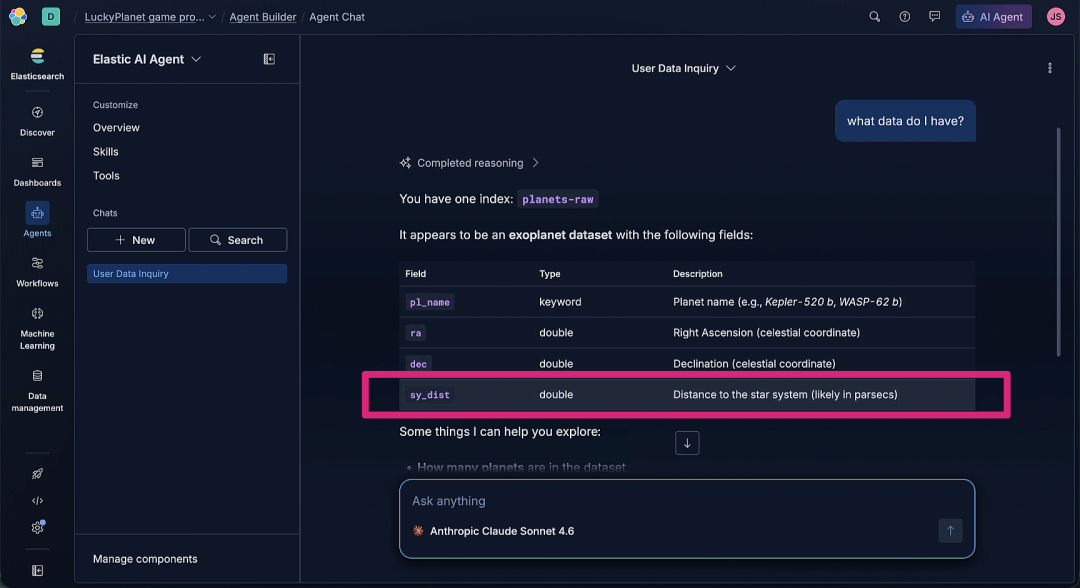
Screenshot of the Elastic AI Agent interface in dark mode, showing a user query “what data do I have?” and the system’s response describing an index named planets‑raw. The focus is on the sy_dist row. The left sidebar includes navigation options, such as Discover, Dashboards, Agents, Workflows, Machine Learning, and Data management.
Screenshot of the Elastic AI Agent interface in dark mode, showing a user query “what data do I have?” and the system’s response describing an index named planets‑raw. The focus is on the sy_dist row. The left sidebar includes navigation options, such as Discover, Dashboards, Agents, Workflows, Machine Learning, and Data management.
我们希望游戏中的行星距离单位是光年,而不是秒差距。使用光年作为行星距离数据的单位更佳,因为它基于一年光速传播的距离,是最容易理解巨大距离的方式。例如,如果一颗行星距离地球 4.2 光年,那么以光速飞行需要 4.2 年才能到达。
此外,更具描述性的字段名称会更好。我们可以通过创建一个新索引来实现这一点。从顶部导航菜单中点击 Developer Tools(开发者工具)。
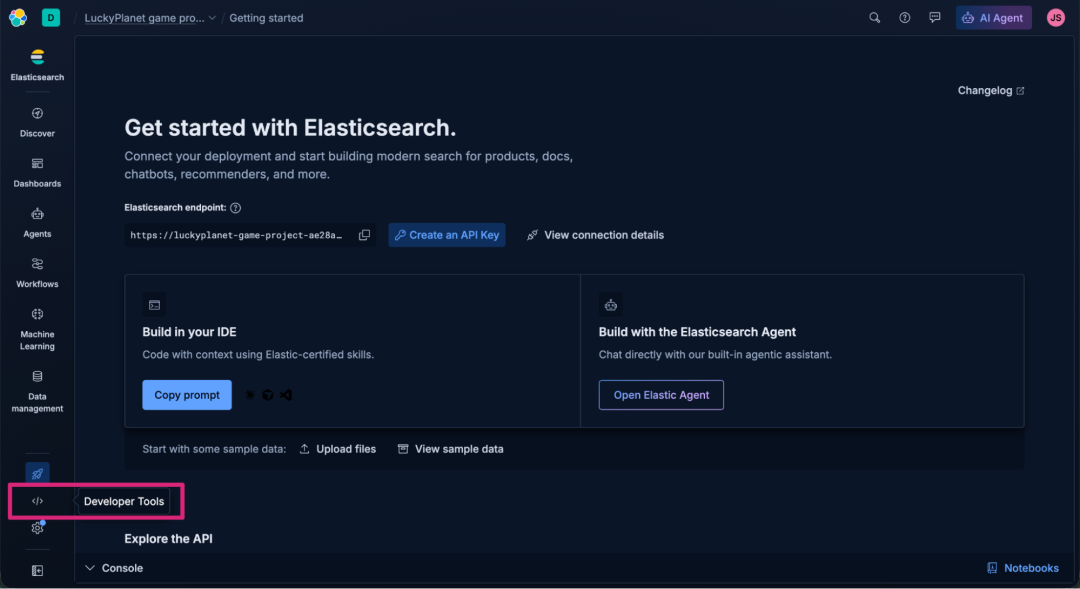
Screenshot of the “Getting started” page in Elasticsearch, showing connection setup options for deployments and API keys. The interface includes panels for building in an IDE or with the Elasticsearch Agent, sample data upload buttons, and a dark sidebar with navigation items. The focus is on
Screenshot of the “Getting started” page in Elasticsearch, showing connection setup options for deployments and API keys. The interface includes panels for building in an IDE or with the Elasticsearch Agent, sample data upload buttons, and a dark sidebar with navigation items. The focus is on "Developer Tools."
复制以下 _reindex 请求,它将用更新后的字段名称和一个新的“距离地球光年”字段填充 planets 索引。由于该索引不存在,系统将自动创建一个。
1
2
3
4
5
6
7
8
9
10
11
12
13
14
15
16
17
18
19

POST _reindex
{
  "source": {
    "index": "planets-raw"
  },
  "dest": {
    "index": "planets"
  },
  "script": {
    "source": """
      ctx._id = ctx._source.pl_name;
      ctx._source.planet_name = ctx._source.remove('pl_name');
      if (ctx._source.sy_dist != null) {
        ctx._source.light_years_distance_from_earth = Math.round(ctx._source.sy_dist * 3.26156 * 100) / 100;
      }
      ctx._source.remove('sy_dist');
    """
  }
}
将请求粘贴到开发者工具中,然后点击 Click to send request(点击发送请求)按钮发送 POST _reindex 请求。您应该会看到一个 200 OK 的确认消息,确认新的 planets 索引已创建。
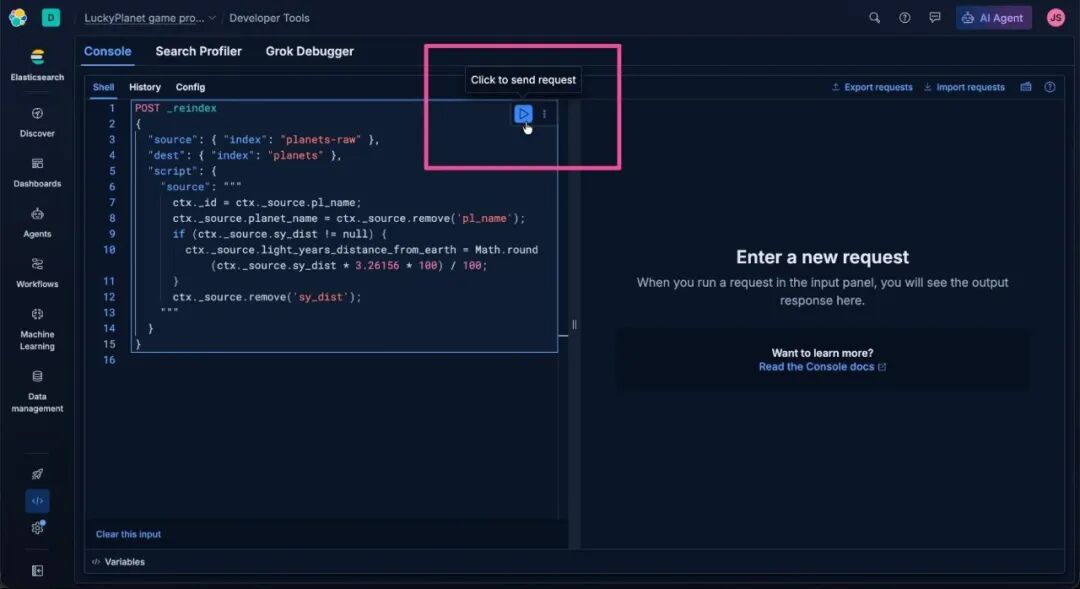
Screenshot of the Elasticsearch Developer Tools console, showing a JSON script for reindexing data. The left panel contains the code editor, and the right panel displays a message area for responses. The focus is on the “Click to send request” button used to execute the script.
Screenshot of the Elasticsearch Developer Tools console, showing a JSON script for reindexing data. The left panel contains the code editor, and the right panel displays a message area for responses. The focus is on the “Click to send request” button used to execute the script.
太棒了!我们现在已经将数据准备好并导入 Elastic,可以投入使用了。现在,让我们构建一个能够使用这些数据的智能体。从顶部导航栏中选择 Agents(智能体)以打开 Agent Builder。
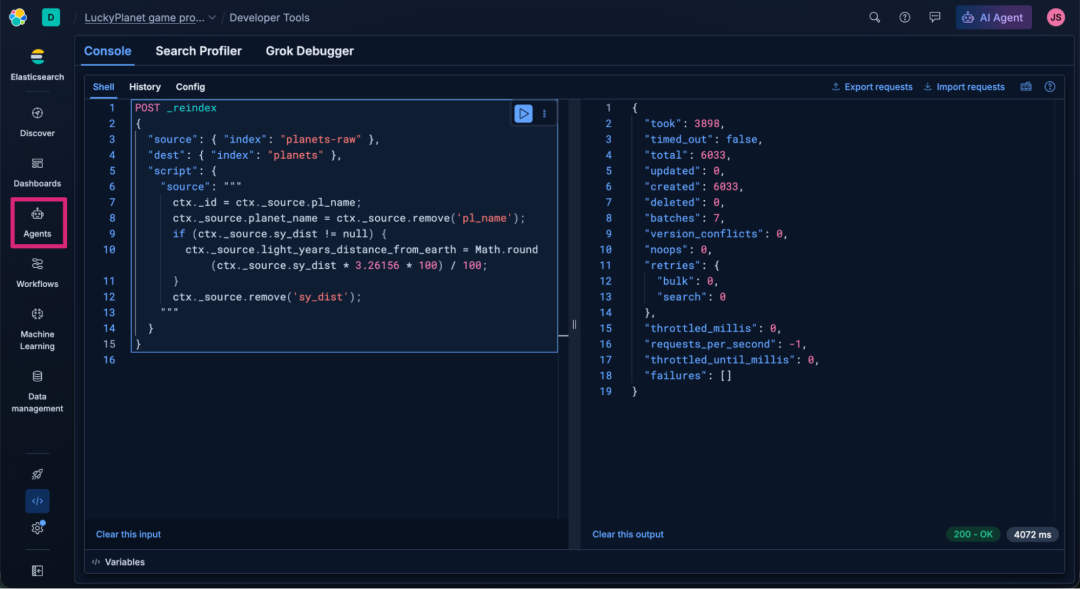
Screenshot of the Elasticsearch Developer Tools console, showing a reindexing script transferring data. The left panel contains the JSON script, and the right panel displays the operation’s output confirming 6,033 documents created with no errors. The focus is on the “Agents” icon in the left sidebar.
Screenshot of the Elasticsearch Developer Tools console, showing a reindexing script transferring data. The left panel contains the JSON script, and the right panel displays the operation’s output confirming 6,033 documents created with no errors. The focus is on the “Agents” icon in the left sidebar.
在 Elastic Agent Builder 中创建工具
我们将通过创建一个 Model Context Protocol (MCP) 工具来启动智能体创建过程。Agent Builder 支持创建不同类型的工具,这些工具可以进行索引搜索、执行 Elasticsearch Query Language (ES|QL) 查询、运行工作流,以及调用其他 MCP 工具。您在 Agent Builder 中构建的每个工具都将作为一个托管的 MCP 服务器暴露出来,任何外部 MCP 客户端都可以调用它。在 Agent Builder 中,选择 Tools(工具)。
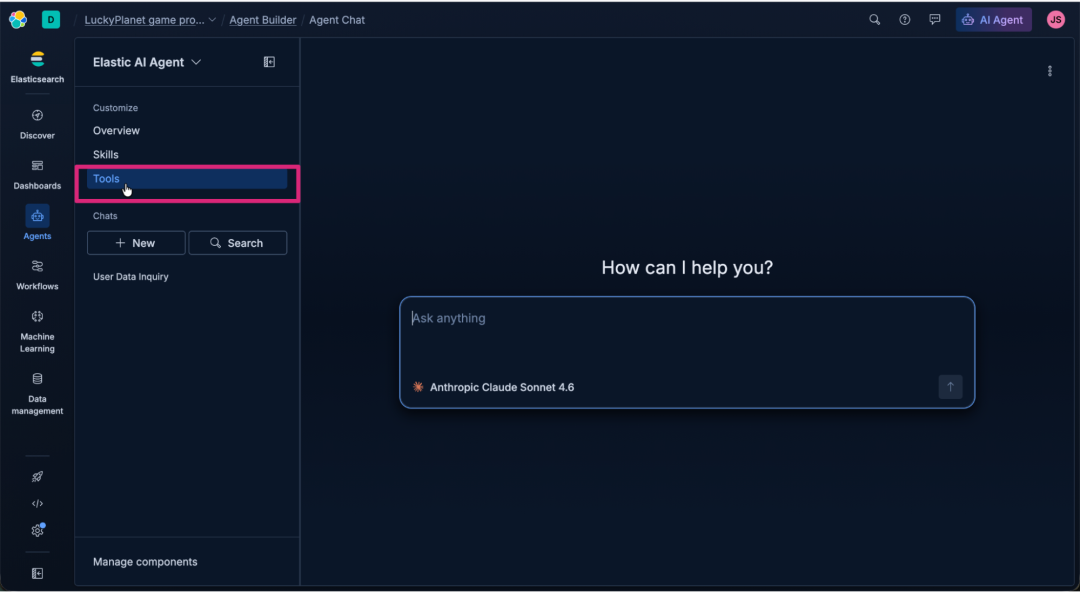
Screenshot of the Elastic AI Agent interface in dark mode, showing the left sidebar with navigation options, such as Discover, Dashboards, Agents, Workflows, Machine Learning, and Data management. Under the Elastic AI Agent section, menu items include Customize, Overview, Skills, Tools, Chats, and User Data Inquiry. The focus is on the “Tools” option. The main workspace displays a chat panel with the prompt “How can I help you?” and the input “Ask anything.”
Screenshot of the Elastic AI Agent interface in dark mode, showing the left sidebar with navigation options, such as Discover, Dashboards, Agents, Workflows, Machine Learning, and Data management. Under the Elastic AI Agent section, menu items include Customize, Overview, Skills, Tools, Chats, and User Data Inquiry. The focus is on the “Tools” option. The main workspace displays a chat panel with the prompt “How can I help you?” and the input “Ask anything.”
点击 Manage all tools(管理所有工具)以查看当前工具列表。
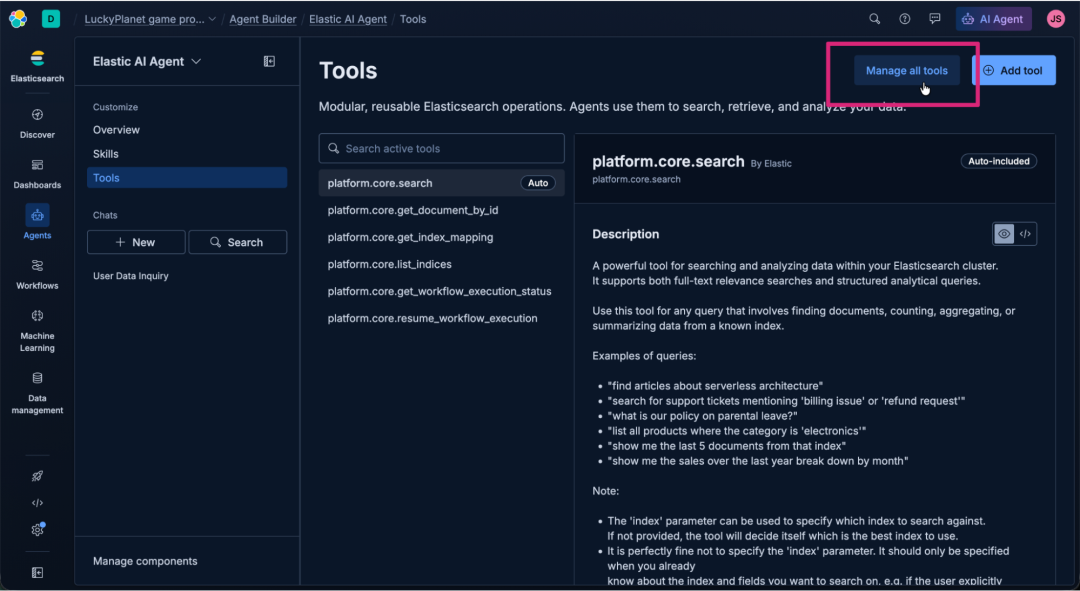
Screenshot of the Elastic AI Agent interface in dark mode showing the “Tools” page. The left sidebar lists navigation options such as Discover, Dashboards, Agents, Workflows, Machine Learning, and Data management. The main panel displays a list of platform tools. The focus is on the “Manage all tools” button at the top right of the interface.
Screenshot of the Elastic AI Agent interface in dark mode showing the “Tools” page. The left sidebar lists navigation options such as Discover, Dashboards, Agents, Workflows, Machine Learning, and Data management. The main panel displays a list of platform tools. The focus is on the “Manage all tools” button at the top right of the interface.
点击 + New tool(+ 新建工具)。
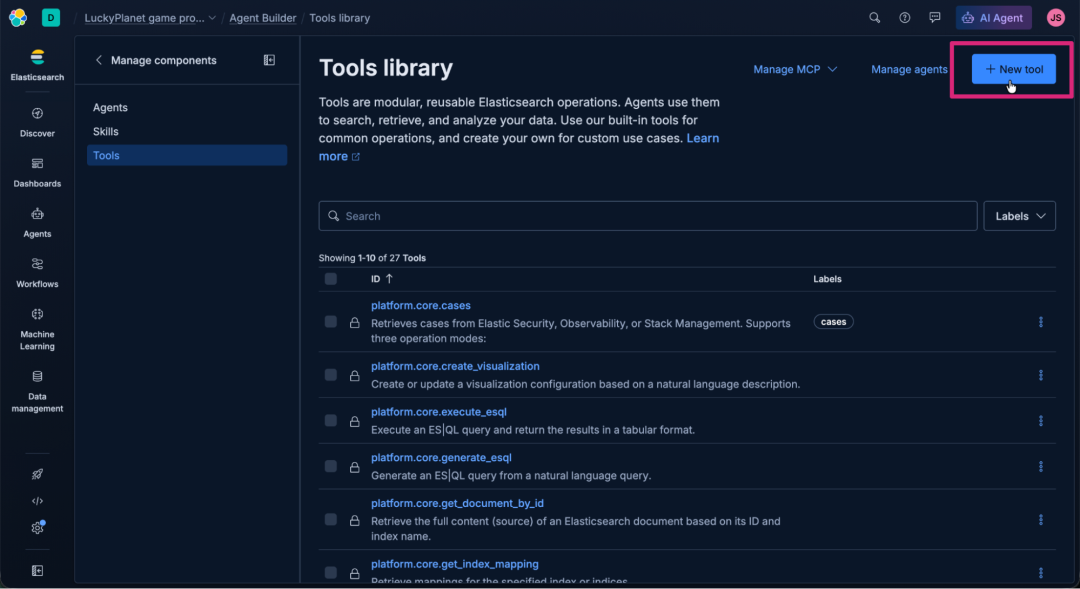
Screenshot of the Elastic AI Agent “Tools library” interface in dark mode, showing a list of modular Elasticsearch operations. The left sidebar includes navigation options, like Discover, Dashboards, Agents, Workflows, Machine Learning, and Data management. The focus is on the “+ New tool” button at the top right.
Screenshot of the Elastic AI Agent “Tools library” interface in dark mode, showing a list of modular Elasticsearch operations. The left sidebar includes navigation options, like Discover, Dashboards, Agents, Workflows, Machine Learning, and Data management. The focus is on the “+ New tool” button at the top right.
在 Create Tool(创建工具)表单中,选择 ES|QL 作为工具 Type(类型),并输入以下值。
在 ES|QL Query(ES|QL 查询)文本区域中,输入以下查询,它将从我们的 planets 索引中随机选择一颗行星:
1
2
3
4
5

FROM planets
| EVAL rand_key = hash("md5", CONCAT(planet_name, TO_STRING((NOW()))))
| SORT rand_key ASC
| KEEP planet_name, light_years_distance_from_earth, ra, dec
| LIMIT 1
对于 Tool ID(工具 ID):
1

get_random_planet
对于 Description(描述):
1

Get a random planet.
完成后的 Create tool(创建工具)表单应如下图所示。点击 Save(保存)以创建工具。
Screenshot of the Elastic AI Agent “Create a new tool” interface in dark mode showing configuration fields for an ES|QL query. The code editor contains a query that selects a random planet from the planets dataset. Below the editor are fields for defining tool details and parameter options, with sections for Type and Details. The left sidebar includes navigation links for Discover, Dashboards, Agents, Workflows, Machine Learning, and Data management.
创建智能体并为其分配工具
Agent Builder 智能体创建起来非常简单。特别是考虑到我们刚刚创建的 MCP 工具(我们的智能体将使用它)也托管在 Elastic 上,我们可以轻松地将其分配给智能体。
点击 Manage agents(管理智能体)。

Screenshot of the Elastic AI Agent “Tools library” interface in dark mode, showing a list of modular Elasticsearch operations. The left sidebar includes navigation options, like Discover, Dashboards, Agents, Workflows, Machine Learning, and Data management. The focus is on the “Manage agents” button at the top right of the interface.
Screenshot of the Elastic AI Agent “Tools library” interface in dark mode, showing a list of modular Elasticsearch operations. The left sidebar includes navigation options, like Discover, Dashboards, Agents, Workflows, Machine Learning, and Data management. The focus is on the “Manage agents” button at the top right of the interface.
点击 + New agent(+ 新建智能体)。
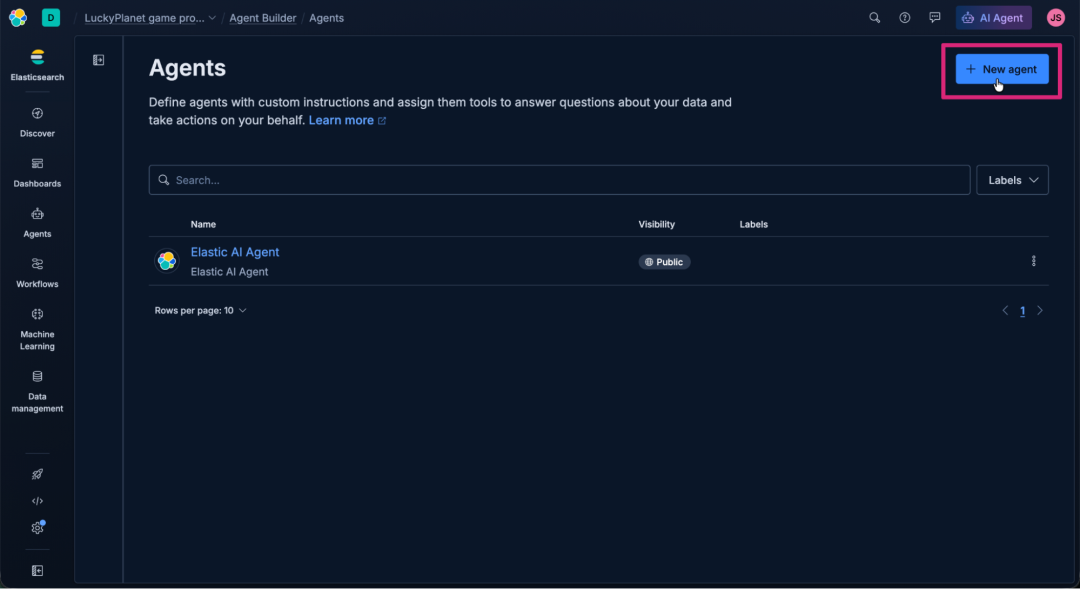
Screenshot of the Elastic AI Agent “Agents” interface in dark mode, showing a table listing existing agents with columns for Name, Visibility, and Labels. The left sidebar includes navigation options, like Discover, Dashboards, Agents, Workflows, Machine Learning, and Data management. The focus is on the “+ New agent” button at the top right of the interface.
Screenshot of the Elastic AI Agent “Agents” interface in dark mode, showing a table listing existing agents with columns for Name, Visibility, and Labels. The left sidebar includes navigation options, like Discover, Dashboards, Agents, Workflows, Machine Learning, and Data management. The focus is on the “+ New agent” button at the top right of the interface.
在 New Agent(新建智能体)表单中输入以下信息。
对于 Agent ID(智能体 ID),输入以下文本:
1

lucky_planet_agent
在 Custom Instructions(自定义指令)文本区域中,输入以下指令。如您所见,我们不再使用 Query DSL 或 ES|QL 进行确定性 REST 调用,而是向智能体提供简单的指令,并依赖其通过 MCP 进行数据访问以及其上下文和推理能力。智能体将负责调整游戏以支持多玩家,并提供一个相关且有趣的游戏结果摘要。
1
2
3
4
5
6
7
8
9
10
11
12
13
14
15
16
17
18
19
20
21
22
23
24

You are the game master for a game called "Lucky Planet". Start the game when prompted.

# Game Sequence:
1) At the beginning of each game you'll say:
  "Let's play Lucky Planet!
  Rolling the cosmic dice..."
2) Select a planet for the "Agent Planet" using the get_random_planet tool.
3) Select a planet for the "Player Planet" using the get_random_planet tool.
4) Ensure each player has a unique planet.
5) Conclude game.

# Game Conclusion:
Display each game player's planet along with its distance (formatted with commas) from Earth and announce the game winner.
Use this exact output for the first lines of your Game Conclusion response:
'''
-----
Agent Planet: <planet_name> - <light_years_distance_from_earth> light years from Earth (ra: <ra> dec: <dec>)
Player Planet: <planet_name> - <light_years_distance_from_earth> light years from Earth (ra: <ra> dec: <dec>)
The winner is <game winner>!
-----
'''

# Multi-Player Option
If the game is invoked with a prompt containing a list of players, use only those players to play the game by getting a random planet for each player and adapt the Game Conclusion response for multiple players. Sort the list of players ordered by closest planet to furthest. An example multi-player prompt would be: start game Socrates, Plato, and Aristotle.
对于 Display name(显示名称),输入以下文本:
1

Lucky Planet Agent
对于 Display description(显示描述),输入以下文本:
1

Agent that plays the game "Lucky Planet".
通过点击 Tools(工具)选项卡,为智能体分配我们之前创建的自定义工具。
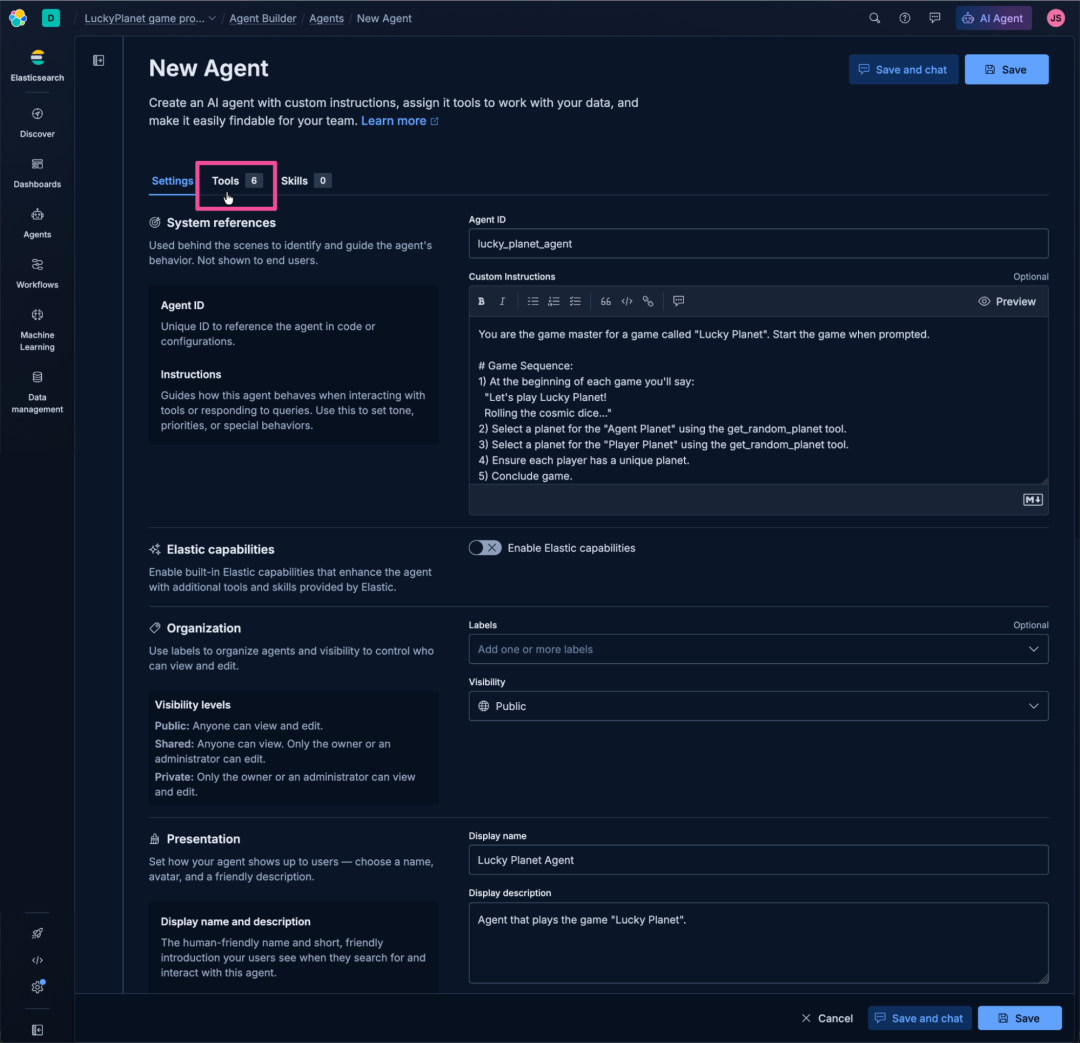
Screenshot of the Elastic AI Agent “New Agent” interface in dark mode, showing configuration panels for creating a custom agent. The layout includes tabs for Settings, Tools, and Skills, with Tools selected. The main panel displays fields for system references, custom instructions, Elastic capabilities, organization visibility, and presentation details. The left sidebar includes navigation options, like Discover, Dashboards, Agents, Workflows, Machine Learning, and Data management. The focus is on the “Tools” tab near the top of the interface.
Screenshot of the Elastic AI Agent “New Agent” interface in dark mode, showing configuration panels for creating a custom agent. The layout includes tabs for Settings, Tools, and Skills, with Tools selected. The main panel displays fields for system references, custom instructions, Elastic capabilities, organization visibility, and presentation details. The left sidebar includes navigation options, like Discover, Dashboards, Agents, Workflows, Machine Learning, and Data management. The focus is on the “Tools” tab near the top of the interface.
仅选择我们之前创建的 get_random_planet 工具。
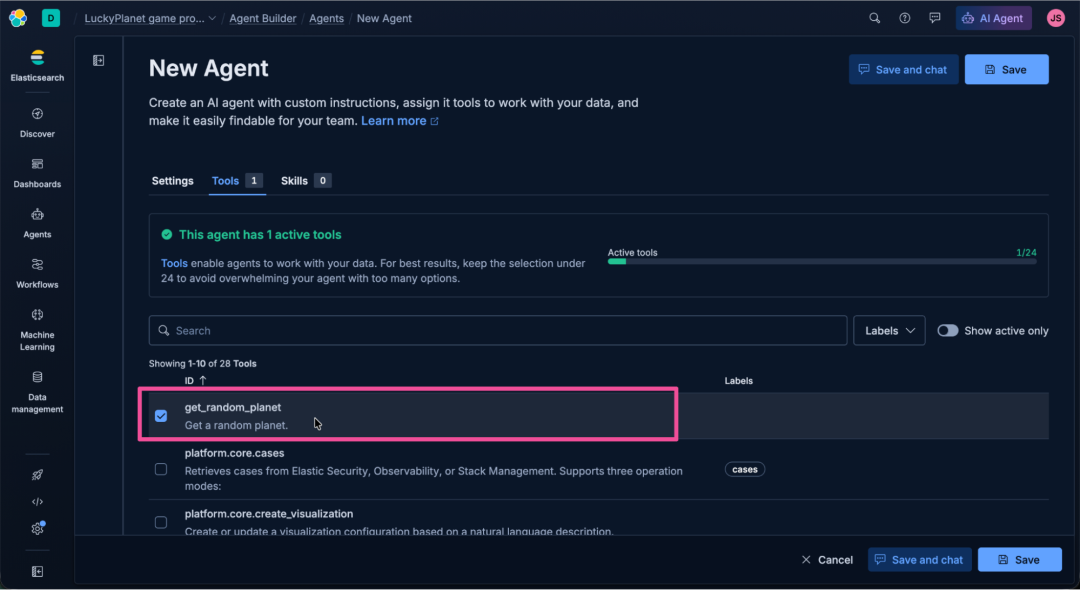
Screenshot of the Elastic AI Agent “New Agent” interface in dark mode, showing the Tools tab with a list of available Elasticsearch operations. The layout includes a highlighted message indicating one active tool and a progress indicator. The left sidebar includes navigation options, like Discover, Dashboards, Agents, Workflows, Machine Learning, and Data management. The focus is on the selected tool entry in the list
Screenshot of the Elastic AI Agent “New Agent” interface in dark mode, showing the Tools tab with a list of available Elasticsearch operations. The layout includes a highlighted message indicating one active tool and a progress indicator. The left sidebar includes navigation options, like Discover, Dashboards, Agents, Workflows, Machine Learning, and Data management. The focus is on the selected tool entry in the list "get_random_planet."
然后点击 Save and chat(保存并聊天)以保存智能体并进行测试。
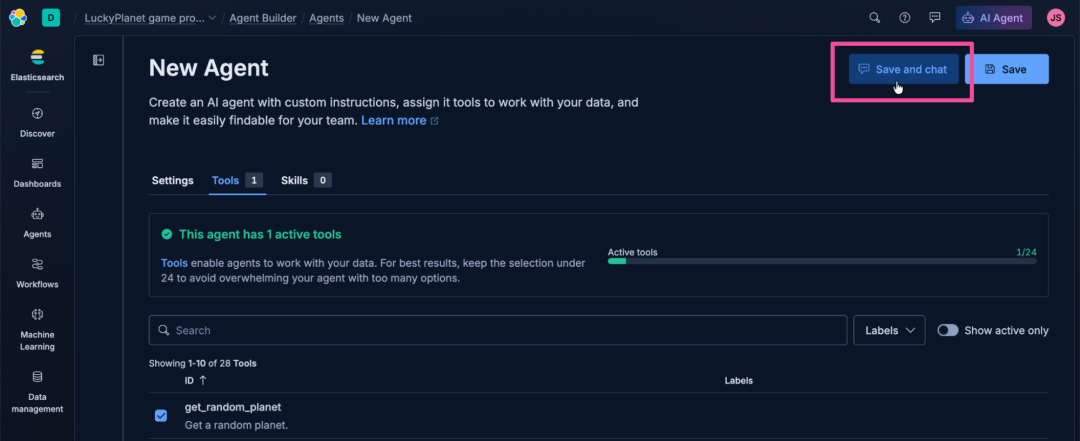
Screenshot of the Elastic AI Agent “New Agent” interface in dark mode, showing the Tools tab with one active tool selected. The layout includes a progress indicator and a table listing the tool entry. The left sidebar includes navigation options, like Discover, Dashboards, Agents, Workflows, Machine Learning, and Data management. The focus is on the “Save and chat” button at the top right of the interface.
Screenshot of the Elastic AI Agent “New Agent” interface in dark mode, showing the Tools tab with one active tool selected. The layout includes a progress indicator and a table listing the tool entry. The left sidebar includes navigation options, like Discover, Dashboards, Agents, Workflows, Machine Learning, and Data management. The focus is on the “Save and chat” button at the top right of the interface.
只需输入“play”即可开始《幸运星球》游戏。
Animated tour of the Elastic AI Agent “Agent Chat” interface in dark mode, showing a workspace for interacting with a configured agent. The main panel displays a prompt area with the text “How can I help you?” and an input box labeled “Ask anything.” A footer note indicates the model “Anthropic Claude Sonnet 4.6.” The tour concludes with
Animated tour of the Elastic AI Agent “Agent Chat” interface in dark mode, showing a workspace for interacting with a configured agent. The main panel displays a prompt area with the text “How can I help you?” and an input box labeled “Ask anything.” A footer note indicates the model “Anthropic Claude Sonnet 4.6.” The tour concludes with "The winner is the Player."
太棒了!我们的努力得到了回报。我们有了一个功能齐全的游戏。让我们试试多人游戏选项。我们只需向智能体发送一个启动命令和玩家列表,例如:
1

play game Gandalf, Frodo, Strider
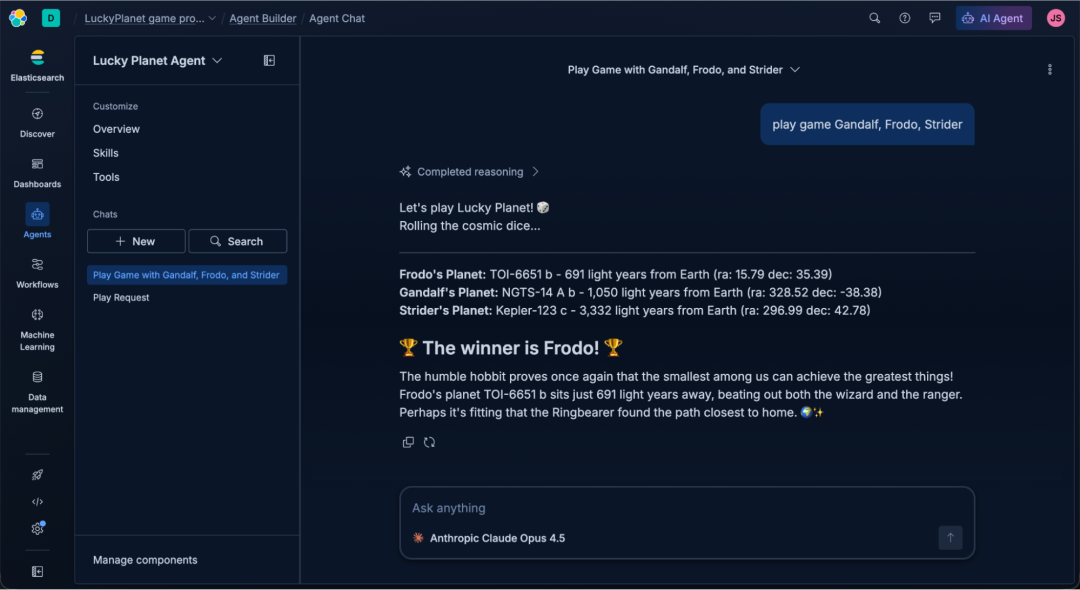
Screenshot of the Elastic AI Agent “Agent Chat” interface in dark mode, showing a conversation where the user plays a game with Gandalf, Frodo, and Strider. The chat displays the agent’s completed reasoning, listing each character’s assigned planet with distances from Earth and coordinates. The message announces Frodo as the winner and includes a short narrative celebrating his victory.
Screenshot of the Elastic AI Agent “Agent Chat” interface in dark mode, showing a conversation where the user plays a game with Gandalf, Frodo, and Strider. The chat displays the agent’s completed reasoning, listing each character’s assigned planet with distances from Earth and coordinates. The message announces Frodo as the winner and includes a short narrative celebrating his victory.
太棒了!游戏可以运行。尽管《幸运星球》本身就很有趣,但如果能真正可视化玩家行星在银河系中的位置,那会更酷。碰巧有一个名为 mw-plot 的开源 Python 库可以实现这一点。现在我们只需要一个用 Python 编写的智能体编排框架。由于我们是在 Agent Builder 中构建智能体的,这意味着我们的智能体可以被任何支持 A2A 协议的智能体开发工具使用。
Agent Development Kit (ADK)
Rectangular banner with colorful logo that shows a stylized robot face outlined in blue and green with two blue eyes, and below it two red angle brackets forming a coding symbol. To the right, bold black text reads “Agent Development Kit (ADK).”
事实证明,Google 开发的 Agent Development Kit (ADK) 是构建智能体 A2A 应用程序的最佳开源工具包之一。它支持 Python、Go、Java 和 TypeScript。
Python 中 ADK 的入门
让我们启动代码编辑器并运行一些代码。在您的本地计算机上,打开 Visual Studio Code 并打开一个新的终端。
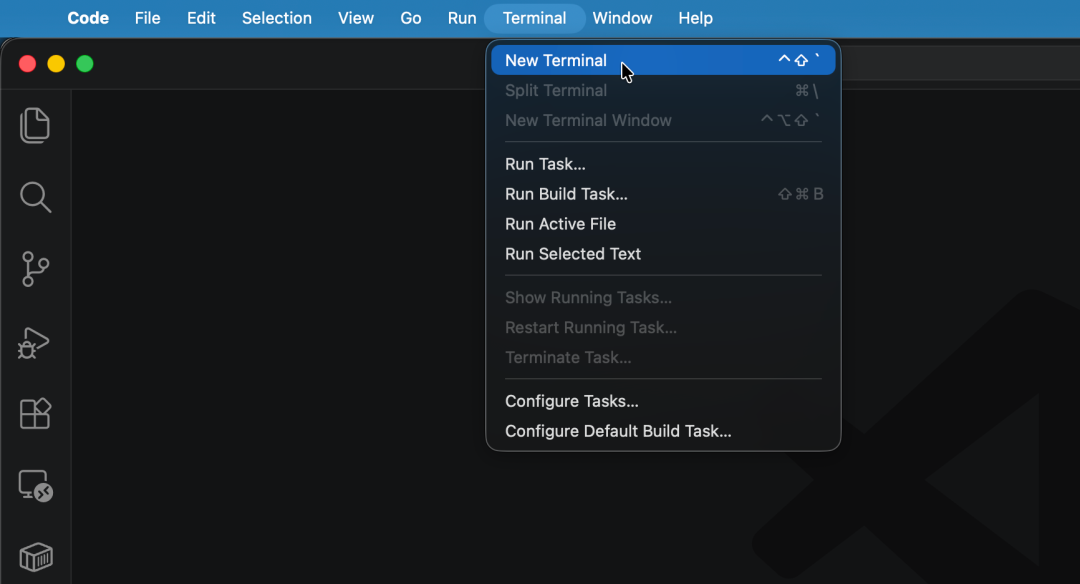
Screenshot of the Visual Studio Code interface in dark mode, showing the top menu bar with items Code, File, Edit, Selection, View, Go, Run, Terminal, Window, and Help. The Terminal menu is open, displaying options for creating and running tasks. A cursor points to the highlighted
Screenshot of the Visual Studio Code interface in dark mode, showing the top menu bar with items Code, File, Edit, Selection, View, Go, Run, Terminal, Window, and Help. The Terminal menu is open, displaying options for creating and running tasks. A cursor points to the highlighted "New Terminal" option.
在新打开的终端中,运行以下命令从 Github 克隆《幸运星球》(Lucky Planet)应用程序代码。
1

git clone https://github.com/jsimonweb/lucky-planet
在终端中,cd 到 lucky-planet 目录。
1

cd lucky-planet
在终端中,输入以下命令以在 Visual Studio Code 编辑器中打开当前文件夹。
1

code -r .
克隆的 lucky-planet 仓库在 Visual Studio Code 中应该如下图所示。
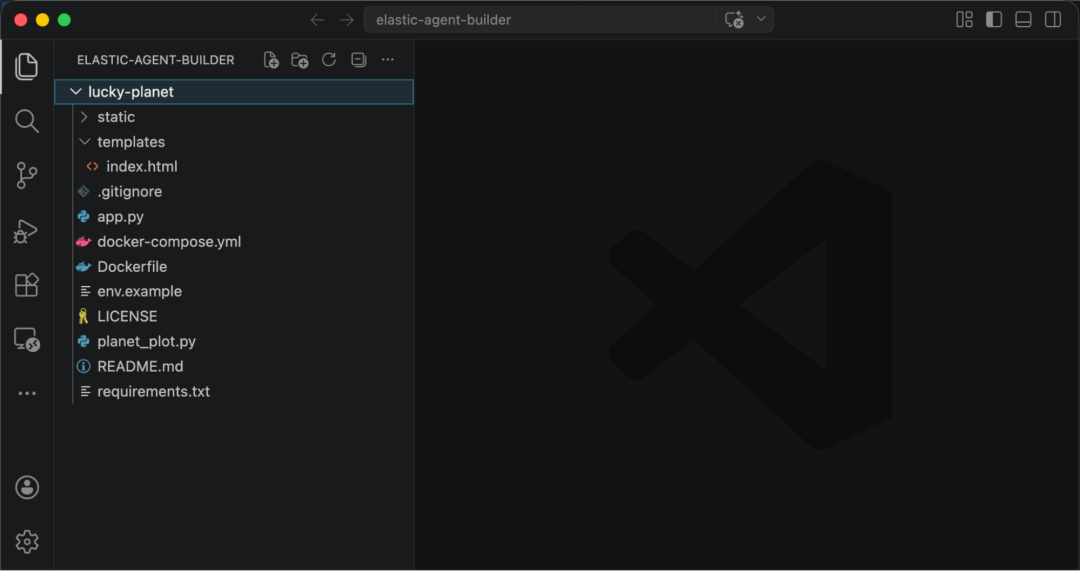
Screenshot of the Visual Studio Code interface showing a project titled
Screenshot of the Visual Studio Code interface showing a project titled "Elastic Agent Builder." The file explorer lists a folder named lucky planet, with subfolders static and templates, plus files, including gitignore, app.py, Dockerfile, README.md, and requirements.txt.
应用程序的基本架构是一个前端 HTML UI (/templates/index.html),它使用 Python Flask 后端来调用 ADK,以发送和接收来自 Elastic 智能体的响应。当游戏玩家输入玩家姓名并点击按钮开始游戏时,前端会向 app.py 文件中的 Flask “/api/ask” 路由发送一个带有玩家姓名的 POST 请求。
1
2
3
4
5
6
7
8

@app.route("/api/ask", methods=["POST"])
def ask():
    """Returns agent text immediately — plot generation is a separate call."""
    try:
        players       = request.get_json(force=True).get("players", [])
        prompt        = "play game " + ", ".join(players) if players else "play game"
        response_text = asyncio.run(_send_a2a(prompt))
        return jsonify({"response": response_text})
在该路由中,会使用 asyncio.run(_send_a2a(prompt)) 调用 _send_a2a() 方法。ADK 从 Elastic 智能体收集到的响应存储在 response_text 中,并使用 Flask 的 jsonify 工具以 JSON 格式返回给前端。
现在让我们看看 _send_a2a() 方法,这是 ADK 与 Agent Builder 智能体交互的地方。
1
2
3
4
5
6
7
8
9
10
11
12
13
14
15
16
17
18
19
20
21
22
23
24
25
26
27
28
29
30
31
32
33
34
35
36
37
38
39
40
41
42
43

# ── A2A call ─────────────────────────────────────────────────────────────────
async def _send_a2a(prompt: str) -> str:
    auth = {"Authorization": f"ApiKey {ELASTIC_API_KEY}"}
    async with httpx.AsyncClient(headers=auth, timeout=120.0) as http_client:
        resolver = A2ACardResolver(httpx_client=http_client, base_url=ELASTIC_AGENT_URL)
        card = await resolver.get_agent_card(relative_card_path="/lucky_planet_agent.json")

        remote_agent = RemoteA2aAgent(
            name="elastic_agent",
            agent_card=card,
            httpx_client=http_client,
        )

        session_service = InMemorySessionService()
        async with Runner(
            agent=remote_agent,
            app_name=APP_NAME,
            session_service=session_service,
        ) as runner:
            session = await session_service.create_session(
                app_name=APP_NAME,
                user_id="user",
                session_id=str(uuid.uuid4()),
            )

            new_message = genai_types.Content(
                role="user",
                parts=[genai_types.Part(text=prompt)],
            )

            final_text = "(no response)"
            async for event in runner.run_async(
                user_id="user",
                session_id=session.id,
                new_message=new_message,
            ):
                if event.is_final_response() and event.content and event.content.parts:
                    texts = [p.text for p in event.content.parts if p.text]
                    if texts:
                        final_text = "\n".join(texts)

        await remote_agent.cleanup()
    return final_text
该方法首先创建一个 HTTP 客户端,并在客户端的授权头中指定 Elastic API key。
1
2

auth = {"Authorization": f"ApiKey {ELASTIC_API_KEY}"}
async with httpx.AsyncClient(headers=auth, timeout=120.0) as http_client:
该方法随后使用 HTTP 客户端调用 A2ACardResolver,它会获取 Elastic 智能体的“卡片”。A2A 智能体卡片是一个 JSON 清单,描述了智能体能做什么、它暴露了哪些端点以及如何与之通信。A2ACardResolver 正在执行 A2A 握手,其中包括 Elastic 智能体 URL 和 lucky_planet_agent.json 的 relative_card_path,这与我们之前在 Agent Builder 中创建 Elastic 智能体时指定的 lucky_planet_agent Agent ID 相对应。
1
2

resolver = A2ACardResolver(httpx_client=http_client, base_url=ELASTIC_AGENT_URL)
card = await resolver.get_agent_card(relative_card_path="/lucky_planet_agent.json")
ADK 的 RemoteA2aAgent 接收智能体卡片,并使远程 Elastic 智能体看起来与本地定义的 ADK 智能体完全相同。
1
2
3
4
5

remote_agent = RemoteA2aAgent(
    name="elastic_agent",
    agent_card=card,
    httpx_client=http_client,
)
然后,ADK 向 Elastic 智能体发送一条消息,这只是一个文本提示,例如“play game Lovelace, Shannon, Turing”。运行器会流式传回 ADK 事件。应用程序等待 is_final_response(),忽略中间的思考和工具调用事件,并收集最终的纯英文回复。
1
2
3
4
5

new_message = genai_types.Content(role="user", parts=[genai_types.Part(text=prompt)])

async for event in runner.run_async(..., new_message=new_message):
    if event.is_final_response() and event.content and event.content.parts:
        final_text = "\n".join(texts)
最后,ADK 关闭 RemoteA2aAgent 使用的底层 HTTP 客户端,并且 Elastic 智能体的响应被返回到前端 UI,以便解析并与前三个最近行星位置的银河系图一起显示。
1
2

    await remote_agent.cleanup()
return final_text
A2A 将远程 Elastic 智能体转换为一个可以通过标准协议进行对话的对象。应用程序不调用自定义 REST 端点,例如 POST /api/v1/run-game。它使用 A2A 进行通信,这意味着接口是自然语言,而不是函数签名。最终结果是一个游戏,其中查询数据和实现游戏机制的复杂性由 Elastic 智能体处理,而 ADK 则通过 A2A 与智能体通信以启动游戏并传递智能体对游戏结果的摘要。
将您的智能体 URL 和 API Key 设置为环境变量
为了将《幸运星球》应用程序连接到您的 Elastic Agent Builder 智能体,您需要设置两个环境变量:A2A 端点 URL 和您的 Elastic API key。示例应用程序使用名为 .env 的文件来存储这些值。
复制 env.example 文件,并将新文件命名为 .env。
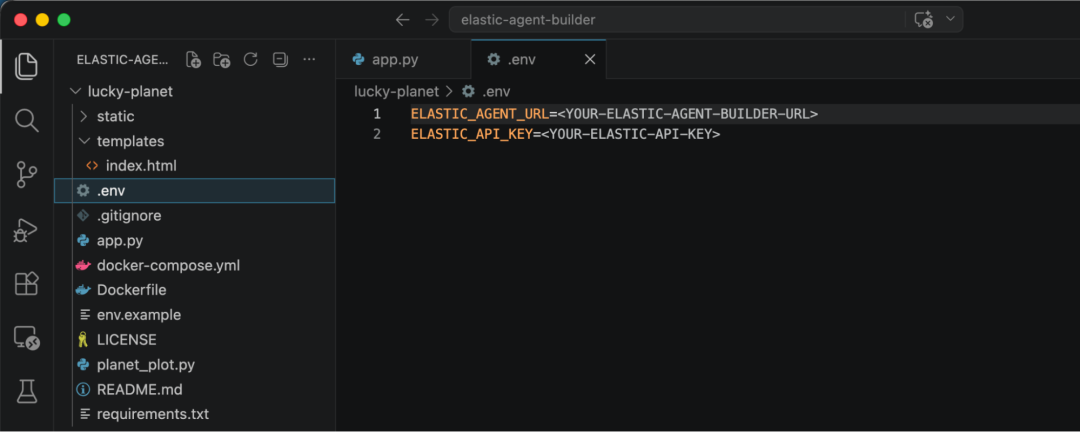
Screenshot of a code editor window showing a project titled
Screenshot of a code editor window showing a project titled "Elastic Agent Builder." The file explorer lists a folder named lucky planet with subfolders static and templates, and files including env, gitignore, app.py, Dockerfile, README.md, and requirements.txt. The editor displays the env file containing two environment variables labeled ELASTIC_AGENT_URL and ELASTIC_API_KEY with placeholder values.
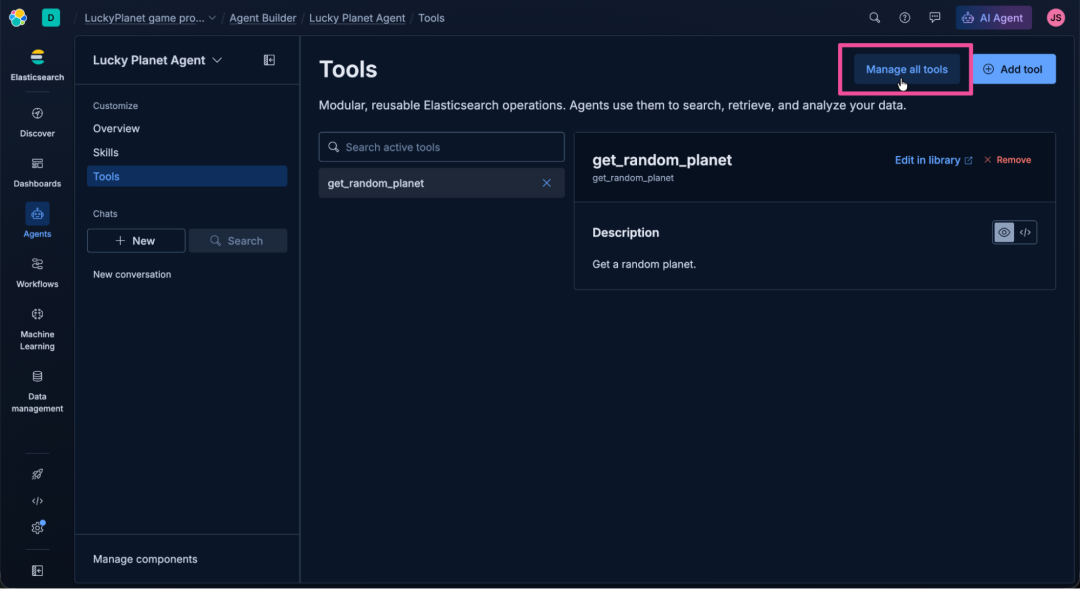
返回 Agent Builder 界面,获取应用程序与 Elastic 通信所需的两个值。从 Lucky Planet Agent 的自定义选项中选择 Tools(工具)。
Screenshot of a dark‑themed interface showing a workspace titled
Screenshot of a dark‑themed interface showing a workspace titled "Lucky Planet Agent." The left sidebar lists sections including Customize, Overview, Skills, and Tools, with the focus on "Tools." Below are options for Chats and Manage components. The main area displays a chat panel with the text “How can I help you?” and a prompt box labeled “Ask anything.”
点击屏幕右上角的 Manage all tools(管理所有工具)。
Screenshot of a dark‑themed interface showing a workspace titled
Screenshot of a dark‑themed interface showing a workspace titled "Lucky Planet Agent." The left sidebar lists sections including Customize, Overview, Skills, and Tools. The upper-right corner shows a button labeled Manage all tools, with the focus on this button. The main panel displays the heading Tools, a description about modular, reusable Elasticsearch operations, a search bar containing get_random_planet, and a box describing that tool with options to edit or remove it.
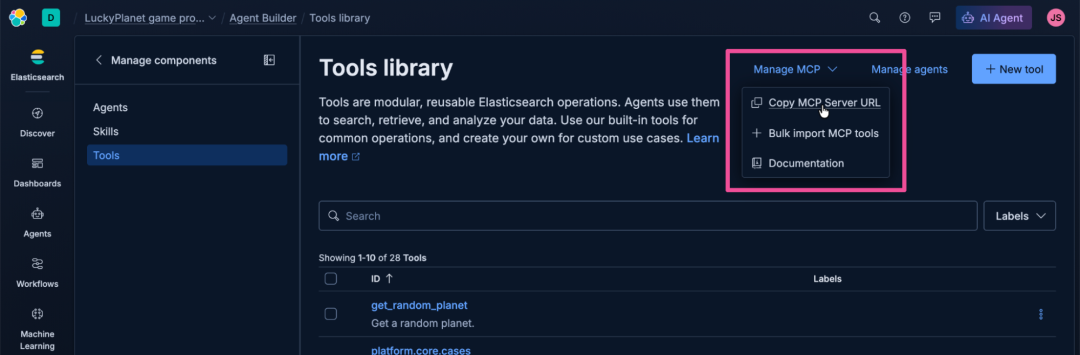
点击工具库页面顶部的 Manage MCP 下拉菜单,并选择 Copy MCP Server URL(复制 MCP 服务器 URL)。
Screenshot of a dark‑themed interface showing a workspace titled
Screenshot of a dark‑themed interface showing a workspace titled "Lucky Planet Agent." The left sidebar lists sections including Customize, Overview, Skills, and Tools. The main panel displays the heading Tools library with a description about modular, reusable Elasticsearch operations. A dropdown menu labeled Manage MCP is open, with the focus on options Copy MCP Server URL, Bulk import MCP tools, and Documentation. A "New tool" button appears to the right of the dropdown.
将 MCP Server URL 粘贴到 .env 文件中,替换 占位符。Agent Builder 暴露了两个端点:/mcp 用于向 MCP 客户端提供 MCP 工具,而 /a2a 用于向 A2A 客户端提供智能体。我们将使用 /a2a。请更新 URL,将末尾的“mcp”替换为“a2a”,因为 ADK 将使用 A2A 与 Agent Builder 中运行的智能体进行通信。
编辑后的 URL 应该类似于:
https://luckyplanet-game-project-12345a.kb.us-central1.gcp.elastic.cloud/api/agent_builder/a2a
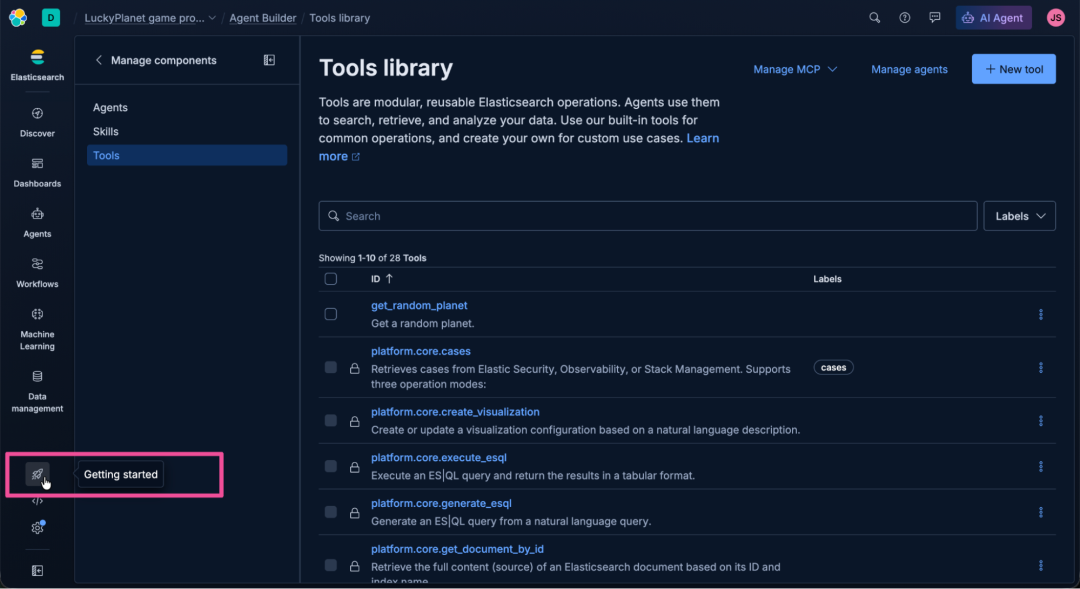
接下来我们需要 API key。点击 Elastic Cloud 顶部导航中的 Getting started(入门)。
Screenshot of a dark‑themed interface showing a workspace titled
Screenshot of a dark‑themed interface showing a workspace titled "Lucky Planet Agent." The left sidebar lists sections including Customize, Overview, Skills, and Tools, with the focus on "Getting started." The main panel displays the heading Tools library and a description about modular, reusable Elasticsearch operations. A list of tools appears below. The upper-right corner includes buttons labeled Manage MCP and New tool.
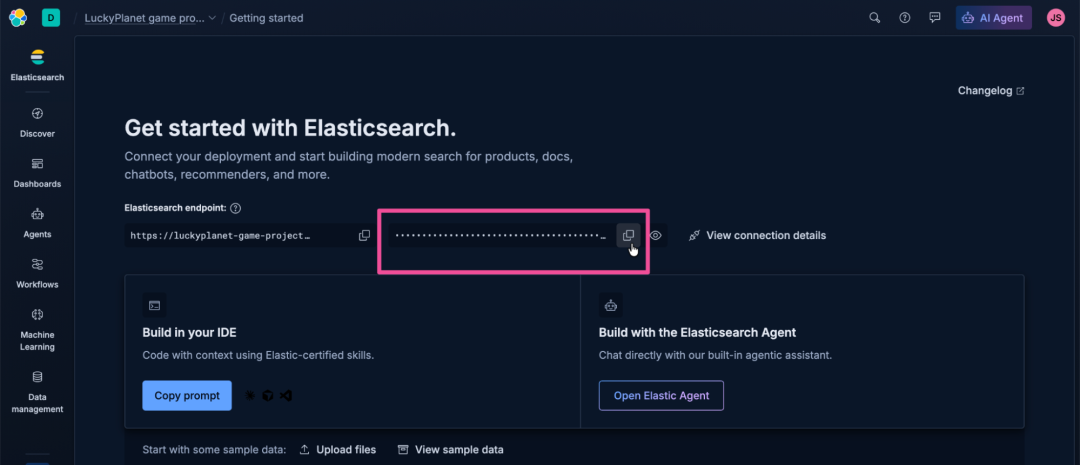
点击 Copy API key button(复制 API key 按钮)以复制 API key。
Screenshot of a dark‑themed interface showing a workspace titled
Screenshot of a dark‑themed interface showing a workspace titled "Lucky Planet Agent." The main panel displays the heading "Get started with Elasticsearch" and text about connecting a deployment to build modern search for products, docs, and chatbots. The focus is on the Copy API key button.
回到 Visual Studio Code,将 API key 粘贴到 .env 文件中,替换 占位符文本。您的 .env 文件应该如下图所示:

Screenshot of a code editor window showing a project titled
Screenshot of a code editor window showing a project titled "Elastic Agent Builder." The file explorer lists a folder named lucky planet with the env file open. The editor displays two environment variables: ELASTIC_AGENT_URL with a full Elastic Cloud API endpoint and ELASTIC_API_KEY with a long numeric key ending in double equals signs.
运行应用程序
要运行《幸运星球》应用程序:
- 1. 使用以下命令创建一个 Python 虚拟环境:
1

python -m venv .venv
- 2. 根据您本地计算机的操作系统,运行以下命令激活虚拟环境。
- • macOS/Linux
1

source .venv/bin/activate
- • Windows
1

.venv\Scripts\activate
- 3. 《幸运星球》应用程序依赖 ADK 进行智能体编排,所以现在让我们安装它。运行以下命令安装 ADK 以及应用程序所需的所有 Python 库依赖项:
1

pip install -r requirements.txt
- 4. 好的,是时候戴上安全帽并运行这个应用程序了。使用以下命令运行它:
1

python app.py
Animation of a code editor window showing a project titled "Elastic Agent Builder." The file explorer lists a folder named lucky planet, with subfolders static and templates, and files including app.py, Dockerfile, README.md, and requirements.txt. The editor displays Python code defining an asynchronous function that sends an authenticated request using httpx and initializes a remote agent. The bottom panel shows a terminal open to the lucky planet directory on the main branch.
运行 python app.py 命令应该会输出一个 URL,例如 http://127.0.0.1:5001,您可以在浏览器中打开它来查看正在运行的《幸运星球》游戏。让我们来试试吧!
Animated diagram showing a dark‑themed interface titled "Lucky Planet." A dialog box near the top invites players to “Enter player names and roll to discover your cosmic destiny.” Two player names, spock and yoda, appear with small remove icons beside them. Below are buttons labeled + Add Player and Roll Cosmic Dice. The background features a cosmic theme.
利用数据上下文构建 AI 应用程序
正如您在本博客文章中看到的,Elastic Agent Builder 提供了快速构建具有您自身数据上下文的智能体所需的一切。这包括一个原生的 A2A 端点,可供任何兼容框架进行编排。试用 Elastic Cloud 来构建具有上下文和检索层的智能体,以解决对您而言重要的挑战。
本文参与 腾讯云自媒体同步曝光计划,分享自微信公众号。
原始发表:2026-06-07,如有侵权请联系 cloudcommunity@tencent.com 删除
评论
登录后参与评论
推荐阅读
目录
腾讯云开发者

Copyright © 2013 - 2026 Tencent Cloud. All Rights Reserved. 腾讯云 版权所有
深圳市腾讯计算机系统有限公司 ICP备案/许可证号:粤B2-20090059 ![]() 粤公网安备44030502008569号
粤公网安备44030502008569号
腾讯云计算(北京)有限责任公司 京ICP证150476号 | 京ICP备11018762号