【MyBatis】基础增删改查 && XML配置文件开发 && 多表查询 && 字符串拼接问题 && 数据库连接池
原创
【MyBatis】基础增删改查 && XML配置文件开发 && 多表查询 && 字符串拼接问题 && 数据库连接池
原创
lirendada
发布于 2026-06-20 13:14:04
发布于 2026-06-20 13:14:04
Ⅰ. 什么是 MyBatis
官网:MyBatis中文网
- MyBatis 是一款优秀的持久层框架,用于简化JDBC的开发。
- MyBatis 本是 Apache 的一个开源项目 iBatis,2010 年这个项目由 apache 迁移到了 googlecode,并且改名为 MyBatis。2013 年 11 月迁移到 Github。
在上面我们提到一个词:持久层
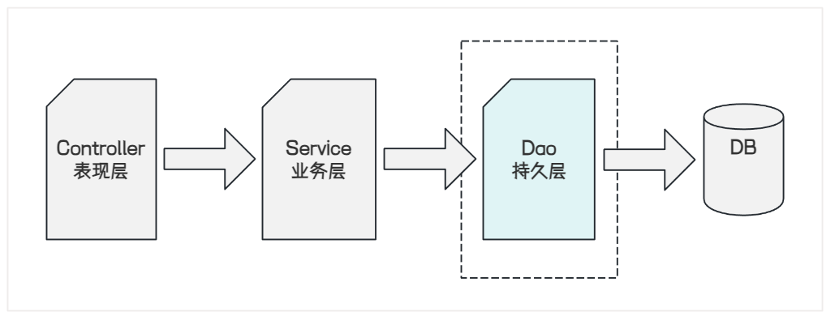
- 持久层:指的就是持久化操作的层,通常指数据访问层(dao),是用来操作数据库的。
简单来说 MyBatis 是更简单完成程序和数据库交互的框架,也就是更简单的操作和读取数据库工具。
Ⅱ. MyBatis入门 -- @Mapper
Mybatis 操作数据库的步骤:
- 准备工作(创建 springboot 工程、数据库表准备、实体类)
- 引入 Mybatis 的相关依赖,配置 Mybatis(数据库连接信息)
- 编写 SQL 语句(注解/XML)
- 测试
# 数据库连接配置
spring:
  datasource:
    url: jdbc:mysql://127.0.0.1:3306/mybatis_test?characterEncoding=utf8&useSSL=false
    username: root
    password: root
    driver-class-name: com.mysql.cj.jdbc.Driver
在项目中,创建持久层接口 UserInfoMapper:
import com.example.demo.model.UserInfo;
import org.apache.ibatis.annotations.Mapper;
import org.apache.ibatis.annotations.Select;
import java.util.List;

@Mapper
public interface UserInfoMapper {
    //查询所有用户
    @Select("select username, `password`, age, gender, phone from user_info")
    public List<UserInfo> queryAllUser();
}
Mybatis的持久层接口规范一般都叫 XxxMapper:
@Mapper注解:表示是 MyBatis 中的 Mapper 接口
- 程序运行时,框架会自动生成接口的实现类对象(代理对象),并给交 Spring 的 IOC 容器管理
@Select注解:代表的就是 select 查询,也就是注解对应方法的具体实现内容。
Ⅲ. MyBatis的基础操作
一、打印日志
在 Mybatis 当中我们可以借助日志,查看到 sql 语句的执行、执行传递的参数以及执行结果。
在配置文件中进行配置即可:
mybatis:
  configuration:  # 配置打印 MyBatis日志
    log-impl: org.apache.ibatis.logging.stdout.StdOutImpl
如果是 application.properties,配置内容如下:
#指定mybatis输出日志的位置, 输出控制台
mybatis.configuration.log-impl=org.apache.ibatis.logging.stdout.StdOutImpl
重新运行程序,可以看到SQL执行内容,以及传递参数和执行结果:
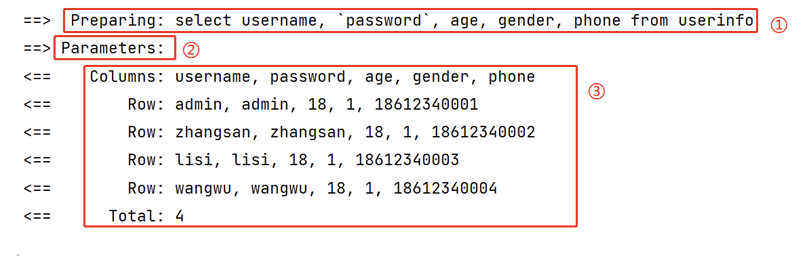
①:查询语句
②:传递参数及类型
③:SQL执行结果
二、参数传递:#{} && @Param
需求:查找 id=4 的用户,对应的 sql 就是:select * from user_info where id=4
@Select("select username, `password`, age, gender, phone from user_info where id= 4 ")
UserInfo queryById();
但是这样的话,只能查找 id=4 的数据,所以 sql 语句中的 id 值不能写成固定数值,需要变为动态的数值。
解决方案:在 queryById 方法中添加一个参数(id),将方法中的参数,传给SQL语句。
使用 #{} 的方式获取方法中的参数:
@Select("select username, `password`, age, gender, phone from user_info where id= #{id}")
UserInfo queryById(Integer id);要绑定的参数建议和方法形参名保持一致。 但是如果
mapper接口方法形参只有一个普通类型的参数,#{…}里面的属性名可以随便写。
当然也可以通过 @Param 设置参数的别名。如果使用了 @Param 设置别名,则 #{...} 里面的属性名必须和 @Param 设置的一样,如下所示:
@Select("select username, `password`, age, gender, phone from user_info where id= #{userid}")
UserInfo queryById(@Param("userid") Integer id);
三、增(Insert)
直接使用 UserInfo 对象的属性名来获取参数,注意绑定的参数要和 UserInfo 中的字段名相同!
@Insert("insert into user_info (username, `password`, age, gender, phone) values (#{username},#{password},#{age},#{gender},#{phone})")
Integer insert(UserInfo userInfo);
注意:如果设置了 @Param 属性,#{...}需要使用 参数.属性 来获取:
@Insert("insert into user_info (username, `password`, age, gender, phone) values (#{userInfo.username},#{userInfo.password},#{userInfo.age},#{userInfo.gender},#{userInfo.phone})")
Integer insert(@Param("userInfo") UserInfo userInfo);返回插入数据的主键:@Options
Insert 语句默认返回的是受影响的行数。但有些情况下,数据插入之后,还需要有后续的关联操作,需要获取到新插入数据的 id。
比如订单系统:当我们下完订单之后,需要通知物流系统,库存系统,结算系统等,这时候就需要拿到订单ID。
如果想要拿到自增 id,需要在 Mapper 接口的方法上添加一个 Options 的注解:
@Options(useGeneratedKeys = true, keyProperty = "id")
@Insert("insert into user_info (username, age, gender, phone) values (#{userInfo.username},#{userInfo.age},#{userInfo.gender},#{userInfo.phone})")
Integer insert(@Param("userInfo") UserInfo userInfo);useGeneratedKeys:这会令MyBatis使用JDBC的getGeneratedKeys方法来取出由数据库内部生成的主键,默认是false。keyProperty:指定能够唯一识别对象的属性,MyBatis会使用getGeneratedKeys的返回值或insert语句的selectKey子元素设置它的值,默认是未设置。
测试代码:
@Test
void insert() {
    UserInfo userInfo = new UserInfo();
    userInfo.setUsername("zhaoliu");
    userInfo.setPassword("zhaoliu");
    userInfo.setGender(2);
    userInfo.setAge(21);
    userInfo.setPhone("18612340005");
    Integer count = userInfoMapper.insert(userInfo);
    System.out.println("添加数据条数:" +count +", 数据ID:" + userInfo.getId()); // 从对象中取出id
}

// 结果:
添加数据条数:1,数据ID:6注意:设置 useGeneratedKeys=true 之后,方法返回值依然是受影响的行数,只不过自增 id 会设置在上述 keyProperty 指定的属性中,像上述代码一样从对象中取出 id 即可。
四、删(Delete)
@Delete("delete from user_info where id = #{id}")
void delete(Integer id);
五、改(Update)
@Update("update user_info set username=#{username} where id=#{id}")
void update(UserInfo userInfo);
六、查(Select)
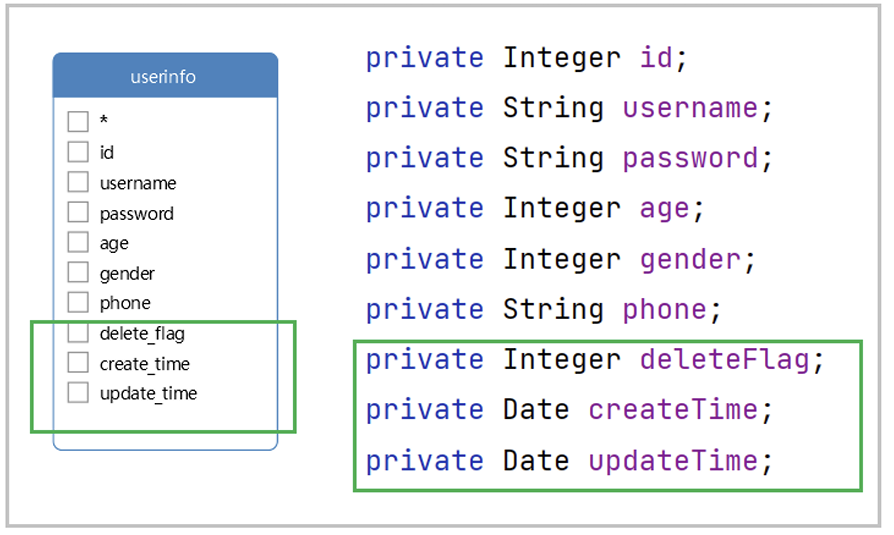
在查询时发现,有几个字段是没有赋值的,只有 Java 对象属性和数据库字段一模一样时,才会进行赋值。
@Select("select id, username, `password`, age, gender, phone, delete_flag, create_time, update_time from user_info")
List<UserInfo> queryAllUser();
查询结果:

从运行结果上可以看到 SQL 语句中,查询了 delete_flag,create_time,update_time,但是这几个属性却没有赋值。
注意:如果
MySQL查询返回多条,但是方法使用UserInfo接收而不是用List<UserInfo>接收的话,则MyBatis执行就会报错。
原因分析:
当自动映射查询结果时,MyBatis 会获取结果中返回的列名并在 Java 类中查找相同名字的属性(忽略大小写),所以上面就是出现了列名和字段名不同,导致赋值错误的情况。
解决办法:
- 起别名
- 结果映射
- 开启驼峰命名
1. 起别名
在 SQL 语句中,使用 as 给列名起别名,保持别名和实体类属性名一样:
@Select("select id, username, `password`, age, gender, phone, delete_flag as deleteFlag, " +
        "create_time as createTime, update_time as updateTime from user_info")
public List<UserInfo> queryAllUser();
tip:SQL语句太长时,使用加号
+进行字符串拼接。
2. 结果映射:@Results && @Result && @ResultMap
@Select("select id, username, `password`, age, gender, phone, delete_flag, create_time, update_time from user_info")
@Results({
    @Result(column = "delete_flag", property = "deleteFlag"),
    @Result(column = "create_time", property = "createTime"),
    @Result(column = "update_time", property = "updateTime")
})
List<UserInfo> queryAllUser();
如果其它 SQL 也希望可以复用这个映射关系,可以给 @Results 定义一个 id,然后其它 SQL 使用 @ResultMap 注解引入那个 id 即可,如下所示:
@Select("select id, username, `password`, age, gender, phone, delete_flag, create_time, update_time from user_info")
@Results(id = "resultMap", value = {
    @Result(column = "delete_flag", property = "deleteFlag"),
    @Result(column = "create_time", property = "createTime"),
    @Result(column = "update_time", property = "updateTime")
})
List<UserInfo> queryAllUser();

@Select("select id, username, `password`, age, gender, phone, delete_flag, create_time, update_time " +
        "from user_info where id= #{userid} ")
@ResultMap(value = "resultMap")
UserInfo queryById(@Param("userid") Integer id);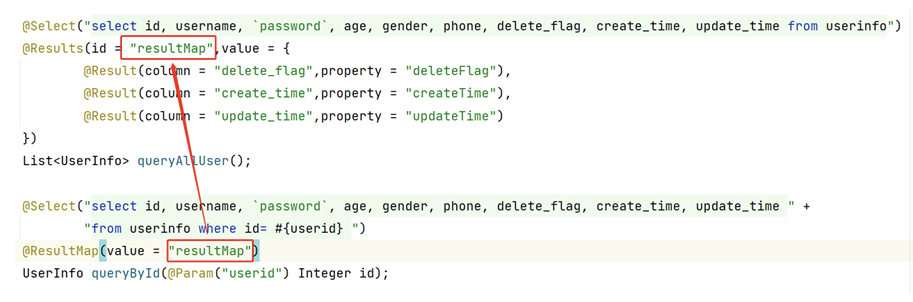
3. 开启驼峰命名(⭐⭐⭐推荐)
通常数据库列使用蛇形命名法进行命名(下划线分割各个单词),而 Java 属性一般遵循驼峰命名法约定。
为了在这两种命名方式之间启用自动映射,需要在配置文件中将 mapUnderscoreToCamelCase 设置为 true。
mybatis:
  configuration:
map-underscore-to-camel-case: true #配置驼峰自动转换驼峰命名规则:abc_xyz => abcXyz
- 表中字段名:
abc_xyz - 类中属性名:
abcXyz
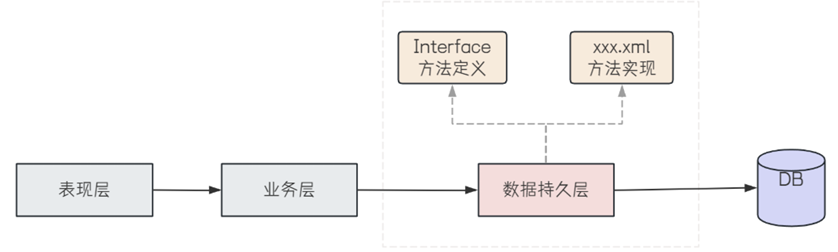
Ⅳ. MyBatis XML配置文件开发
使用 Mybatis 的注解方式,主要是来完成一些简单的增删改查功能。如果需要实现复杂的 SQL 功能,建议使用 XML 来配置映射语句,也就是将 SQL 语句写在 XML 配置文件中。
MyBatis XML 的方式需要以下两步:
- 配置数据库连接字符串和
MyBatis - 写持久层代码
一、配置连接字符串和MyBatis
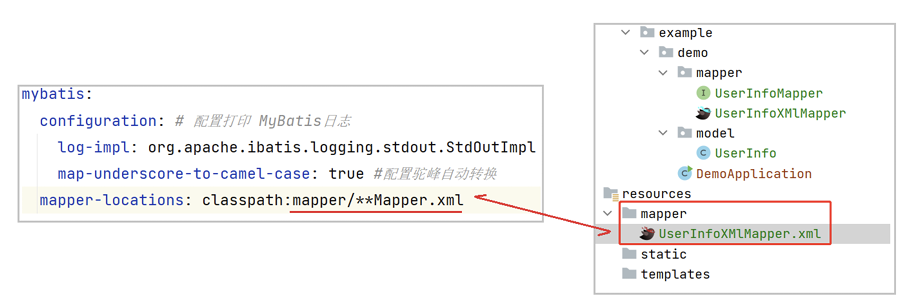
此步骤需要进行两项设置,数据库连接字符串设置和 MyBatis 的 XML 文件配置。
如果是 application.yml 文件,配置内容如下:
# 数据库连接配置
spring:
  datasource:
    url: jdbc:mysql://127.0.0.1:3306/mybatis_test?characterEncoding=utf8&useSSL=false
    username: root
    password: root
    driver-class-name: com.mysql.cj.jdbc.Driver
# 配置 mybatis xml 的文件路径,在 resources/mapper 创建所有表的 xml 文件
mybatis:
  mapper-locations: classpath:mapper/*Mapper.xml
二、写持久层代码
持久层代码分两部分:
- 方法定义 Interface
- 方法实现:XXX.xml
1. 添加 mapper 接口
数据持久层的接口定义:
import com.example.demo.model.UserInfo;
import org.apache.ibatis.annotations.Mapper;
import java.util.List;

@Mapper
public interface UserInfoXMlMapper {
    List<UserInfo> queryAllUser();
}
2. 编写 UserInfoXMLMapper.xml
<?xml version="1.0" encoding="UTF-8"?>
<!DOCTYPE mapper PUBLIC "-//mybatis.org//DTD Mapper 3.0//EN"
        "http://mybatis.org/dtd/mybatis-3-mapper.dtd">
<mapper namespace="com.example.demo.mapper.UserInfoXMlMapper">
    <select id="queryAllUser" resultType="com.example.demo.model.UserInfo">
        select username,`password`, age, gender, phone from user_info
    </select>
</mapper><mapper>标签:需要指定namespace属性,表示命名空间,值为mapper接口的全限定名,包括全包名.类名。<select>查询标签:是用来执行数据库的查询操作的:id:是和 Interface (接口)中定义的方法名称一样的,表示对接口的具体实现方法。resultType:是返回的数据类型,也就是开头我们定义的实体类。
三、增删改查操作
1. 增(Insert)
UserInfoMapper 接口:
Integer insertUser(UserInfo userInfo);UserInfoMapper.xml 实现:
<insert id="insertUser">
    insert into userinfo (username, `password`, age, gender, phone)
    values (#{username}, #{password}, #{age},#{gender},#{phone})
</insert>
如果使用
@Param设置参数名称的话,使用方法和注解类似。 UserInfoMapper接口: Integer insertUser(@Param("userInfo") UserInfo userInfo); UserInfoMapper.xml实现: <insert id="insertUser"> insert into user_info (username, `password`, age, gender, phone) values (#{userInfo.username},#{userInfo.password},#{userInfo.age},#{userInfo.gender},#{userInfo.phone}) </insert>
返回自增 id:接口定义不变,Mapper.xml 实现设置 useGeneratedKeys 和 keyProperty 属性,如下所示:
<insert id="insertUser" useGeneratedKeys="true" keyProperty="id">
    insert into user_info (username, `password`, age, gender, phone)
    values (#{userInfo.username},#{userInfo.password},#{userInfo.age},#{userInfo.gender},#{userInfo.phone})
</insert>
2. 删(Delete)
UserInfoMapper接口:
Integer deleteUser(Integer id);UserInfoMapper.xml实现:
<delete id="deleteUser">
    delete from user_info where id = #{id}
</delete>
3. 改(Update)
UserInfoMapper接口:
Integer updateUser(UserInfo userInfo);UserInfoMapper.xml实现:
<update id="updateUser">
    update user_info set username=#{username} where id=#{id}
</update>
4. 查(Select)
同样的,使用 XML 的方式进行查询,也存在数据封装的问题:
<select id="queryAllUser" resultType="com.example.demo.model.UserInfo">
    select id, username,`password`, age, gender, phone, delete_flag, create_time, update_time from user_info
</select>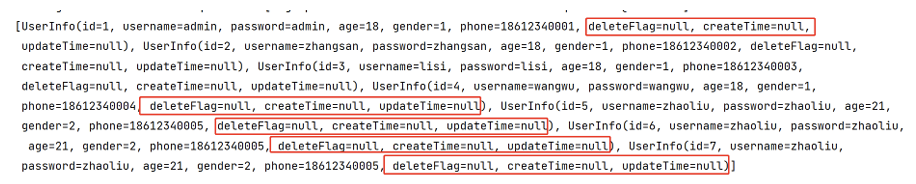
结果显示:deleteFlag,createTime,updateTime 也没有进行赋值。
解决办法和注解类似:
- 起别名
- 结果映射
- 开启驼峰命名
其中方法 1 和方法 3 的解决办法和注解一样,不再多说,接下来看下 xml 如果来写结果映射:
Mapper.xml:
<resultMap id="BaseMap" type="com.example.demo.model.UserInfo">
    <id column="id" property="id"></id>
    <result column="delete_flag" property="deleteFlag"></result>
    <result column="create_time" property="createTime"></result>
    <result column="update_time" property="updateTime"></result>
</resultMap>

<select id="queryAllUser" resultMap="BaseMap">
    select id, username,`password`, age, gender, phone, delete_flag, create_time, update_time from user_info
</select>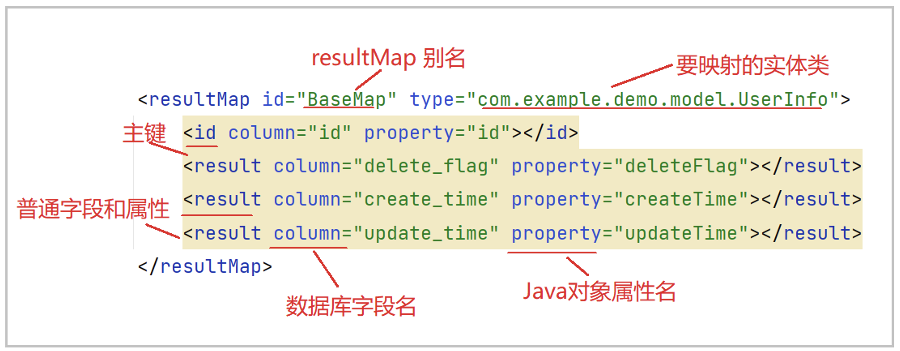
Ⅴ. 多表查询
多表查询和单表查询类似,只是 SQL 不同而已。
Model:
import lombok.Data;
import java.util.Date;

@Data
public class ArticleInfo {
    private Integer id;
    private String title;
    private String content;
    private Integer uid;
    private Integer deleteFlag;
    private Date createTime;
    private Date updateTime;
}
需求:根据 uid 查询作者的名称等相关信息
SQL 如下所示:
SELECT
    ta.id,
    ta.title,
    ta.content,
    ta.uid,
    tb.username,
    tb.age,
    tb.gender
FROM
    articleinfo ta
LEFT JOIN user_info tb ON ta.uid = tb.id
WHERE
    ta.id =1
此时就需要补充实体类:
@Data
public class ArticleInfo {
    private Integer id;
    private String title;
    private String content;
    private Integer uid;
    private Integer deleteFlag;
    private Date createTime;
    private Date updateTime;

    // 添加用户相关信息
    private String username;
    private Integer age;
    private Integer gender;
}
接口定义:
import com.example.demo.model.ArticleInfo;
import org.apache.ibatis.annotations.Mapper;

@Mapper
public interface ArticleInfoMapper {
    @Select("SELECT ta.id,ta.title,ta.content,ta.uid,tb.username,tb.age,tb.gender " +
           "FROM articleinfo ta LEFT JOIN user_info tb ON ta.uid = tb.id " +
           "WHERE ta.id = #{id}")
    ArticleInfo queryUserByUid(Integer id);
}
Ⅵ. #{} 和 ${}
MyBatis参数赋值有两种方式,前面使用了 #{} 进行赋值,接下来我们看下二者的区别。
#{}是预编译处理,防止 SQL 注入,推荐使用。${}是字符串拼接,动态拼接 SQL,需谨慎使用。
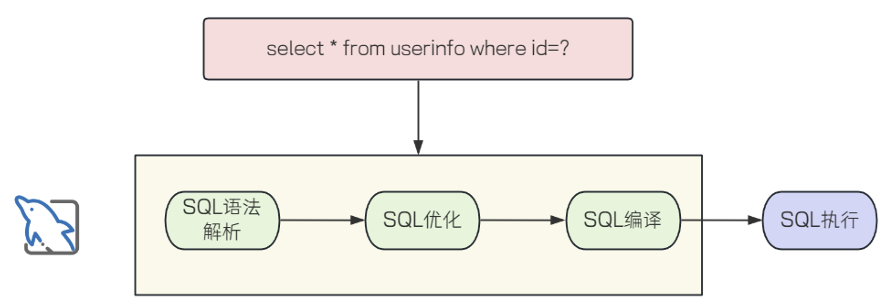
此外,因为预编译 SQL 在编译一次之后会被缓存起来,后面再次执行这条语句时不会再编译,省去了解析优化等过程,提高了效率!
但是一些场景,#{} 不能处理,比如排序功能,表名,字段名作为参数时,这些情况需要使用 ${}。
模糊查询虽然 ${} 可以完成,但因为存在SQL注入的问题,所以通常使用 mysql 内置函数 concat 来完成。
Ⅶ. 数据库连接池
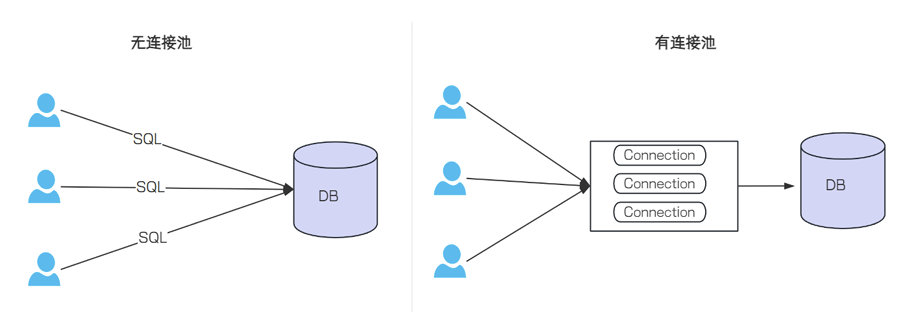
常见的数据库连接池:
- C3P0
- DBCP
- Druid
- Hikari
目前比较流行的是Hikari,Druid。
Hikari:SpringBoot 默认使用的数据库连接池。Hikari是日语"光"的意思(ひかり),Hikari也是以追求性能极致为目标。Druid:如果我们想把默认的数据库连接池切换为 Druid 数据库连接池,只需要引入相关依赖即可:<dependency> <groupId>com.alibaba</groupId> <artifactId>druid-spring-boot-3-starter</artifactId> <version>1.2.21</version> </dependency>
如果 SpringBoot 版本为 2.X,使用 druid-spring-boot-starter 依赖:
<dependency>
    <groupId>com.alibaba</groupId>
    <artifactId>druid-spring-boot-starter</artifactId>
    <version>1.1.17</version>
</dependency>
参考官方地址:https://github.com/alibaba/druid/tree/master/druid-spring-boot-starter
- Druid连接池是阿里巴巴开源的数据库连接池项目
- 功能强大,性能优秀,是Java语言最好的数据库连接池之一
- 学习文档:https://github.com/alibaba/druid/wiki/%E9%A6%96%E9%A1%B5
原创声明:本文系作者授权腾讯云开发者社区发表,未经许可,不得转载。
如有侵权,请联系 cloudcommunity@tencent.com 删除。
原创声明:本文系作者授权腾讯云开发者社区发表,未经许可,不得转载。
如有侵权,请联系 cloudcommunity@tencent.com 删除。
评论
登录后参与评论
推荐阅读
目录
腾讯云开发者

Copyright © 2013 - 2026 Tencent Cloud. All Rights Reserved. 腾讯云 版权所有
深圳市腾讯计算机系统有限公司 ICP备案/许可证号:粤B2-20090059 ![]() 粤公网安备44030502008569号
粤公网安备44030502008569号
腾讯云计算(北京)有限责任公司 京ICP证150476号 | 京ICP备11018762号