50-Rust 教程 - 发布与部署

50-Rust 教程 - 发布与部署

LarryLan
发布于 2026-07-06 17:03:11
发布于 2026-07-06 17:03:11
发布与部署
代码写完了,然后呢?别让你的程序只活在你的电脑上!
🎬 引入
恭喜你!经过 49 篇的学习,你已经写出了人生第一个 Rust 项目!
然后你面临一个严肃的问题:
用户:"这程序怎么用啊?"
你:"额...你得先安装 Rust,然后 clone 我的代码,然后 cargo build..."
用户:"???我只是想双击运行而已..."
这就好比你开了家餐厅:
- 菜做得再好(代码质量高)
- 装修再漂亮(代码风格好)
- 但大门紧锁(不会部署)
顾客进不来啊! 😭
今天这最后一篇,咱们来聊聊怎么把你的 Rust 程序"发布到全世界"!
📌 核心概念
发布的"三个层次"
层次 1:本地编译
  ↓ 给自己用
层次 2:交叉编译
  ↓ 给不同平台用
层次 3:容器化/CI/CD
  ↓ 自动化、规模化
生活化类比:
发布方式 | 类比 | 适用场景 |
|---|---|---|
cargo build | 在家做饭自己吃 | 本地开发测试 |
交叉编译 | 开连锁店到不同城市 | 多平台发布 |
Docker | 中央厨房 + 配送 | 服务器部署 |
CI/CD | 自动化生产线 | 持续集成发布 |
发布流程概览
开发完成
  ↓
本地测试(cargo test)
  ↓
优化构建(cargo build --release)
  ↓
交叉编译(可选)
  ↓
打包分发
  ↓
部署上线
  ↓
监控维护
💻 代码示例
1. 基础发布流程
步骤 1:优化构建
# Debug 模式(开发用)
cargo build

# Release 模式(发布用)
cargo build --release

# 查看构建产物
ls -lh target/release/your_app
# 通常比 debug 模式小 10 倍以上!
Debug vs Release 对比:
属性 | Debug | Release |
|---|---|---|
编译速度 | 快 | 慢(5-10 倍) |
运行速度 | 慢 | 快(10-100 倍) |
文件大小 | 大 | 小 |
调试信息 | 完整 | 精简 |
优化级别 | 无 | 激进 |
步骤 2:剥离调试符号(进一步减小体积)
# Linux/Mac
strip target/release/your_app

# Windows 用 cargo-binutils
cargo install cargo-binutils
rustup component add llvm-tools-preview
cargo build --release --bin your-app
cargo strip --bin your-app
体积对比:
原始 release:  5.2 MB
strip 后:     1.8 MB  (减少 65%!)
步骤 3:打包分发
Linux 打包:
# 创建发布目录
mkdir -p release/linux
cp target/release/your_app release/linux/
cp README.md release/linux/
cp LICENSE release/linux/

# 打包
cd release/linux
tar -czvf your_app-linux-x86_64.tar.gz *
Windows 打包:
# 创建发布目录
New-Item -ItemType Directory -Path "release\windows"
Copy-Item "target\release\your_app.exe" "release\windows\"
Copy-Item "README.md" "release\windows\"

# 打包(需要 7-Zip)
cd release\windows
7z a your_app-windows-x86_64.zip *
Mac 打包:
# 创建 .app bundle(可选)
mkdir -p YourApp.app/Contents/MacOS
cp target/release/your_app YourApp.app/Contents/MacOS/

# 创建 Info.plist
cat > YourApp.app/Contents/Info.plist << EOF
<?xml version="1.0" encoding="UTF-8"?>
<!DOCTYPE plist PUBLIC "-//Apple//DTD PLIST 1.0//EN" "http://www.apple.com/DTDs/PropertyList-1.0.dtd">
<plist version="1.0">
<dict>
    <key>CFBundleExecutable</key>
    <string>your_app</string>
    <key>CFBundleIdentifier</key>
    <string>com.yourname.yourapp</string>
    <key>CFBundleVersion</key>
    <string>1.0.0</string>
</dict>
</plist>
EOF

# 打包
zip -r your_app-macos-x86_64.zip YourApp.app
2. 交叉编译
什么是交叉编译?
在你的电脑上编译出其他平台能运行的程序。
场景:
- 在 Windows 上编译 Linux 版本
- 在 Mac 上编译 Windows 版本
- 在 x86 电脑上编译 ARM 版本(树莓派)
交叉编译到 Linux
在 Windows/Mac 上编译 Linux 程序:
# 1. 添加目标平台
rustup target add x86_64-unknown-linux-musl

# 2. 安装交叉编译工具
# Mac
brew install messense/macos-cross-toolchains/x86_64-unknown-linux-musl

# Windows(需要 WSL 或 Docker)

# 3. 编译
cargo build --release --target x86_64-unknown-linux-musl

# 4. 产物位置
target/x86_64-unknown-linux-musl/release/your_app
交叉编译到 Windows
在 Linux/Mac 上编译 Windows 程序:
# 1. 添加目标
rustup target add x86_64-pc-windows-msvc

# 2. 安装链接器(Mac 用 mingw-w64)
# Mac
brew install mingw-w64

# Ubuntu/Debian
sudo apt install mingw-w64

# 3. 配置 .cargo/config.toml
[target.x86_64-pc-windows-msvc]
linker = "x86_64-w64-mingw32-gcc"

# 4. 编译
cargo build --release --target x86_64-pc-windows-msvc
交叉编译到 ARM(树莓派)
# 1. 添加 ARM 目标
rustup target add armv7-unknown-linux-gnueabihf

# 2. 安装交叉编译工具
# Ubuntu
sudo apt install gcc-arm-linux-gnueabihf

# 3. 配置 .cargo/config.toml
[target.armv7-unknown-linux-gnueabihf]
linker = "arm-linux-gnueabihf-gcc"

# 4. 编译
cargo build --release --target armv7-unknown-linux-gnueabihf

# 5. 传输到树莓派
scp target/armv7-unknown-linux-gnueabihf/release/your_app pi@raspberrypi:/home/pi/
使用 cargo-zigbuild(推荐!)
cargo-zigbuild 让交叉编译变得简单:
# 安装
cargo install cargo-zigbuild

# 使用(自动处理工具链)
cargo zigbuild --release --target x86_64-unknown-linux-musl

# 产物需要手动移动到 target 目录
3. Docker 部署
基础 Docker 镜像
Dockerfile(多阶段构建):
# 第一阶段:编译
FROM rust:1.75 as builder

WORKDIR /app

# 复制 Cargo 文件(利用缓存)
COPY Cargo.toml Cargo.lock ./
COPY src ./src

# 编译 release 版本
RUN cargo build --release

# 第二阶段:运行
FROM debian:bullseye-slim

# 安装运行时依赖(如果需要)
RUN apt-get update && apt-get install -y \
    ca-certificates \
    && rm -rf /var/lib/apt/lists/*

# 从 builder 阶段复制编译好的程序
COPY --from=builder /app/target/release/your_app /usr/local/bin/

# 设置入口点
ENTRYPOINT ["your_app"]
构建和运行:
# 构建镜像
docker build -t your_app:latest .

# 运行
docker run --rm your_app:latest

# 带参数运行
docker run --rm your_app:latest --help

# 挂载数据卷
docker run --rm -v $(pwd)/data:/data your_app:latest
最小化镜像(Alpine + musl)
# 使用 musl 编译静态链接
FROM rust:1.75-alpine as builder

RUN apk add --no-cache musl-dev

WORKDIR /app
COPY Cargo.toml Cargo.lock ./
COPY src ./src

RUN cargo build --release --target x86_64-unknown-linux-musl

# 使用 scratch(空镜像)
FROM scratch

COPY --from=builder /app/target/x86_64-unknown-linux-musl/release/your_app /your_app

ENTRYPOINT ["/your_app"]
镜像大小对比:
普通 Debian 镜像:~150 MB
Alpine 镜像:     ~50 MB
scratch 镜像:   ~2 MB  (只有你的程序!)
4. CI/CD 自动化
GitHub Actions 示例
.github/workflows/ci.yml:
name: CI/CD

on:
  push:
    branches: [main]
  pull_request:
    branches: [main]

env:
  CARGO_TERM_COLOR: always

jobs:
  # 1. 测试
  test:
    runs-on: ubuntu-latest
    steps:
      - uses: actions/checkout@v4

      - name: Install Rust
        uses: dtolnay/rust-action@stable

      - name: Cache
        uses: Swatinem/rust-cache@v2

      - name: Run tests
        run: cargo test --verbose

      - name: Run clippy
        run: cargo clippy -- -D warnings

      - name: Check formatting
        run: cargo fmt --check

  # 2. 构建多平台
  build:
    needs: test
    runs-on: ${{ matrix.os }}
    strategy:
      matrix:
        os: [ubuntu-latest, windows-latest, macos-latest]

    steps:
      - uses: actions/checkout@v4

      - name: Install Rust
        uses: dtolnay/rust-action@stable

      - name: Build release
        run: cargo build --release

      - name: Upload artifacts
        uses: actions/upload-artifact@v4
        with:
          name: your_app-${{ matrix.os }}
          path: target/release/your_app*

  # 3. 发布到 crates.io(可选)
  publish:
    needs: build
    runs-on: ubuntu-latest
    if: startsWith(github.ref, 'refs/tags/v')

    steps:
      - uses: actions/checkout@v4

      - name: Install Rust
        uses: dtolnay/rust-action@stable

      - name: Publish to crates.io
        env:
          CARGO_REGISTRY_TOKEN: ${{ secrets.CARGO_REGISTRY_TOKEN }}
        run: cargo publish

  # 4. 发布 Docker 镜像
  docker:
    needs: build
    runs-on: ubuntu-latest
    if: startsWith(github.ref, 'refs/tags/v')

    steps:
      - uses: actions/checkout@v4

      - name: Set up Docker Buildx
        uses: docker/setup-buildx-action@v3

      - name: Login to Docker Hub
        uses: docker/login-action@v3
        with:
          username: ${{ secrets.DOCKER_USERNAME }}
          password: ${{ secrets.DOCKER_TOKEN }}

      - name: Build and push
        uses: docker/build-push-action@v5
        with:
          push: true
          tags: yourname/your_app:latest
自动发布 GitHub Release
添加 release 步骤:
  release:
    needs: build
    runs-on: ubuntu-latest
    if: startsWith(github.ref, 'refs/tags/v')

    steps:
      - uses: actions/checkout@v4

      - name: Download all artifacts
        uses: actions/download-artifact@v4

      - name: Create Release
        uses: softprops/action-gh-release@v1
        with:
          files: |
            **/your_app-*
generate_release_notes: true
        env:
          GITHUB_TOKEN: ${{ secrets.GITHUB_TOKEN }}
5. 发布到 crates.io
如果你想发布自己的库:
步骤 1:准备 Cargo.toml
[package]
name = "your_crate_name"
version = "0.1.0"
edition = "2021"
authors = ["Your Name <your.email@example.com>"]
description = "A brief description of your crate"
license = "MIT OR Apache-2.0"
repository = "https://github.com/yourname/your_crate"
homepage = "https://github.com/yourname/your_crate"
documentation = "https://docs.rs/your_crate"
keywords = ["keyword1", "keyword2"]
categories = ["development-tools"]

# 确保这些字段都有值!
步骤 2:添加文档注释
//! # Your Crate
//!
//! A brief description of what your crate does.
//!
//! ## Example
//!
//! ```
//! use your_crate::some_function;
//!
//! let result = some_function();
//! ```

/// Some function documentation
///
/// # Arguments
/// * `arg` - description
///
/// # Returns
/// Returns something
pub fn some_function() -> String {
    todo!()
}
步骤 3:本地测试
# 检查是否能发布
cargo publish --dry-run

# 生成文档测试
cargo test --doc
步骤 4:获取 token 并发布
# 1. 访问 https://crates.io/me
# 2. 创建 API token
# 3. 登录
cargo login <your_token>

# 4. 发布
cargo publish

# 5. 验证
# 访问 https://crates.io/crates/your_crate_name
⚠️ 注意事项:
- 发布后不能删除版本(只能 yank)
- 版本号遵循语义化版本(SemVer)
- 确保代码质量(clippy 无警告)
🐛 常见坑点
坑点 1:动态链接库缺失
问题:
# 在自己电脑上能运行
./your_app

# 换台电脑:
./your_app: error while loading shared libraries: libssl.so.1.1: cannot open shared object file
解决:
# 方法 1:静态链接(用 musl)
rustup target add x86_64-unknown-linux-musl
cargo build --release --target x86_64-unknown-linux-musl

# 方法 2:用 Docker 部署
# 方法 3:把依赖库一起打包
坑点 2:路径问题
问题:
// 开发时
let config = std::fs::read_to_string("config.toml")?;

// 部署后:File not found
解决:
// 用环境变量
let config_path = std::env::var("CONFIG_PATH")
    .unwrap_or_else(|_| "config.toml".to_string());

// 用可执行文件所在目录
use std::path::PathBuf;

fn get_config_path() -> PathBuf {
    let exe_dir = std::env::current_exe()
        .unwrap()
        .parent()
        .unwrap()
        .to_path_buf();
    exe_dir.join("config.toml")
}
坑点 3:权限问题
问题:
# Linux 上运行报错
./your_app: Permission denied
解决:
chmod +x your_app
坑点 4:CI/CD 配置错误
问题: YAML 缩进错误、密钥配置错误
解决:
- 用 YAML 验证工具检查语法
- 在 GitHub Settings 里正确配置 Secrets
- 先用简单配置测试,再逐步复杂化
🎯 实战案例
案例:完整发布一个 CLI 工具
项目结构:
my_cli_tool/
├── Cargo.toml
├── src/
│   └── main.rs
├── .github/
│   └── workflows/
│       └── ci.yml
├── Dockerfile
├── README.md
└── release.sh
release.sh(一键发布脚本):
#!/bin/bash

set -e

VERSION="1.0.0"
APP_NAME="my_cli_tool"

echo "🚀 开始发布 $VERSION"

# 1. 运行测试
echo "📝 运行测试..."
cargo test

# 2. 代码质量检查
echo "🔍 代码检查..."
cargo clippy -- -D warnings
cargo fmt --check

# 3. 多平台编译
echo "🔨 编译多平台版本..."

# Linux
cargo build --release --target x86_64-unknown-linux-musl
cp target/x86_64-unknown-linux-musl/release/$APP_NAME release/$APP_NAME-linux-x86_64

# Mac
cargo build --release
cp target/release/$APP_NAME release/$APP_NAME-macos-x86_64

# Windows
cargo build --release --target x86_64-pc-windows-msvc
cp target/x86_64-pc-windows-msvc/release/$APP_NAME.exe release/$APP_NAME-windows-x86_64.exe

# 4. 打包
echo "📦 打包..."
cd release
tar -czvf $APP_NAME-linux-x86_64.tar.gz $APP_NAME-linux-x86_64
zip $APP_NAME-macos-x86_64.zip $APP_NAME-macos-x86_64
zip $APP_NAME-windows-x86_64.zip $APP_NAME-windows-x86_64.exe

# 5. 创建 Git tag
echo "🏷️  创建 Git tag..."
cd ..
git tag -a "v$VERSION" -m "Release version $VERSION"
git push origin "v$VERSION"

echo "✅ 发布完成!"
echo "📍 产物在 release/ 目录"
echo "🌐 记得在 GitHub 创建 Release"
使用:
chmod +x release.sh
./release.sh
🧠 思维导图
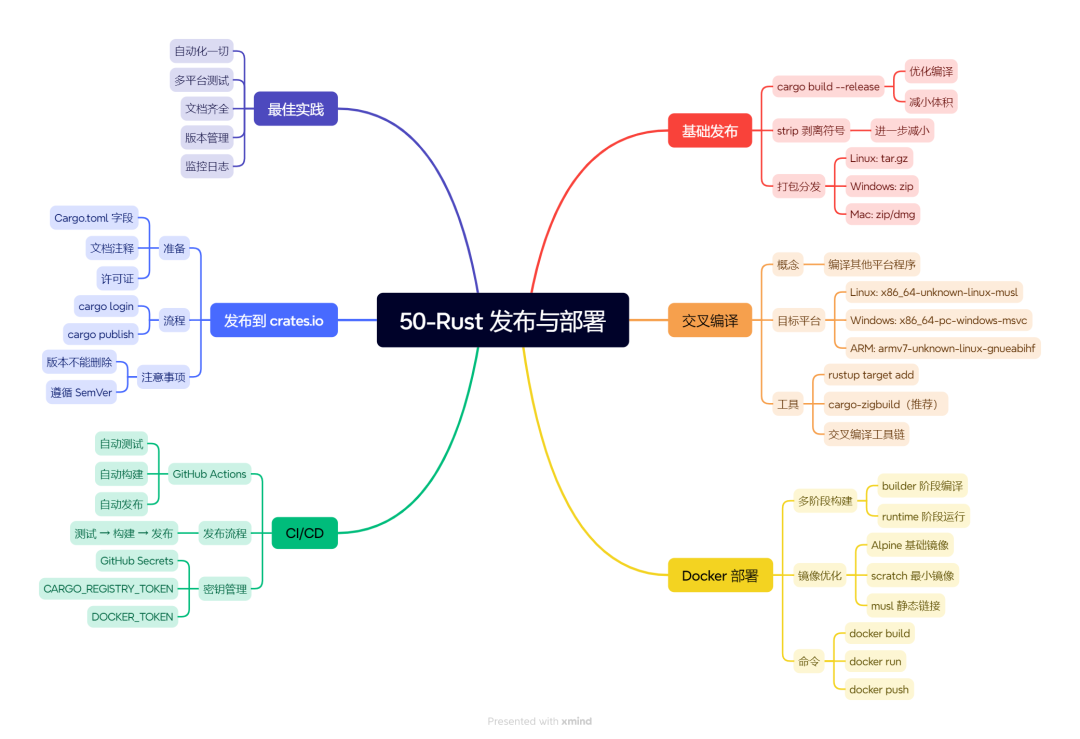
50-Rust 发布与部署
📝 小结
核心要点:
- Release 模式发布 - 别用 debug 模式给用户
- 交叉编译多平台 - 让不同系统用户都能用
- Docker 简化部署 - 一次构建,到处运行
- CI/CD 自动化 - 解放双手,减少人为错误
- crates.io 分享 - 开源精神,回馈社区
金句时间:
"代码写完了只是开始,让用户用上才是终点。" "好的部署流程让你忘记部署的存在。"
🎉 50 篇教程完结!
恭喜你完成了整个 Rust 教程系列! 🎊
学习路线回顾
入门基础(1-10)
  ↓
核心概念(11-20)
  ↓
内存与类型(21-28)
  ↓
并发与异步(29-34)
  ↓
高级主题(35-38)
  ↓
实战项目(39-46)
  ↓
生态实践(47-50)✅
接下来学什么?
🎯 进阶方向:
- 深入某个领域
- Web 开发:Axum/Actix + 数据库
- 系统编程:操作系统、驱动开发
- 嵌入式:STM32、ESP32
- 区块链:Solana、Substrate
- 阅读优秀源码
- Rust 标准库
- Tokio
- Serde
- 你喜欢的任何 crate
- 参与开源
- 给喜欢的项目提 PR
- 修复文档错别字也是贡献
- 发布自己的 crate
- 持续学习
- 关注 Rust 官方博客
- 看 RustConf 演讲
- 加入 Rust 社区(Discord、论坛)
💡 最后的建议:
"学 Rust 不是为了记住所有语法,而是为了理解背后的思想。" "所有权、借用、生命周期——这些概念会改变你写代码的方式,即使你以后写其他语言。" "保持好奇,保持耐心,保持 coding!"
🔗 参考资料
- Rust 官方部署指南
- 交叉编译维基
- Docker 最佳实践
- GitHub Actions 文档
- crates.io 发布指南
本文参与 腾讯云自媒体同步曝光计划,分享自微信公众号。
原始发表:2026-06-29,如有侵权请联系 cloudcommunity@tencent.com 删除
目录
腾讯云开发者

Copyright © 2013 - 2026 Tencent Cloud. All Rights Reserved. 腾讯云 版权所有
深圳市腾讯计算机系统有限公司 ICP备案/许可证号:粤B2-20090059  粤公网安备44030502008569号
腾讯云计算(北京)有限责任公司 京ICP证150476号 | 京ICP备11018762号