
Android : autoSize of EditText不工作
在我当前的项目中,有一个带有固定layout_width和layout_height的layout_height,称为exercise,它是通过编程向下展开的:One line of text (String) + "\n"被添加到EditText中。
有时,添加到EditText中的行(我们称之为元素)太长,无法适应对象的全部宽度,因此它被分割成一个新的行。问题是,我希望调整exercise中的行的文本大小以适应EditText的宽度,或者在每一行(元素)之间有一个清晰的可见距离,但是由于不适合exercise的宽度,所以不能在换行线内。
因此,我搜索了尽可能多的内容,并尝试了我今天能找到的所有可能的解决方案。我试过的是:
使用EditText作为对象,使用android:autoSizeTextType="uniform" &android:inputType="textMultiLine|textCapSentences"作为属性,或者使用androidx.appcompat.widget.AppCompatEditText,附带属性app:autoSizeMaxTextSize="28sp"、app:autoSizeMinTextSize="8sp"和app:autoSizeStepGranularity="1sp" (与仅支持API 26的设备一起使用)
- 使用其他类型的文本objects
- using
lineSpacingExtra插入一些间距。不幸的是,这也插入了包装/拆分行之间的间距,因此通过在EditText中包装的原始元素的行也有间距。
那就是我现在的处境。当编辑文本的宽度太宽时,我无法自动缩小文本大小。
如果需要的话,我可以提供完整的XML。
我很感激任何能帮上忙的暗示。提前感谢!
回答 2
Stack Overflow用户
发布于 2022-07-20 18:49:39
下面是一个非常基本的RecyclerView实现(使用视图绑定,如果您不熟悉视图绑定,请告诉我--您只需findViewById所有内容):
class MainFragment : Fragment(R.layout.fragment_main) {

    lateinit var binding: FragmentMainBinding

    override fun onViewCreated(view: View, savedInstanceState: Bundle?) {
        super.onViewCreated(view, savedInstanceState)
        binding = FragmentMainBinding.bind(view)
        with(binding) {
            val adapter = MyAdapter()
            recyclerView.adapter = adapter
            recyclerView.layoutManager = LinearLayoutManager(requireContext())

            addButton.setOnClickListener {
                val item = textEntry.text.toString()
                if (item.isNotBlank()) {
                    adapter.addItem(item)
                    textEntry.text.clear()
                }
            }
        }
    }


}

class MyAdapter : RecyclerView.Adapter<MyAdapter.ViewHolder>() {

    private var data: List<String> = emptyList()

    fun addItem(item: String) {
        data = data + item
        notifyItemInserted(data.lastIndex)
    }

    override fun onCreateViewHolder(parent: ViewGroup, viewType: Int): ViewHolder {
        val view = ItemViewBinding.inflate(LayoutInflater.from(parent.context), parent, false)
        return ViewHolder(view)
    }

    override fun onBindViewHolder(holder: ViewHolder, position: Int) {
        holder.binding.textView.text = data[position]
    }

    override fun getItemCount(): Int = data.size

    class ViewHolder(val binding: ItemViewBinding) : RecyclerView.ViewHolder(binding.root)
}fragment_main.xml
<?xml version="1.0" encoding="utf-8"?>
<androidx.constraintlayout.widget.ConstraintLayout xmlns:android="http://schemas.android.com/apk/res/android"
android:layout_width="match_parent"
android:layout_height="match_parent"
xmlns:app="http://schemas.android.com/apk/res-auto"
android:orientation="vertical"
android:gravity="center"
android:padding="10dp">
<androidx.recyclerview.widget.RecyclerView
android:id="@+id/recyclerView"
android:layout_width="match_parent"
android:layout_height="0dp"
android:layout_marginBottom="8dp"
app:layout_constraintTop_toTopOf="parent"
app:layout_constraintBottom_toTopOf="@id/textEntry"
/>
<EditText
android:id="@+id/textEntry"
android:layout_width="0dp"
android:layout_height="wrap_content"
android:singleLine="true"
app:layout_constraintBottom_toBottomOf="parent"
app:layout_constraintStart_toStartOf="parent"
app:layout_constraintEnd_toStartOf="@id/addButton"
/>
<Button
android:id="@+id/addButton"
android:text="ADD"
android:layout_width="wrap_content"
android:layout_height="wrap_content"
app:layout_constraintBottom_toBottomOf="parent"
app:layout_constraintEnd_toEndOf="parent"
/>
</androidx.constraintlayout.widget.ConstraintLayout>item_view.xml
<?xml version="1.0" encoding="utf-8"?>
<FrameLayout
xmlns:android="http://schemas.android.com/apk/res/android"
xmlns:app="http://schemas.android.com/apk/res-auto"
android:layout_width="match_parent"
android:layout_height="wrap_content"
android:paddingHorizontal="16dp"
>
<TextView
android:id="@+id/textView"
app:autoSizeTextType="uniform"
android:layout_width="match_parent"
android:layout_height="48sp"
android:maxLines="1"
android:gravity="center_vertical"
/>
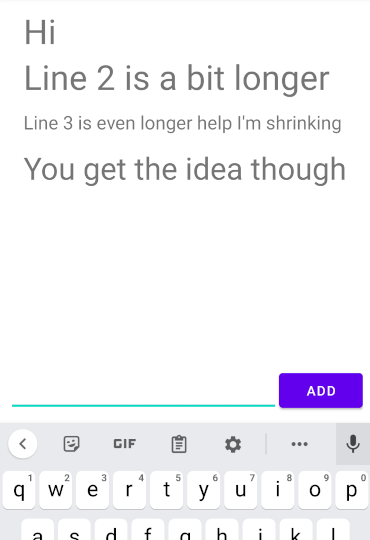
</FrameLayout>这很简单--您有一个文本输入字段和一个按钮,可以将内容添加为新行。该按钮将内容传递给适配器上的addItem,后者将其附加到data中的行列表中。RecyclerView只显示data中的所有项,使用具有自动调整大小的TextView的ViewHolder布局来缩放每个项目。
理想情况下,您希望以某种方式持久化data (例如,Add按钮将新数据传递给ViewModel,以某种方式存储它,更新适配器具有observed的当前列表,以便每当发生更改时它都会更新)--我只是把它作为概念的基本证明。此外,如果单独保存单独的项目,则更容易存储它们--如果您真的想要的话,可以通过将它们连接到一个字符串来序列化它们!但一般来说你不会想那样做的
编辑--由于您在setTypeface方面遇到了麻烦,这就是全部:
override fun onBindViewHolder(holder: ViewHolder, position: Int) {
    with(holder.binding.textView) {
        val styled = position % 2 == 0
        text = data[position]
        setTypeface(typeface, if (styled) Typeface.BOLD else Typeface.NORMAL)
        setTextColor(if (styled) Color.RED else Color.BLACK)
    }
}
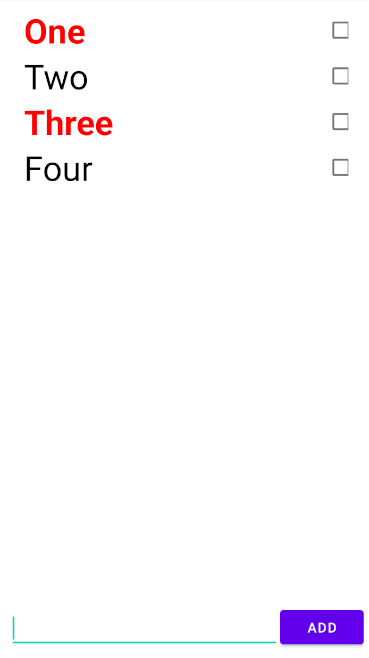
逻辑只不过是用不同的方式设计替代项,但希望您能理解。您将根据给定项的内容来决定如何对其进行样式设置,然后通过适当设置属性来应用该样式。它总是一个“如果这个是真做A,否则做B”的情况,所以您总是以某种方式设置属性。您从未将其设置为一种情况,因为如果不是这种情况,则会显示旧状态。
这比较复杂,但您也可以为不同类型的项目创建不同的ViewHolder(有它们自己的XML布局)。因此,与其拥有一个必须处理所有内容的单一ViewHolder,还必须根据所显示的项目类型重新配置onBindViewHolder中的所有样式,您只需使用不同样式、不同布局的不同ViewHolder:
// creating a sealed class so we can say our adapter handles a MyViewHolder type,
// and we can have a specific set of possible subclasses of that
sealed class MyViewHolder(view: View) : RecyclerView.ViewHolder(view)
class HeaderViewHolder(val binding: HeaderItemBinding) : MyViewHolder(binding.root)
class ItemViewHolder(val binding: ItemViewBinding) : MyViewHolder(binding.root)

// the Adapter now uses the MyViewHolder type (which as above, covers a couple of different
// ViewHolder classes we're using)
class MyAdapter : RecyclerView.Adapter<MyViewHolder>() {

    private var data: List<String> = emptyList()

    fun addItem(item: String) {
        data = data + item
        notifyItemInserted(data.lastIndex)
    }

    // some identifiers for the different ViewHolder types we're using
    private val HEADER_TYPE = 0
    private val ITEM_TYPE = 1

    override fun getItemViewType(position: Int): Int {
        // Work out what kind of ViewHolder the item in this position should display in.
        // This gets passed to onCreateViewHolder, where you create the appropriate type,
        // and that type of ViewHolder is what gets passed into onBindViewHolder for this position
        return if (data[position].startsWith("Section")) HEADER_TYPE else ITEM_TYPE
    }

    override fun onCreateViewHolder(parent: ViewGroup, viewType: Int): MyViewHolder {
        val inflater = LayoutInflater.from(parent.context)
        // creating the appropriate ViewHolder instance depending on the type requested
        return when(viewType) {
            HEADER_TYPE -> HeaderViewHolder(HeaderItemBinding.inflate(inflater, parent, false))
            ITEM_TYPE -> ItemViewHolder(ItemViewBinding.inflate(inflater, parent, false))
            else -> throw RuntimeException("Unhanded view type!")
        }
    }

    override fun onBindViewHolder(holder: MyViewHolder, position: Int) {
        // The type of MyViewHolder passed in here depends on what getItemViewType returns
        // for this position - binding is a different type in each case,
        // because it's been generated from different layouts
        when(holder) {
            is HeaderViewHolder -> holder.binding.textView.text = data[position]
            is ItemViewHolder -> holder.binding.textView.text = data[position]
        }
    }

    override fun getItemCount(): Int = data.size

}
(你可以比这更聪明一些,但只是为了说明一般的想法!)
它使用的是和以前一样的item_view.xml,以及一个header_item.xml变体(但实际上可以有任何东西,它们是完全独立的布局,完全独立的ViewHolder):
header_item.xml

<?xml version="1.0" encoding="utf-8"?>
<LinearLayout
    xmlns:android="http://schemas.android.com/apk/res/android"
    xmlns:app="http://schemas.android.com/apk/res-auto"
    android:layout_width="match_parent"
    android:layout_height="wrap_content"
    android:paddingHorizontal="16dp"
    >
    <TextView
        android:id="@+id/textView"
        app:autoSizeTextType="uniform"
        android:layout_width="match_parent"
        android:layout_height="48sp"
        android:layout_weight="1"
        android:textStyle="bold"
        android:textColor="#DD1100"
        android:maxLines="1"
        android:gravity="center_vertical"
        />

</LinearLayout>
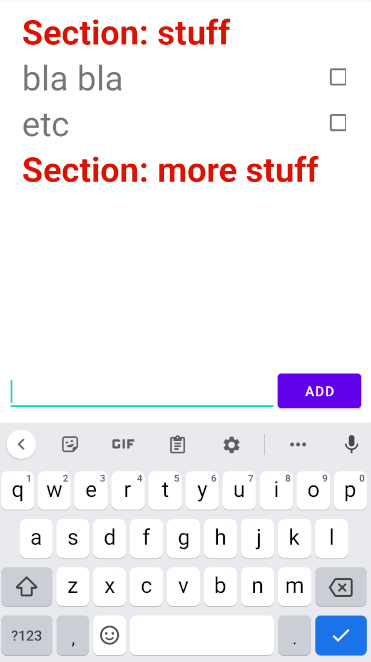
因此,不必在代码中“重新设计”一个ViewHolder来在不同的项目类型和样式之间来回切换,您只需使用两种不同样式的布局即可。这是一个更多的工作设置,但它可以更整洁,更灵活,当你有完全独立的东西-特别是如果你想给他们不同的功能。这取决于它对您是否值得,或者您是否乐于拥有一个ViewHolder,并在代码中重新调整样式、隐藏或显示元素等等。
Stack Overflow用户
发布于 2022-07-19 15:45:02
你可以试试这样的东西
if(et.getText().length()>10) {
et.setTextSize(newValue)https://stackoverflow.com/questions/73039770
复制相似问题
腾讯云开发者

Copyright © 2013 - 2026 Tencent Cloud. All Rights Reserved. 腾讯云 版权所有
深圳市腾讯计算机系统有限公司 ICP备案/许可证号:粤B2-20090059 ![]() 粤公网安备44030502008569号
粤公网安备44030502008569号
腾讯云计算(北京)有限责任公司 京ICP证150476号 | 京ICP备11018762号