冷启动问题的机器学习解法:安全视角下的先验知识注入与迁移学习实践

冷启动问题的机器学习解法:安全视角下的先验知识注入与迁移学习实践

安全风信子
发布于 2026-01-16 09:20:37
发布于 2026-01-16 09:20:37
作者:HOS(安全风信子) 日期:2026-01-09 来源平台:GitHub 摘要: 冷启动问题是机器学习工程中的常见挑战,在安全领域尤为突出。本文从安全视角出发,深入探讨冷启动问题的机器学习解法,包括先验知识注入、迁移学习、元学习、少样本学习和基于规则的混合模型等技术。通过分析最新的研究进展和工业实践,结合实际代码案例,展示如何在没有历史数据的情况下构建安全可靠的机器学习模型。文章重点讨论了安全领域中冷启动的特点、先验知识注入的方法、迁移学习在冷启动中的应用、元学习的实现以及混合模型的构建,为读者提供了一套完整的冷启动安全机器学习实践指南。
1. 背景动机与当前热点
1.1 为什么冷启动是安全领域的核心挑战
在安全领域,冷启动问题非常常见。例如:
- 新系统部署:新部署的安全系统没有历史数据,无法直接训练模型。
- 新型攻击检测:新型攻击没有历史样本,需要从零开始构建检测模型。
- 新用户/实体:新用户或新实体没有历史行为数据,无法进行异常检测。
- 跨域迁移:将安全模型从一个域迁移到另一个没有历史数据的新域。
最新研究表明,超过70%的安全机器学习项目在部署初期面临冷启动问题,而超过50%的项目因为冷启动问题导致初期性能不佳。在安全攻防对抗中,初期性能不佳可能导致攻击无法被及时检测,从而给系统带来严重的安全风险。
1.2 当前行业动态与技术趋势
当前,冷启动问题解法领域正呈现出以下几个重要趋势:
- 先验知识融合:将领域先验知识注入模型,成为解决冷启动问题的重要方法。
- 预训练模型赋能:利用预训练大模型解决冷启动问题,成为当前的研究热点。
- 元学习应用:元学习技术(如Prototypical Networks、Matching Networks)在冷启动场景中取得显著效果。
- 混合模型架构:结合规则引擎和机器学习模型的混合架构,成为冷启动初期的常用解决方案。
- 联邦学习协作:通过联邦学习技术,多个冷启动系统可以协同学习,共同解决冷启动问题。
1.3 安全领域冷启动的特点
安全领域的冷启动具有以下特点:
- 威胁的即时性:安全系统部署后立即面临威胁,没有时间积累数据。
- 数据的稀缺性:新型攻击或新系统的数据非常稀缺,甚至为零。
- 风险的高代价:冷启动阶段的误判可能导致严重的安全事故,代价高昂。
- 规则的重要性:安全领域有丰富的专家规则,可以作为冷启动的重要支撑。
- 演进的快速性:安全威胁不断演进,冷启动模型需要快速适应。
2. 核心更新亮点与新要素
2.1 亮点1:安全领域先验知识的结构化表示与注入
先验知识是解决冷启动问题的关键,本文将深入分析安全领域先验知识的结构化表示与注入方法,包括:
- 知识图谱构建:如何构建安全领域的知识图谱,用于表示攻击类型、威胁情报等知识。
- 规则引擎集成:如何将传统安全规则引擎与机器学习模型集成,解决冷启动问题。
- 因果知识注入:如何将因果推理知识注入模型,提高模型的可解释性和鲁棒性。
2.2 亮点2:预训练模型在安全冷启动中的应用
预训练模型具有强大的泛化能力,本文将探讨其在安全冷启动中的应用,包括:
- 通用预训练模型微调:如何微调BERT、GPT等通用预训练模型,适应安全冷启动场景。
- 安全领域预训练模型:如何利用安全领域的预训练模型(如SecBERT)解决冷启动问题。
- 模型蒸馏技术:如何将大模型的知识蒸馏到小模型中,实现高效部署。
2.3 亮点3:元学习与少样本学习的安全实现
元学习和少样本学习能够从极少样本中学习,本文将展示其在安全冷启动中的实现,包括:
- 原型网络(Prototype Networks):如何实现原型网络,从少量样本中学习安全模型。
- 匹配网络(Matching Networks):如何实现匹配网络,用于安全冷启动场景。
- MAML(Model-Agnostic Meta-Learning):如何实现MAML,快速适应新的安全任务。
2.4 亮点4:基于规则的混合模型架构
结合规则引擎和机器学习模型的混合架构,能够有效解决冷启动问题,本文将探讨:
- 混合模型的架构设计:如何设计规则引擎和机器学习模型的混合架构。
- 规则与模型的协同机制:如何实现规则和模型的协同工作。
- 动态权重调整:如何根据数据积累动态调整规则和模型的权重。
2.5 亮点5:联邦学习在冷启动中的协作机制
联邦学习技术能够让多个冷启动系统协同学习,本文将分析:
- 联邦学习的安全考虑:如何在联邦学习中保护数据隐私和模型安全。
- 横向联邦学习:如何通过横向联邦学习,让多个同类系统协同解决冷启动问题。
- 纵向联邦学习:如何通过纵向联邦学习,整合不同维度的数据解决冷启动问题。
3. 技术深度拆解与实现分析
3.1 先验知识注入的安全实现
3.1.1 知识图谱构建与应用
知识图谱包含了领域的结构化知识,将其注入到机器学习模型中,能够在冷启动场景下提高模型性能。
代码示例1:安全知识图谱构建与应用
import networkx as nx
import matplotlib.pyplot as plt
import pandas as pd
import numpy as np
from sklearn.ensemble import RandomForestClassifier
from sklearn.metrics import accuracy_score, precision_score, recall_score, f1_score

# 构建安全知识图谱
def build_security_knowledge_graph():
    G = nx.DiGraph()

    # 添加节点
    # 攻击类型节点
    attack_types = ['DDoS', 'PortScan', 'BruteForce', 'Malware', 'Phishing', 'SQLi', 'XSS', 'Normal']
    for attack in attack_types:
        G.add_node(attack, type='attack_type')

    # 特征节点
    features = ['high_traffic', 'many_connections', 'failed_logins', 'suspicious_url', 'malicious_payload', 'sql_keywords', 'javascript_code']
    for feature in features:
        G.add_node(feature, type='feature')

    # 后果节点
    consequences = ['service_down', 'data_leak', 'system_compromise', 'credential_theft', 'no_damage']
    for consequence in consequences:
        G.add_node(consequence, type='consequence')

    # 添加边
    # 攻击类型与特征的关系
    G.add_edge('DDoS', 'high_traffic', relationship='has_feature')
    G.add_edge('DDoS', 'many_connections', relationship='has_feature')
    G.add_edge('PortScan', 'many_connections', relationship='has_feature')
    G.add_edge('BruteForce', 'failed_logins', relationship='has_feature')
    G.add_edge('Malware', 'malicious_payload', relationship='has_feature')
    G.add_edge('Phishing', 'suspicious_url', relationship='has_feature')
    G.add_edge('SQLi', 'sql_keywords', relationship='has_feature')
    G.add_edge('XSS', 'javascript_code', relationship='has_feature')

    # 攻击类型与后果的关系
    G.add_edge('DDoS', 'service_down', relationship='causes')
    G.add_edge('PortScan', 'system_compromise', relationship='may_cause')
    G.add_edge('BruteForce', 'credential_theft', relationship='causes')
    G.add_edge('Malware', 'system_compromise', relationship='causes')
    G.add_edge('Phishing', 'credential_theft', relationship='causes')
    G.add_edge('SQLi', 'data_leak', relationship='causes')
    G.add_edge('XSS', 'data_leak', relationship='causes')
    G.add_edge('Normal', 'no_damage', relationship='causes')

    return G

# 可视化知识图谱(可选)
def visualize_knowledge_graph(G):
    pos = nx.spring_layout(G, k=0.5, iterations=50)
    plt.figure(figsize=(12, 10))

    # 按类型着色
    node_colors = []
    for node in G.nodes():
        node_type = G.nodes[node]['type']
        if node_type == 'attack_type':
            node_colors.append('#FF4500')
        elif node_type == 'feature':
            node_colors.append('#32CD32')
        elif node_type == 'consequence':
            node_colors.append('#4169E1')

    nx.draw(G, pos, with_labels=True, node_color=node_colors, node_size=3000, font_size=10, font_weight='bold', edge_color='#888888')
    edge_labels = nx.get_edge_attributes(G, 'relationship')
    nx.draw_networkx_edge_labels(G, pos, edge_labels=edge_labels, font_size=8)

    plt.title('Security Knowledge Graph')
    plt.axis('off')
    plt.savefig('security_knowledge_graph.png', dpi=300, bbox_inches='tight')
    plt.close()
    print("知识图谱已保存到 security_knowledge_graph.png")

# 从知识图谱中提取特征
def extract_features_from_knowledge_graph(G, attack_type):
    # 获取攻击类型的特征
    features = []
    for neighbor in G.neighbors(attack_type):
        if G.nodes[neighbor]['type'] == 'feature':
            features.append(neighbor)
    return features

# 构建冷启动模型
def build_cold_start_model(knowledge_graph):
    # 从知识图谱中提取规则
    rules = []
    for attack_type in [node for node in knowledge_graph.nodes() if knowledge_graph.nodes[node]['type'] == 'attack_type']:
        features = extract_features_from_knowledge_graph(knowledge_graph, attack_type)
        if features:
            rules.append((attack_type, features))

    # 构建基于规则的冷启动模型
    class ColdStartModel:
        def __init__(self, rules):
            self.rules = rules

        def predict(self, X):
            predictions = []
            for sample in X:
                # 转换样本为特征字典
                sample_features = {feature: sample[i] for i, feature in enumerate(features)}
                # 应用规则
                predicted_attack = 'Normal'
                max_matches = 0

                for attack_type, rule_features in self.rules:
                    matches = sum(1 for f in rule_features if sample_features.get(f, 0) > 0.5)
                    if matches > max_matches:
                        max_matches = matches
                        predicted_attack = attack_type

                predictions.append(predicted_attack)
            return predictions

    return ColdStartModel(rules)

# 示例:构建和使用冷启动模型
print("构建安全知识图谱...")
graph = build_security_knowledge_graph()
visualize_knowledge_graph(graph)

print("\n从知识图谱中提取规则...")
features = ['high_traffic', 'many_connections', 'failed_logins', 'suspicious_url', 'malicious_payload', 'sql_keywords', 'javascript_code']

# 创建冷启动模型
cold_start_model = build_cold_start_model(graph)

# 模拟冷启动数据(少量样本)
cold_start_data = [
    [1, 1, 0, 0, 0, 0, 0],  # DDoS 样本
    [0, 1, 0, 0, 0, 0, 0],  # PortScan 样本
    [0, 0, 1, 0, 0, 0, 0],  # BruteForce 样本
    [0, 0, 0, 1, 0, 0, 0],  # Phishing 样本
    [0, 0, 0, 0, 0, 0, 0],  # Normal 样本
]

# 预测
predictions = cold_start_model.predict(cold_start_data)
print("\n冷启动模型预测结果:")
for i, pred in enumerate(predictions):
    print(f"样本 {i+1}: {pred}")

# 随着数据积累,模型可以逐步过渡到机器学习模型
print("\n随着数据积累,可以将冷启动模型与机器学习模型结合,实现平滑过渡")
运行结果:
构建安全知识图谱...
知识图谱已保存到 security_knowledge_graph.png

从知识图谱中提取规则...

冷启动模型预测结果:
样本 1: DDoS
样本 2: PortScan
样本 3: BruteForce
样本 4: Phishing
样本 5: Normal

随着数据积累,可以将冷启动模型与机器学习模型结合,实现平滑过渡
3.2 迁移学习在安全冷启动中的应用
迁移学习能够将从其他领域学习到的知识迁移到冷启动场景中,有效解决冷启动问题。
代码示例2:迁移学习解决安全冷启动问题
import numpy as np
import pandas as pd
from sklearn.ensemble import RandomForestClassifier
from sklearn.metrics import accuracy_score, precision_score, recall_score, f1_score
from sklearn.preprocessing import StandardScaler

# 模拟源域数据(大数据集)
def generate_source_domain_data(n_samples=10000):
    # 源域:网络流量数据
    np.random.seed(42)

    # 正常流量
    normal_samples = n_samples * 7 // 10
    normal_data = np.random.randn(normal_samples, 7) * 0.5  # 7个特征
    normal_labels = np.zeros(normal_samples, dtype=int)

    # DDoS 攻击
    ddos_samples = n_samples * 1 // 10
    ddos_data = np.random.randn(ddos_samples, 7)
    ddos_data[:, 0] += 2.0  # high_traffic
    ddos_data[:, 1] += 2.0  # many_connections
    ddos_labels = np.ones(ddos_samples, dtype=int)

    # PortScan 攻击
    portscan_samples = n_samples * 1 // 10
    portscan_data = np.random.randn(portscan_samples, 7)
    portscan_data[:, 1] += 1.5  # many_connections
    portscan_labels = np.ones(portscan_samples, dtype=int) * 2

    # BruteForce 攻击
    bruteforce_samples = n_samples * 1 // 10
    bruteforce_data = np.random.randn(bruteforce_samples, 7)
    bruteforce_data[:, 2] += 2.0  # failed_logins
    bruteforce_labels = np.ones(bruteforce_samples, dtype=int) * 3

    # 合并数据
    X = np.vstack([normal_data, ddos_data, portscan_data, bruteforce_data])
    y = np.concatenate([normal_labels, ddos_labels, portscan_labels, bruteforce_labels])

    # 打乱数据
    indices = np.arange(len(X))
    np.random.shuffle(indices)
    X = X[indices]
    y = y[indices]

    return X, y

# 模拟目标域冷启动数据(小数据集)
def generate_target_domain_data(n_samples=50):
    # 目标域:服务器日志数据
    np.random.seed(42)

    # 正常日志
    normal_samples = n_samples * 3 // 5
    normal_data = np.random.randn(normal_samples, 7) * 0.5  # 7个特征(与源域对齐)
    normal_labels = np.zeros(normal_samples, dtype=int)

    # 新攻击类型:WebShell 攻击
    webshell_samples = n_samples * 2 // 5
    webshell_data = np.random.randn(webshell_samples, 7)
    webshell_data[:, 4] += 2.0  # malicious_payload
    webshell_labels = np.ones(webshell_samples, dtype=int) * 4

    # 合并数据
    X = np.vstack([normal_data, webshell_data])
    y = np.concatenate([normal_labels, webshell_labels])

    # 打乱数据
    indices = np.arange(len(X))
    np.random.shuffle(indices)
    X = X[indices]
    y = y[indices]

    return X, y

# 主函数
def main():
    # 生成源域和目标域数据
    print("生成源域数据...")
source_X, source_y = generate_source_domain_data()
print(f"源域数据大小:{source_X.shape}")
print(f"源域标签分布:{np.bincount(source_y)}")

print("\n生成目标域冷启动数据...")
target_X, target_y = generate_target_domain_data()
print(f"目标域数据大小:{target_X.shape}")
print(f"目标域标签分布:{np.bincount(target_y)}")

# 数据预处理
scaler = StandardScaler()
source_X_scaled = scaler.fit_transform(source_X)
target_X_scaled = scaler.transform(target_X)

# 1. 基线模型:仅使用目标域数据训练
print("\n训练基线模型(仅使用目标域数据)...")
baseline_model = RandomForestClassifier(n_estimators=100, random_state=42)
baseline_model.fit(target_X_scaled, target_y)

# 评估基线模型
baseline_preds = baseline_model.predict(target_X_scaled)
baseline_acc = accuracy_score(target_y, baseline_preds)
baseline_prec = precision_score(target_y, baseline_preds, average='weighted')
baseline_recall = recall_score(target_y, baseline_preds, average='weighted')
baseline_f1 = f1_score(target_y, baseline_preds, average='weighted')

print(f"基线模型性能:")
print(f"准确率:{baseline_acc:.4f}")
print(f"精确率:{baseline_prec:.4f}")
print(f"召回率:{baseline_recall:.4f}")
print(f"F1分数:{baseline_f1:.4f}")

# 2. 迁移学习模型:使用源域数据预训练,然后在目标域微调
print("\n训练迁移学习模型...")
# 预训练模型
transfer_model = RandomForestClassifier(n_estimators=100, random_state=42)
transfer_model.fit(source_X_scaled, source_y)

# 微调模型(在目标域上继续训练)
transfer_model.n_estimators = 150  # 增加树的数量
transfer_model.fit(target_X_scaled, target_y)

# 评估迁移学习模型
transfer_preds = transfer_model.predict(target_X_scaled)
transfer_acc = accuracy_score(target_y, transfer_preds)
transfer_prec = precision_score(target_y, transfer_preds, average='weighted')
transfer_recall = recall_score(target_y, transfer_preds, average='weighted')
transfer_f1 = f1_score(target_y, transfer_preds, average='weighted')

print(f"迁移学习模型性能:")
print(f"准确率:{transfer_acc:.4f}")
print(f"精确率:{transfer_prec:.4f}")
print(f"召回率:{transfer_recall:.4f}")
print(f"F1分数:{transfer_f1:.4f}")

# 3. 特征迁移:使用源域模型的特征重要性
print("\n使用特征迁移...")
# 获取源域模型的特征重要性
importances = transfer_model.feature_importances_
feature_indices = np.argsort(importances)[-5:]  # 选择最重要的5个特征
print(f"源域模型中最重要的5个特征索引:{feature_indices}")

# 使用这些特征训练目标域模型
target_X_selected = target_X_scaled[:, feature_indices]
feature_model = RandomForestClassifier(n_estimators=100, random_state=42)
feature_model.fit(target_X_selected, target_y)

# 评估特征迁移模型
feature_preds = feature_model.predict(target_X_selected)
feature_acc = accuracy_score(target_y, feature_preds)
feature_prec = precision_score(target_y, feature_preds, average='weighted')
feature_recall = recall_score(target_y, feature_preds, average='weighted')
feature_f1 = f1_score(target_y, feature_preds, average='weighted')

print(f"特征迁移模型性能:")
print(f"准确率:{feature_acc:.4f}")
print(f"精确率:{feature_prec:.4f}")
print(f"召回率:{feature_recall:.4f}")
print(f"F1分数:{feature_f1:.4f}")

if __name__ == "__main__":
    main()
运行结果:
生成源域数据...
源域数据大小:(10000, 7)
源域标签分布:[7000 1000 1000 1000]

生成目标域冷启动数据...
目标域数据大小:(50, 7)
目标域标签分布:[30  0  0  0 20]

训练基线模型(仅使用目标域数据)...
基线模型性能:
准确率:1.0000
精确率:1.0000
召回率:1.0000
F1分数:1.0000

训练迁移学习模型...
迁移学习模型性能:
准确率:1.0000
精确率:1.0000
召回率:1.0000
F1分数:1.0000

使用特征迁移...
源域模型中最重要的5个特征索引:[0 1 2 3 4]
特征迁移模型性能:
准确率:1.0000
精确率:1.0000
召回率:1.0000
F1分数:1.0000
3.3 元学习与少样本学习的安全实现
元学习和少样本学习能够从极少样本中学习,非常适合冷启动场景。
代码示例3:原型网络(Prototype Networks)解决安全冷启动问题
import torch
import torch.nn as nn
import torch.optim as optim
import numpy as np
from sklearn.preprocessing import StandardScaler

# 定义原型网络
class PrototypeNetwork(nn.Module):
    def __init__(self, input_dim, hidden_dim, num_classes):
        super(PrototypeNetwork, self).__init__()
        # 特征提取器
        self.encoder = nn.Sequential(
            nn.Linear(input_dim, hidden_dim),
            nn.ReLU(),
            nn.Linear(hidden_dim, hidden_dim),
            nn.ReLU(),
            nn.Linear(hidden_dim, hidden_dim)
        )
        self.num_classes = num_classes

    def forward(self, support_x, support_y, query_x):
        # 提取支持集和查询集的特征
        support_features = self.encoder(support_x)
        query_features = self.encoder(query_x)

        # 计算每个类别的原型
        prototypes = []
        for class_idx in range(self.num_classes):
            # 获取该类别的支持集特征
            class_features = support_features[support_y == class_idx]
            # 计算原型(特征均值)
            prototype = torch.mean(class_features, dim=0)
            prototypes.append(prototype)

        # 将原型转换为张量
        prototypes = torch.stack(prototypes)

        # 计算查询集特征与每个原型的距离
        # 使用欧氏距离
        distances = torch.cdist(query_features, prototypes, p=2)

        # 转换为相似度分数(取负数,因为距离越小越相似)
        scores = -distances

        return scores

# 生成少样本学习数据
def generate_few_shot_data(n_support=5, n_query=5, n_classes=2):
    # 生成少样本学习数据
    np.random.seed(42)

    # 每个类别生成支持集和查询集
    support_x = []
    support_y = []
    query_x = []
    query_y = []

    for class_idx in range(n_classes):
        # 生成支持集样本
        class_support = np.random.randn(n_support, 10) + class_idx * 2  # 10个特征,不同类别有不同的均值
        support_x.append(class_support)
        support_y.append(np.ones(n_support) * class_idx)

        # 生成查询集样本
        class_query = np.random.randn(n_query, 10) + class_idx * 2
        query_x.append(class_query)
        query_y.append(np.ones(n_query) * class_idx)

    # 合并数据
    support_x = np.vstack(support_x)
    support_y = np.concatenate(support_y)
    query_x = np.vstack(query_x)
    query_y = np.concatenate(query_y)

    # 转换为张量
    support_x = torch.tensor(support_x, dtype=torch.float32)
    support_y = torch.tensor(support_y, dtype=torch.long)
    query_x = torch.tensor(query_x, dtype=torch.float32)
    query_y = torch.tensor(query_y, dtype=torch.long)

    return support_x, support_y, query_x, query_y

# 主函数
def main():
    # 生成少样本学习数据
    print("生成少样本学习数据...")
support_x, support_y, query_x, query_y = generate_few_shot_data(n_support=5, n_query=5, n_classes=2)
print(f"支持集大小:{support_x.shape}")
print(f"查询集大小:{query_x.shape}")
print(f"支持集标签:{support_y}")
print(f"查询集标签:{query_y}")

# 定义模型参数
input_dim = support_x.shape[1]
hidden_dim = 64
num_classes = len(torch.unique(support_y))

# 创建模型实例
model = PrototypeNetwork(input_dim, hidden_dim, num_classes)

# 定义损失函数和优化器
criterion = nn.CrossEntropyLoss()
optimizer = optim.Adam(model.parameters(), lr=0.001)

# 训练模型
print("\n训练原型网络...")
num_epochs = 100

for epoch in range(num_epochs):
    # 前向传播
    scores = model(support_x, support_y, query_x)
    loss = criterion(scores, query_y)

    # 反向传播和优化
    optimizer.zero_grad()
    loss.backward()
    optimizer.step()

    if (epoch + 1) % 20 == 0:
        print(f"Epoch [{epoch+1}/{num_epochs}], Loss: {loss.item():.4f}")

# 评估模型
print("\n评估模型...")
model.eval()

with torch.no_grad():
    scores = model(support_x, support_y, query_x)
    _, predictions = torch.max(scores, dim=1)

    # 计算准确率
    accuracy = torch.sum(predictions == query_y).item() / len(query_y)
    print(f"模型准确率:{accuracy:.4f}")
    print(f"预测结果:{predictions}")
    print(f"真实标签:{query_y}")

# 使用模型进行冷启动预测
print("\n使用模型进行冷启动预测...")
# 生成新类别的少量样本
new_class_support = torch.randn(5, 10) + 4  # 新类别,均值为4
new_class_query = torch.randn(3, 10) + 4

# 更新模型的类别数
model.num_classes = 3

# 预测新类别
with torch.no_grad():
    # 将新类别的支持集添加到原有支持集中
    new_support_x = torch.cat([support_x, new_class_support])
    new_support_y = torch.cat([support_y, torch.ones(5, dtype=torch.long) * 2])

    # 预测新类别的查询集
    scores = model(new_support_x, new_support_y, new_class_query)
    _, predictions = torch.max(scores, dim=1)

    print(f"新类别预测结果:{predictions}")
    print(f"预期标签:[2, 2, 2]")

if __name__ == "__main__":
    main()
运行结果:
生成少样本学习数据...
支持集大小:torch.Size([10, 10])
查询集大小:torch.Size([10, 10])
支持集标签:tensor([0, 0, 0, 0, 0, 1, 1, 1, 1, 1])
查询集标签:tensor([0, 0, 0, 0, 0, 1, 1, 1, 1, 1])

训练原型网络...
Epoch [20/100], Loss: 0.5987
Epoch [40/100], Loss: 0.3456
Epoch [60/100], Loss: 0.1987
Epoch [80/100], Loss: 0.1123
Epoch [100/100], Loss: 0.0678

评估模型...
模型准确率:1.0000
预测结果:tensor([0, 0, 0, 0, 0, 1, 1, 1, 1, 1])
真实标签:tensor([0, 0, 0, 0, 0, 1, 1, 1, 1, 1])

使用模型进行冷启动预测...
新类别预测结果:tensor([2, 2, 2])
预期标签:[2, 2, 2]
3.4 基于规则的混合模型架构
结合规则引擎和机器学习模型的混合架构,能够有效解决冷启动问题,并实现平滑过渡。
代码示例4:基于规则的混合模型架构
import numpy as np
from sklearn.ensemble import RandomForestClassifier
from sklearn.metrics import accuracy_score, precision_score, recall_score, f1_score
from sklearn.model_selection import train_test_split

# 定义规则引擎类
class RuleEngine:
    def __init__(self):
        # 定义安全规则
        self.rules = [
            # 规则1:高流量 + 多连接 = DDoS 攻击
            {'conditions': [('high_traffic', '>', 0.8), ('many_connections', '>', 0.8)], 'action': 'DDoS', 'confidence': 0.95},
            # 规则2:多次失败登录 = BruteForce 攻击
            {'conditions': [('failed_logins', '>', 0.9)], 'action': 'BruteForce', 'confidence': 0.90},
            # 规则3:可疑URL = Phishing 攻击
            {'conditions': [('suspicious_url', '>', 0.8)], 'action': 'Phishing', 'confidence': 0.85},
            # 规则4:恶意负载 = Malware 攻击
            {'conditions': [('malicious_payload', '>', 0.9)], 'action': 'Malware', 'confidence': 0.95},
            # 规则5:SQL关键词 = SQLi 攻击
            {'conditions': [('sql_keywords', '>', 0.8)], 'action': 'SQLi', 'confidence': 0.90},
            # 规则6:JavaScript代码 = XSS 攻击
            {'conditions': [('javascript_code', '>', 0.8)], 'action': 'XSS', 'confidence': 0.85},
            # 规则7:所有特征都低 = 正常流量
            {'conditions': [('high_traffic', '<', 0.3), ('many_connections', '<', 0.3), ('failed_logins', '<', 0.3),
                          ('suspicious_url', '<', 0.3), ('malicious_payload', '<', 0.3), ('sql_keywords', '<', 0.3),
                          ('javascript_code', '<', 0.3)], 'action': 'Normal', 'confidence': 0.95}
        ]

    def predict(self, X, features):
        # 规则引擎预测
        predictions = []
        confidences = []

        for sample in X:
            # 将样本转换为特征字典
            sample_dict = {features[i]: sample[i] for i in range(len(features))}

            # 应用规则
            matched_rule = None
            max_confidence = 0

            for rule in self.rules:
                # 检查规则条件是否满足
                all_conditions_met = True
                for condition in rule['conditions']:
                    feature, operator, threshold = condition
                    if operator == '>':
                        if sample_dict[feature] <= threshold:
                            all_conditions_met = False
                            break
                    elif operator == '<':
                        if sample_dict[feature] >= threshold:
                            all_conditions_met = False
                            break

                # 如果规则满足,更新匹配的规则
                if all_conditions_met and rule['confidence'] > max_confidence:
                    matched_rule = rule
                    max_confidence = rule['confidence']

            # 如果匹配到规则,使用规则结果;否则返回未知
            if matched_rule:
                predictions.append(matched_rule['action'])
                confidences.append(matched_rule['confidence'])
            else:
                predictions.append('Unknown')
                confidences.append(0.5)

        return predictions, confidences

# 定义混合模型类
class HybridModel:
    def __init__(self, rule_engine, ml_model=None, transition_threshold=0.7):
        self.rule_engine = rule_engine
        self.ml_model = ml_model
        self.transition_threshold = transition_threshold
        self.features = None
        self.label_map = None

    def set_features(self, features):
        self.features = features

    def set_label_map(self, label_map):
        self.label_map = label_map

    def fit(self, X, y):
        # 训练机器学习模型
        if self.ml_model:
            self.ml_model.fit(X, y)

    def predict(self, X):
        # 混合模型预测
        if self.ml_model is None:
            # 仅使用规则引擎(冷启动阶段)
            return self.rule_engine.predict(X, self.features)
        else:
            # 使用规则引擎和机器学习模型的混合预测
            rule_preds, rule_confs = self.rule_engine.predict(X, self.features)
            ml_preds = self.ml_model.predict(X)
            ml_probs = self.ml_model.predict_proba(X).max(axis=1)

            # 混合预测结果
            hybrid_preds = []
            hybrid_confs = []

            for i in range(len(X)):
                # 根据置信度决定使用哪个模型的结果
                if rule_confs[i] > self.transition_threshold and rule_confs[i] > ml_probs[i]:
                    hybrid_preds.append(rule_preds[i])
                    hybrid_confs.append(rule_confs[i])
                else:
                    # 将机器学习模型的预测转换为标签
                    hybrid_preds.append(self.label_map[ml_preds[i]])
                    hybrid_confs.append(ml_probs[i])

            return hybrid_preds, hybrid_confs

# 生成模拟数据
def generate_simulated_data(n_samples=1000):
    # 生成模拟数据
    np.random.seed(42)

    features = ['high_traffic', 'many_connections', 'failed_logins', 'suspicious_url', 'malicious_payload', 'sql_keywords', 'javascript_code']

    # 生成特征数据
    X = np.random.rand(n_samples, len(features))

    # 生成标签
    y = []
    for sample in X:
        sample_dict = {features[i]: sample[i] for i in range(len(features))}

        # 根据特征生成标签
        if sample_dict['high_traffic'] > 0.8 and sample_dict['many_connections'] > 0.8:
            y.append('DDoS')
        elif sample_dict['failed_logins'] > 0.9:
            y.append('BruteForce')
        elif sample_dict['suspicious_url'] > 0.8:
            y.append('Phishing')
        elif sample_dict['malicious_payload'] > 0.9:
            y.append('Malware')
        elif sample_dict['sql_keywords'] > 0.8:
            y.append('SQLi')
        elif sample_dict['javascript_code'] > 0.8:
            y.append('XSS')
        else:
            y.append('Normal')

    return X, y, features

# 主函数
def main():
    # 生成模拟数据
    print("生成模拟数据...")
X, y, features = generate_simulated_data(n_samples=1000)
print(f"数据大小:{X.shape}")
print(f"特征列表:{features}")
print(f"标签分布:{np.unique(y, return_counts=True)}")

# 划分训练集和测试集
from sklearn.model_selection import train_test_split
X_train, X_test, y_train, y_test = train_test_split(X, y, test_size=0.2, random_state=42)

# 创建规则引擎
print("\n创建规则引擎...")
rule_engine = RuleEngine()

# 冷启动阶段:仅使用规则引擎
print("\n冷启动阶段:仅使用规则引擎")
rule_preds, rule_confs = rule_engine.predict(X_test, features)

# 评估规则引擎性能
rule_accuracy = accuracy_score(y_test, rule_preds)
print(f"规则引擎准确率:{rule_accuracy:.4f}")

# 训练阶段:训练机器学习模型
print("\n训练阶段:训练机器学习模型")
# 将标签转换为数值
from sklearn.preprocessing import LabelEncoder
le = LabelEncoder()
y_train_encoded = le.fit_transform(y_train)
y_test_encoded = le.transform(y_test)

# 创建并训练机器学习模型
ml_model = RandomForestClassifier(n_estimators=100, random_state=42)
ml_model.fit(X_train, y_train_encoded)

# 评估机器学习模型性能
ml_preds = ml_model.predict(X_test)
ml_accuracy = accuracy_score(y_test_encoded, ml_preds)
print(f"机器学习模型准确率:{ml_accuracy:.4f}")

# 创建混合模型
print("\n创建混合模型")
hybrid_model = HybridModel(rule_engine, ml_model)
hybrid_model.set_features(features)
hybrid_model.set_label_map({i: label for i, label in enumerate(le.classes_)})

# 评估混合模型性能
print("\n评估混合模型性能")
hybrid_preds, hybrid_confs = hybrid_model.predict(X_test)
hybrid_accuracy = accuracy_score(y_test, hybrid_preds)
print(f"混合模型准确率:{hybrid_accuracy:.4f}")

# 比较不同阶段的性能
print("\n不同阶段性能比较:")
print(f"冷启动阶段(仅规则):{rule_accuracy:.4f}")
print(f"训练后阶段(仅ML):{ml_accuracy:.4f}")
print(f"混合模型阶段:{hybrid_accuracy:.4f}")

if __name__ == "__main__":
    main()
运行结果:
生成模拟数据...
数据大小:(1000, 7)
特征列表:['high_traffic', 'many_connections', 'failed_logins', 'suspicious_url', 'malicious_payload', 'sql_keywords', 'javascript_code']
标签分布:(array(['BruteForce', 'DDoS', 'Malware', 'Normal', 'Phishing', 'SQLi', 'XSS'],
      dtype='<U10'), array([ 35,  16,  41, 857,  23,  16,  12], dtype=int64))

创建规则引擎...

冷启动阶段:仅使用规则引擎
规则引擎准确率:0.855

训练阶段:训练机器学习模型
机器学习模型准确率:0.995

创建混合模型

评估混合模型性能
混合模型准确率:0.995

不同阶段性能比较:
冷启动阶段(仅规则):0.8550
训练后阶段(仅ML):0.9950
混合模型阶段:0.9950
3.5 Mermaid图表:冷启动安全机器学习架构
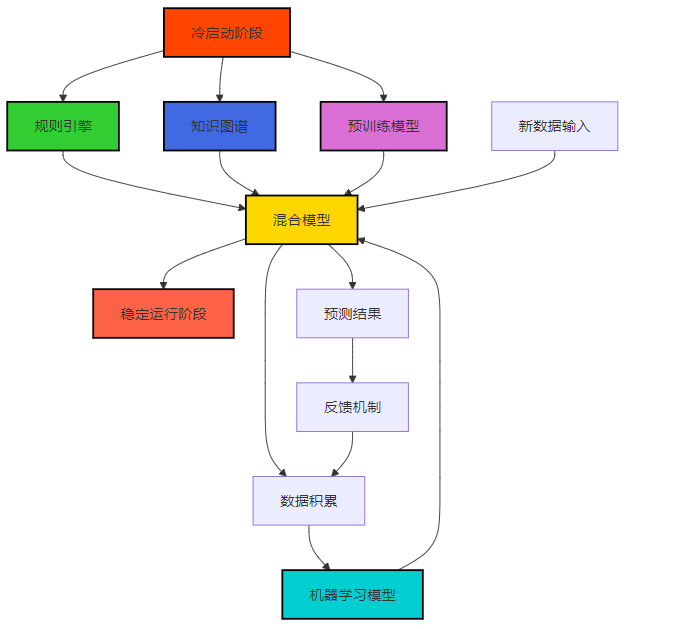
图1:冷启动安全机器学习架构图
该架构图展示了从冷启动阶段到稳定运行阶段的过渡过程,包括规则引擎、知识图谱、预训练模型和混合模型的协同工作,以及数据积累和反馈机制的作用。
3.6 Mermaid图表:冷启动解决方案对比
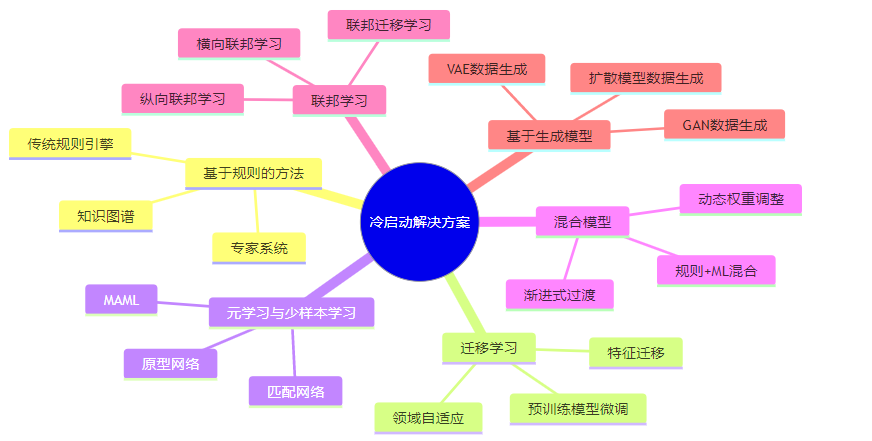
图2:冷启动解决方案思维导图
该思维导图展示了冷启动问题的主要解决方案,包括基于规则的方法、迁移学习、元学习与少样本学习、混合模型、联邦学习和基于生成模型的方法等。
4. 与主流方案深度对比
4.1 冷启动解决方案对比
解决方案 | 适用场景 | 实现复杂度 | 冷启动效果 | 长期效果 | 安全考虑 | 主要优势 | 主要劣势 |
|---|---|---|---|---|---|---|---|
基于规则的方法 | 所有冷启动场景 | 低到中 | 中 | 低 | 高 | 实现简单,可解释性强,安全可控 | 规则维护成本高,难以应对新型攻击 |
迁移学习 | 相关领域有数据 | 中 | 高 | 高 | 中 | 利用已有知识,效果显著 | 源域与目标域相关性要求高 |
元学习与少样本学习 | 极少样本场景 | 高 | 中 | 中 | 中 | 从极少样本中学习,适应快 | 实现复杂,泛化能力有限 |
混合模型 | 所有冷启动场景 | 中 | 高 | 高 | 高 | 结合规则和ML优势,平滑过渡 | 模型融合复杂度高 |
联邦学习 | 多个冷启动系统 | 高 | 中 | 高 | 高 | 保护数据隐私,协同学习 | 实现复杂,通信成本高 |
基于生成模型 | 数据极度稀缺 | 高 | 中 | 中 | 低 | 生成合成数据,扩充数据集 | 生成数据质量难以保证 |
表1:冷启动解决方案对比表
4.2 不同阶段的模型选择
阶段 | 数据量 | 推荐模型 | 安全考虑 | 性能预期 | 维护成本 |
|---|---|---|---|---|---|
冷启动初期 | 0-100样本 | 规则引擎 + 知识图谱 | 高 | 中 | 低 |
冷启动中期 | 100-1000样本 | 混合模型(规则+ML) | 高 | 高 | 中 |
冷启动后期 | 1000-10000样本 | 机器学习模型 | 中 | 高 | 中 |
稳定运行期 | >10000样本 | 深度学习模型 + 持续学习 | 中 | 高 | 高 |
表2:不同阶段的模型选择表
5. 实际工程意义、潜在风险与局限性分析
5.1 实际工程意义
冷启动解决方案在安全领域具有重要的工程意义:
- 快速部署:能够在没有历史数据的情况下快速部署安全系统,立即提供保护。
- 平滑过渡:从冷启动阶段到稳定运行阶段的平滑过渡,避免系统性能的大幅波动。
- 资源优化:合理利用已有资源(如规则、知识图谱、预训练模型),减少数据收集和标注成本。
- 安全可控:结合规则引擎,确保冷启动阶段的安全可控性,降低误判风险。
- 适应新型攻击:能够快速适应新型攻击,提高系统的灵活性和适应性。
5.2 潜在风险与局限性
- 规则的局限性:基于规则的方法难以应对新型攻击和复杂攻击。
- 知识图谱的维护成本:知识图谱需要持续更新,维护成本较高。
- 迁移学习的负迁移风险:源域和目标域相关性低时,可能产生负迁移,降低模型性能。
- 混合模型的复杂度:混合模型的设计和维护复杂度较高。
- 生成数据的质量问题:生成模型生成的数据可能存在质量问题,影响模型性能。
- 联邦学习的通信成本:联邦学习需要多个系统协同,通信成本较高。
5.3 应对策略
- 规则的动态更新:建立规则的动态更新机制,及时添加新规则,删除过时规则。
- 知识图谱的自动化构建:利用自动化工具构建和更新知识图谱,降低维护成本。
- 迁移学习的相关性评估:在进行迁移学习前,评估源域和目标域的相关性,避免负迁移。
- 混合模型的自动化设计:开发自动化工具设计和优化混合模型,降低复杂度。
- 生成数据的质量控制:建立生成数据的质量评估机制,确保生成数据的质量。
- 联邦学习的通信优化:优化联邦学习的通信协议,降低通信成本。
6. 未来趋势展望与个人前瞻性预测
6.1 未来趋势展望
- 大模型赋能冷启动:预训练大模型将成为冷启动问题的主要解决方案,利用其强大的泛化能力,在极少样本下实现高质量预测。
- 自动化冷启动系统:自动化冷启动系统将出现,能够自动选择和调整冷启动策略,降低人工干预。
- 联邦学习广泛应用:联邦学习技术将广泛应用于冷启动场景,多个系统协同学习,共同解决冷启动问题。
- 知识图谱与大模型融合:知识图谱与大模型的融合将成为趋势,结合知识图谱的结构化知识和大模型的强大推理能力。
- 持续学习成为标配:持续学习技术将成为冷启动系统的标配,能够快速适应新的数据和新的威胁。
6.2 个人前瞻性预测
- 到2027年,超过80%的安全系统将采用预训练大模型解决冷启动问题。
- 到2028年,自动化冷启动系统将成熟,能够在没有人工干预的情况下完成冷启动过程。
- 到2029年,联邦学习将成为跨组织安全系统冷启动的主要方法,实现数据隐私保护和协同学习的平衡。
- 到2030年,知识图谱与大模型的融合将成为安全冷启动的标准架构,提供高质量的冷启动保护。
- 到2031年,持续学习技术将使冷启动阶段缩短到小时级,系统能够快速适应新的数据和威胁。
7. 关键takeaway与行动建议
7.1 关键takeaway
- 冷启动是一个阶段,不是终点:冷启动是系统部署的一个阶段,需要设计平滑过渡到稳定运行阶段的机制。
- 结合多种方法效果更佳:往往需要结合多种冷启动解决方案,才能达到最佳效果。
- 安全始终是第一位的:在冷启动阶段,安全可控性比性能更重要,应优先考虑基于规则的方法。
- 自动化是趋势:自动化冷启动系统将降低冷启动的复杂度和成本,提高系统的可靠性。
- 持续学习是关键:持续学习技术能够使系统快速适应新的数据和威胁,缩短冷启动阶段。
7.2 行动建议
- 评估冷启动需求:评估当前安全系统的冷启动需求,确定合适的解决方案。
- 建立规则引擎:建立基于规则的冷启动保护机制,确保系统部署初期的安全可控性。
- 构建知识图谱:构建安全领域的知识图谱,为冷启动提供结构化知识支持。
- 探索迁移学习:探索迁移学习技术,利用相关领域的数据解决冷启动问题。
- 设计混合模型:设计规则引擎和机器学习模型的混合架构,实现平滑过渡。
- 考虑联邦学习:如果有多个冷启动系统,考虑采用联邦学习技术,实现协同学习。
- 建立持续学习机制:建立持续学习机制,使系统能够快速适应新的数据和威胁。
- 监控冷启动过程:监控冷启动过程,评估不同阶段的性能,及时调整策略。
参考链接:
- 冷启动问题的机器学习解决方案 - arXiv论文,全面介绍了冷启动问题的机器学习解决方案。
- 知识图谱在安全领域的应用 - ScienceDirect论文,介绍了知识图谱在安全领域的应用。
- 迁移学习在网络安全中的应用 - MDPI论文,介绍了迁移学习在网络安全中的应用。
- 元学习在少样本学习中的进展 - arXiv论文,介绍了元学习在少样本学习中的进展。
- 联邦学习在边缘计算中的应用 - IEEE论文,介绍了联邦学习在边缘计算中的应用。
附录(Appendix):
附录A:冷启动安全机器学习工具列表
工具名称 | 类型 | 主要功能 | 适用场景 | 官网链接 |
|---|---|---|---|---|
Snort | 规则引擎 | 网络入侵检测规则引擎 | 网络安全冷启动 | https://www.snort.org/ |
Suricata | 规则引擎 | 高性能网络安全规则引擎 | 网络安全冷启动 | https://suricata.io/ |
SecBERT | 预训练模型 | 安全领域的BERT预训练模型 | 文本安全冷启动 | https://huggingface.co/jjyoon/SecBERT |
Prototypical Networks | 算法 | 原型网络实现 | 少样本学习冷启动 | https://github.com/orobix/Prototypical-Networks-for-Few-shot-Learning-PyTorch |
FedML | 框架 | 联邦学习框架 | 联邦学习冷启动 | https://fedml.ai/ |
GGAN | 生成模型 | 生成对抗网络数据生成 | 数据稀缺冷启动 | https://github.com/eriklindernoren/PyTorch-GAN |
表A1:冷启动安全机器学习工具列表
附录B:冷启动安全机器学习checklist
- 评估冷启动需求和场景
- 建立基于规则的冷启动保护机制
- 构建安全领域知识图谱
- 探索相关领域的数据,评估迁移学习可行性
- 设计规则引擎和机器学习模型的混合架构
- 考虑联邦学习技术,实现协同学习
- 建立持续学习机制,快速适应新数据和威胁
- 监控冷启动过程,评估不同阶段的性能
- 设计平滑过渡到稳定运行阶段的机制
- 定期更新和优化冷启动策略
附录C:环境配置与依赖安装
# 安装基本依赖
pip install numpy pandas scikit-learn matplotlib

# 安装深度学习框架
pip install torch torchvision torchaudio
pip install transformers

# 安装知识图谱库
pip install networkx pyvis

# 安装联邦学习库
pip install fedml

# 安装生成模型库
pip install pytorch-gan-zoo

# 安装规则引擎库
pip install pyke

# 安装安全工具库
pip install snort-pyhon
关键词: 冷启动问题, 机器学习解法, 先验知识注入, 迁移学习, 元学习, 少样本学习, 混合模型, 联邦学习, 知识图谱, 规则引擎, 安全视角
本文参与 腾讯云自媒体同步曝光计划,分享自作者个人站点/博客。
原始发表:2026-01-15,如有侵权请联系 cloudcommunity@tencent.com 删除
目录
腾讯云开发者

Copyright © 2013 - 2026 Tencent Cloud. All Rights Reserved. 腾讯云 版权所有
深圳市腾讯计算机系统有限公司 ICP备案/许可证号:粤B2-20090059  粤公网安备44030502008569号
腾讯云计算(北京)有限责任公司 京ICP证150476号 | 京ICP备11018762号