大模型应用:稀疏注意力 vs 滑动窗口:大模型扩窗技术完全解析.58
原创
大模型应用:稀疏注意力 vs 滑动窗口:大模型扩窗技术完全解析.58
原创
未闻花名
发布于 2026-03-27 06:50:13
发布于 2026-03-27 06:50:13
一、引言
我们应该也遇到过这样的情况,在和模型应用沟通的过程中,聊着聊着它就忘了开头的要求;或者让模型工具分析一本几百页的电子书,它只记住了最后几页的内容?我们也反复讨论过,这不是大模型记性差,而是它的注意力范围有限,原始的大模型注意力机制,看的文本越长,计算量就会像滚雪球一样爆炸式增长,普通电脑根本扛不住。
而滑动窗口和稀疏注意力,就是给大模型扩宽视野的两个核心妙招:一个让大模型用放大镜看长文本,只看局部,快但短视,一个让大模型跳着看长文本,注重局部和重点,稍慢但全面。今天咱们就从这两个技术入手,看看它们的底层逻辑、数学原理以及实际用法,针对这些问题可以有一个推荐的解决方案。

二、核心概念
1. 强化“注意力机制”
当我们读这句话的时候,应该要有一种似曾相识的感觉,应该会不自觉地关联前面的内容,比如看到“扩窗技术”,会想起前文所说的“大模型视野有限”。大模型的“注意力机制” 和这个过程一模一样:
- 本质:每个位置的文字(比如第 5 个字),都会计算和其他所有文字的“关联度”,比如和第 3 个字关联度高,和第 100 个字关联度低;
- 作用:关联度高的文字,会被赋予更高的权重,最终影响当前位置的输出;
- 问题:如果文本有 1 万个字,每个字都要和另外 9999 个字算关联度,总共要算 1 亿次,这就是计算量爆炸。
2. 滑动窗口注意力
- 核心逻辑:放大镜式的看文本,给大模型一个“固定大小的放大镜”,读第 i 个字时,只看它周围 W 个字(比如 W=512),超出这个范围的文字,一律不计算关联度;
- 生活比喻:我们用放大镜看一幅 10 米长的画,一次只能看 10 厘米,但移动放大镜就能看完整个画快,但看的时候不知道画的整体布局;
- 关键特点:
- 计算快、省内存,手机/普通显卡都能运行;
- 短视,比如第 1000 个字,看不到第 100 个字的关键信息;
- 实现最简单,大模型入门级扩窗方案。
3. 稀疏注意力
- 核心逻辑:跳着看,看重点,不看全部,但也不只是看周围,而是“局部必看 + 远处挑看 + 首尾必看”;
- 生活比喻:你读一本 1000 页的书,不会逐字读(像原始注意力),也不会只看每页周围 5 行(像滑动窗口),而是:
- 1. 注重局部:逐行读当前页;
- 2. 远处挑看:每 10 页翻一页看标题;
- 3. 首尾重点:必看前言和后记;
- 关键特点:
- 兼顾局部细节和全局重点(能处理超长文本);
- 实现稍复杂、计算量比滑动窗口略高;
- 长文本场景(比如整本书总结、十万行代码分析)的核心方案。
4. 概念对比
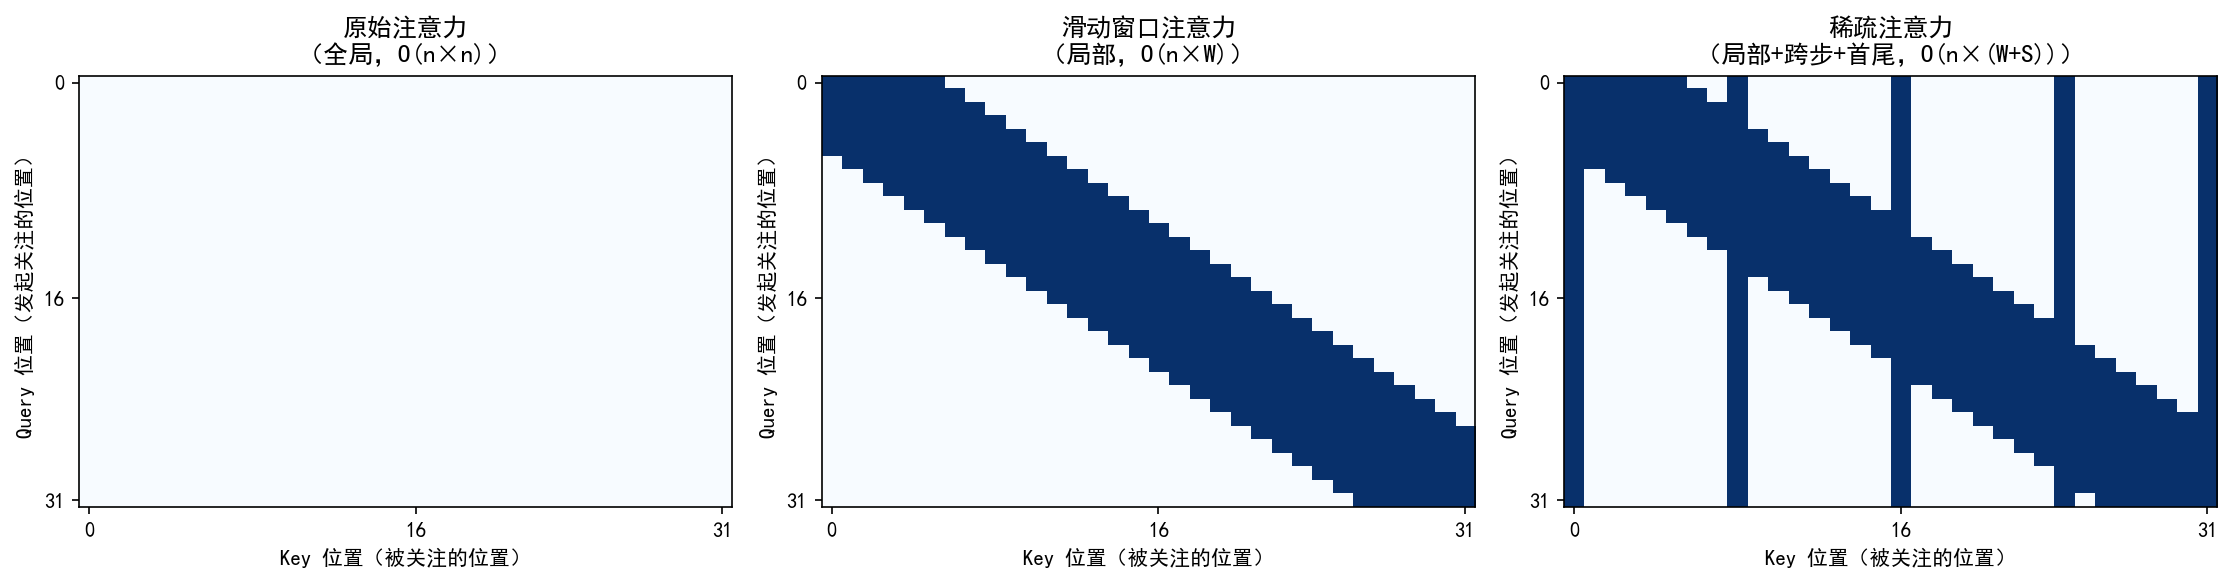
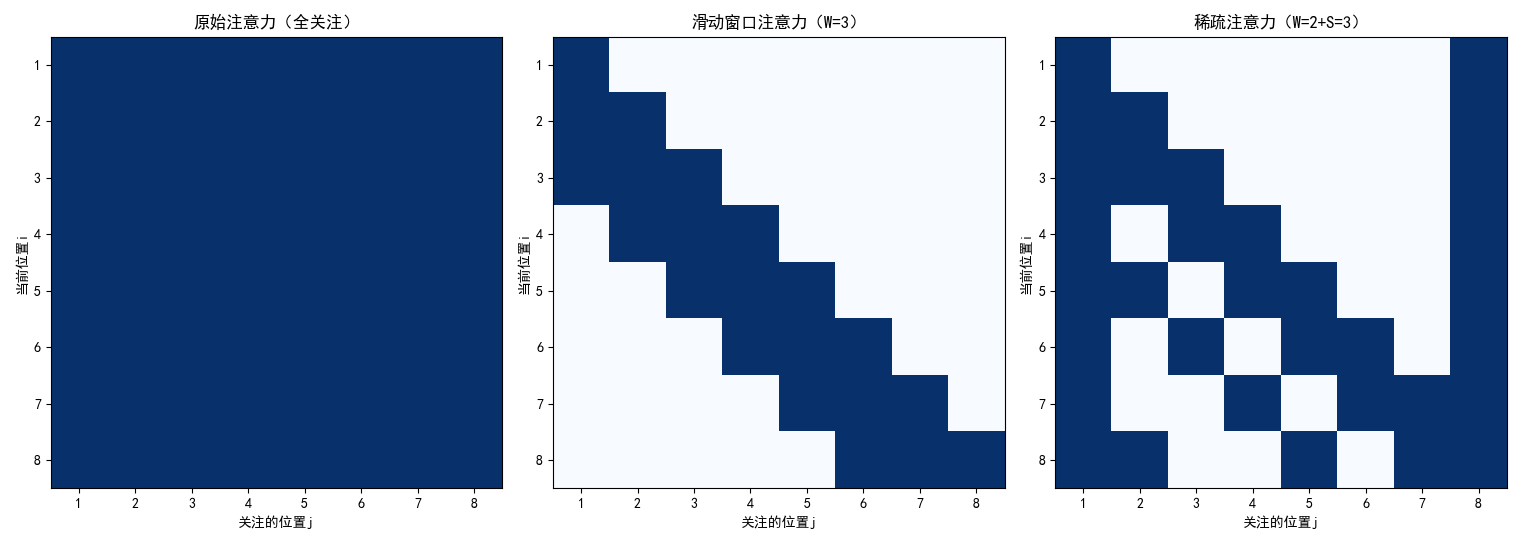
左图:原始注意力
- 整个矩阵全亮(稠密),每个词(token)都与序列中所有其他词相互计算注意力。
- 信息交互最全面;计算量随序列长度平方增长(O(n²)),长文本下内存和计算开销极大。
中图:滑动窗口注意力
- 沿主对角线的一条“带状”亮区,每个词只关注其前后固定窗口内的邻居(如左右各 5 个词)。
- 局部上下文建模;计算复杂度线性增长(O(n×W),W 为窗口大小);实现简单,效率高。
右图:稀疏注意力
- 主对角线亮带 + 垂直/水平的稀疏亮线(代表跨步和首尾)关注范围:结合三类位置:
- 局部窗口(同滑动窗口);
- 跨步远处(每隔若干位置关注一个远端 token);
- 首尾 token(始终关注开头和结尾)。
- 在保持线性复杂度(O(n×(W+S)))的同时,兼顾局部细节与全局结构;设计更灵活,适合超长上下文。
三、基础原理
1. 先明确:注意力的核心公式
不管是哪种注意力,核心都是“加权求和”,先看原始注意力的公式,再了解其他注意力的差别:
Attention(x_i) = ∑(softmax( (q_i · k_j) / √d ) × v_j) (j从1到n)
公式里每个符号详细说明:
- x_i:第 i 个位置的输入(比如第 5 个字的向量表示);
- q_i:查询向量(Query)—— 第 i 个字 “想找什么信息”;
- k_j:键向量(Key)—— 第 j 个字 “有什么信息”;
- v_j:值向量(Value)—— 第 j 个字 “能提供的具体信息”;
- q_i・k_j:向量点积 —— 计算 q_i 和 k_j 的 “匹配度”(数值越大,关联度越高);
- √d:归一化系数(d 是向量维度,比如 768)—— 防止点积数值太大;
- softmax:归一化函数 —— 把匹配度转换成 “权重”,所有权重加起来等于 1;
- ∑(j 从 1 到 n):对所有位置的 v_j 加权求和,这是 O (n²) 的根源(每个 i 都要算 n 次)。
2. 滑动窗口注意力的公式
核心:缩小求和范围:
SWAttention(x_i) = ∑(softmax((q_i · k_j) / √d ) × v_j) (j从max(1, i-W/2)到min(n, i+W/2))
差异点:
- 核心变化:把 “j 从 1 到 n” 改成 “j 只在 i 的窗口范围内”;
- W:窗口大小(比如 W=4),W/2 就是窗口的 “左右半径”;
- max (1, i-W/2):防止窗口超出文本开头(比如 i=1 时,窗口不能从 0 开始);
- min (n, i+W/2):防止窗口超出文本结尾(比如 i=n 时,窗口不能到 n+1);
- 例子:文本长度 n=8,窗口 W=3,i=4(第 4 个位置): j 的范围是 max (1,4-1)=3 到 min (8,4+1)=5 → 只算 j=3、4、5 这 3 个位置;
- 复杂度变化:从 O (n²) 降到 O (n×W)(W 固定,比如 512),n 从 1000 变 10000,计算量只涨 10 倍,不是 100 倍。
3. 稀疏注意力的公式
核心:选关键位置求和
SparseAttention(x_i) = ∑(softmax((q_i · k_j) / √d ) × v_j) (j属于S_i)
差异点:
- 核心变化:把 “j 从 1 到 n” 改成 “j 属于 S_i”(S_i 是第 i 个位置选中的位置集合);
- S_i 的组成:
- 1. 局部窗口:j ∈ [max (1, i-W/2), min (n, i+W/2)](和滑动窗口一样,保证局部细节);
- 2. 跨步远处:j = i+S、i+2S、i+3S…(S 是步长,比如 S=10,每 10 个位置选 1 个);
- 3. 全局重点:j=1(文本开头)、j=n(文本结尾)(保证不丢核心信息);
- 例子:n=8,W=2,S=3,i=4:
- 1. 局部窗口:j=3、4、5;
- 2. 跨步远处:j=4+3=7;
- 3. 全局重点:j=1、8; → S_i = {1,3,4,5,7,8}(去重后),只算这 6 个位置;
- 复杂度变化:O (n×(W+S)),比滑动窗口稍高,但远低于原始注意力。
四、执行流程
1. 滑动窗口注意力执行流程
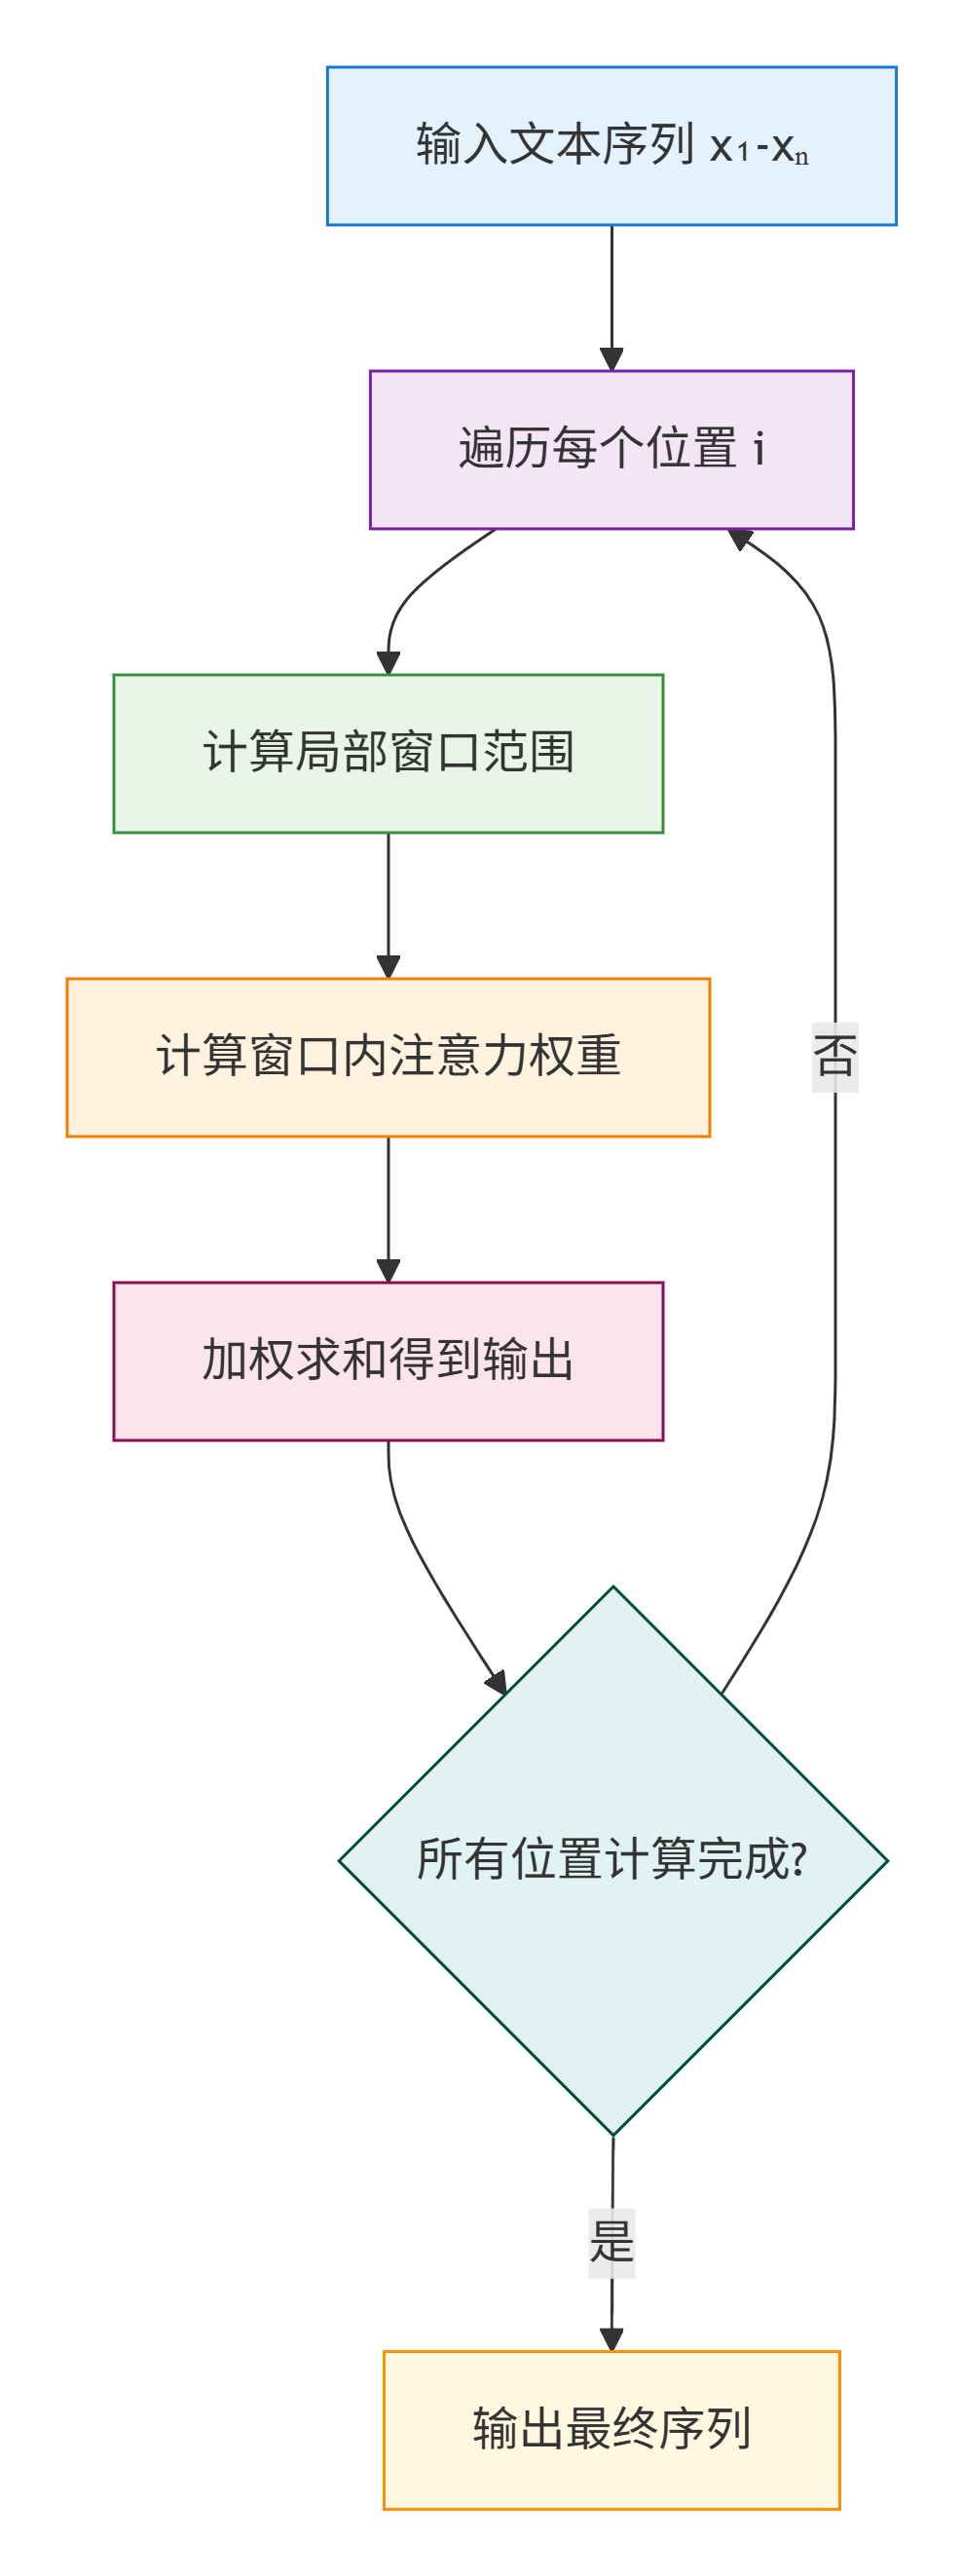
步骤说明:
- 1. 输入:文本序列 x1-xn(比如 8 个字的向量),设定窗口大小 W(比如 3);
- 2. 遍历每个位置 i(从 1 到 8);
- 3. 对每个 i,计算窗口范围:左边界 = max (1, i-W/2),右边界 = min (n, i+W/2);
- 4. 只计算窗口内 j 的 q_i・k_j(匹配度);
- 5. 用 softmax 把匹配度转成权重;
- 6. 加权求和 v_j,得到 i 位置的输出;
- 7. 所有 i 计算完成后,输出最终序列。
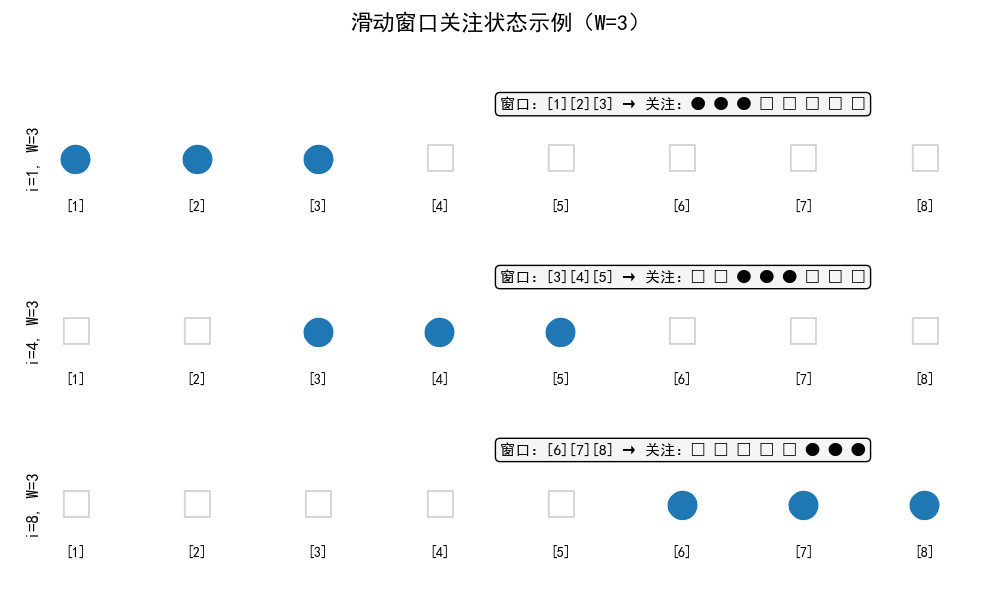
示例展示:
文本序列:[1] [2] [3] [4] [5] [6] [7] [8] i=1,W=3 → 窗口:[1][2][3] → 关注:● ● ● □ □ □ □ □ i=4,W=3 → 窗口:[3][4][5] → 关注:□ □ ● ● ● □ □ □ i=8,W=3 → 窗口:[6][7][8] → 关注:□ □ □ □ □ ● ● ● (●=关注,□=不关注)
2. 稀疏注意力执行流程
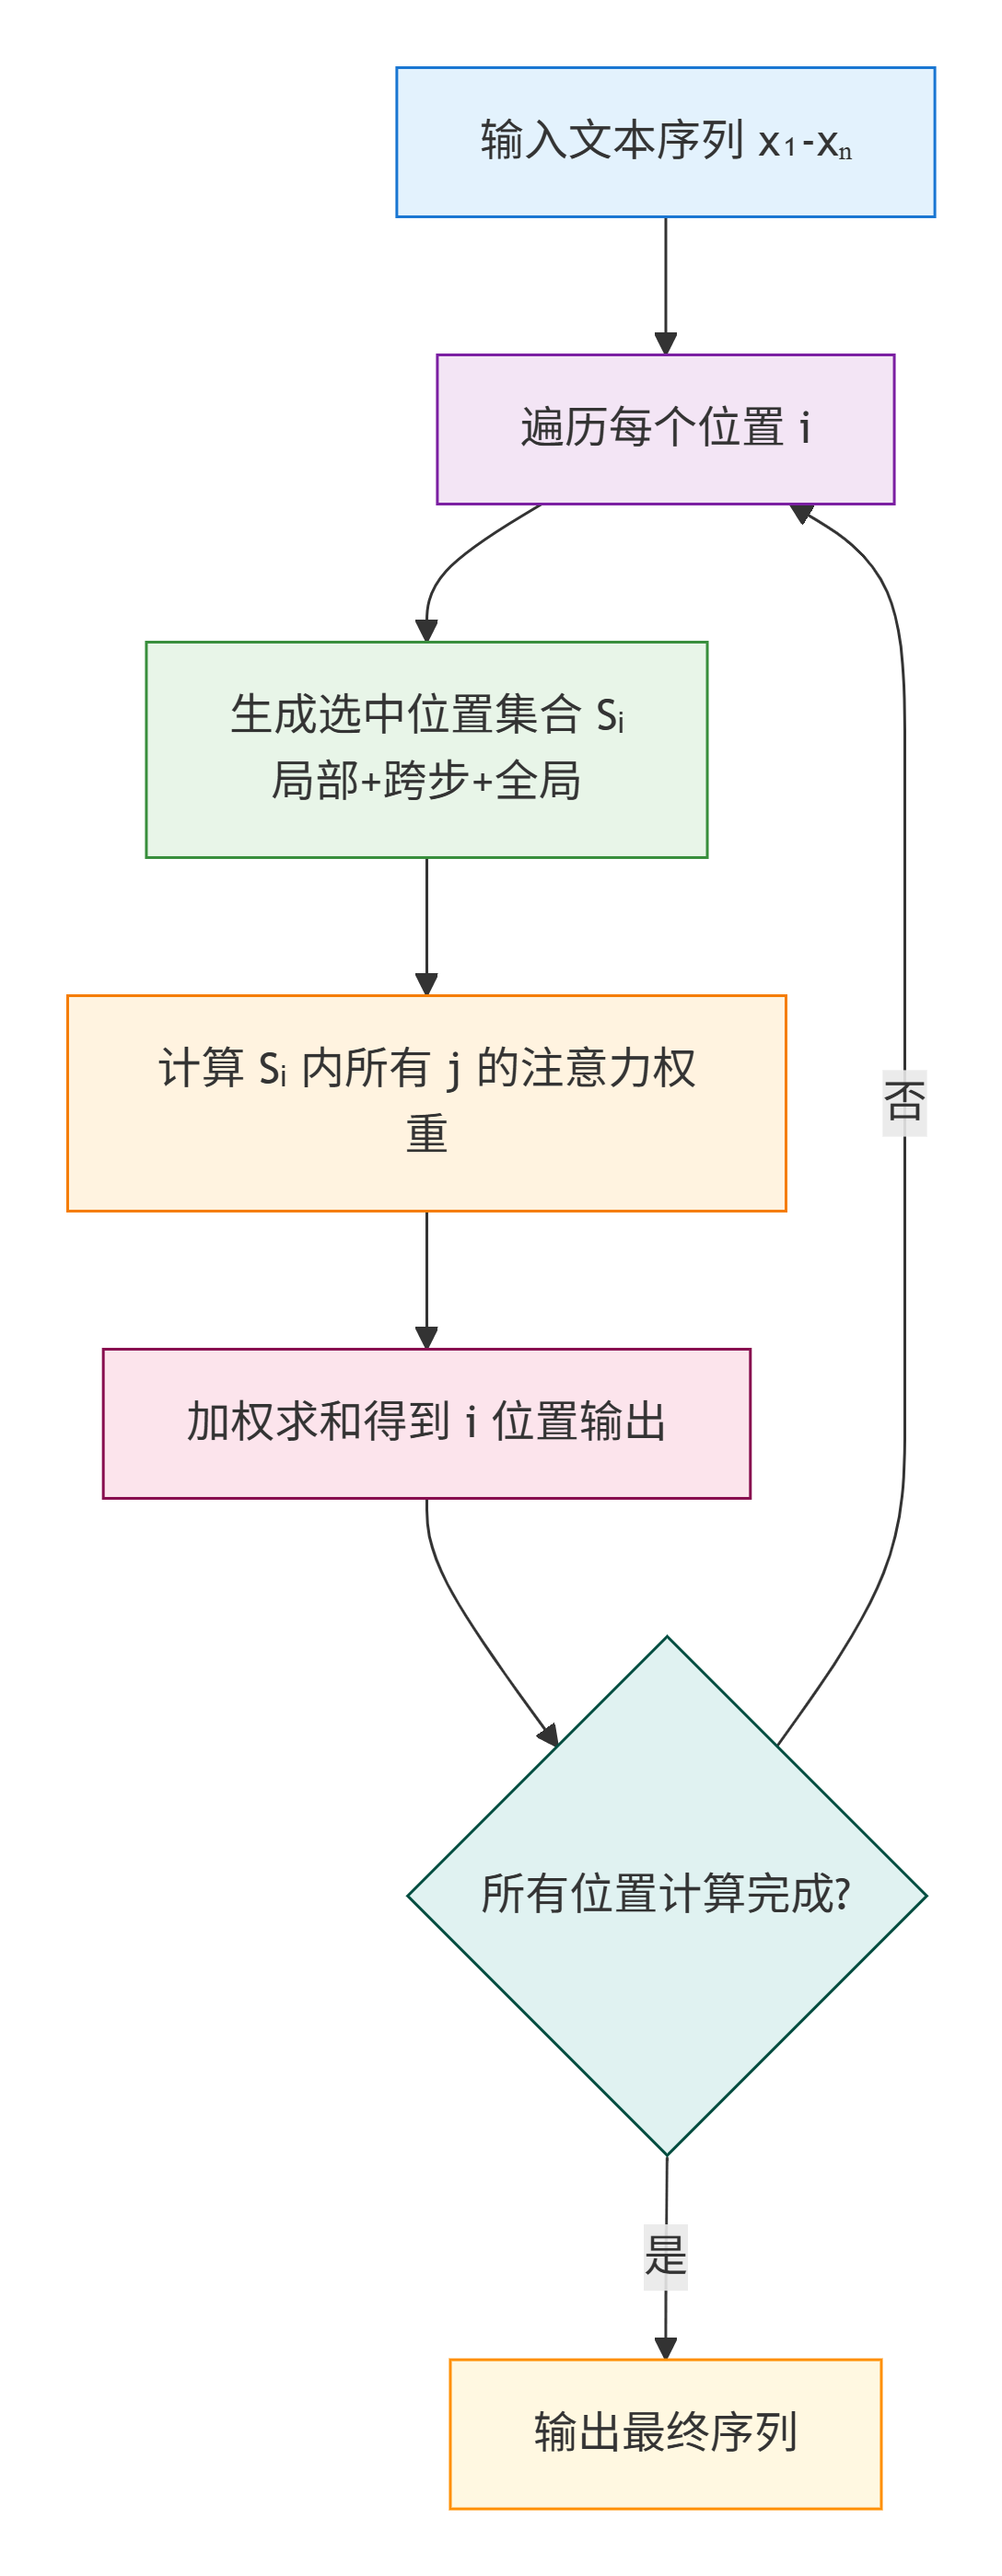
步骤说明:
- 1. 输入:文本序列 x1-xn,设定局部窗口 W(比如 2)、跨步 S(比如 3);
- 2. 遍历每个位置 i;
- 3. 对每个 i,生成选中位置集合 S_i(局部 + 跨步 + 全局);
- 4. 计算 S_i 内 j 的 q_i・k_j;
- 5. softmax 转权重,加权求和 v_j 得到 i 位置输出;
- 6. 输出最终序列。
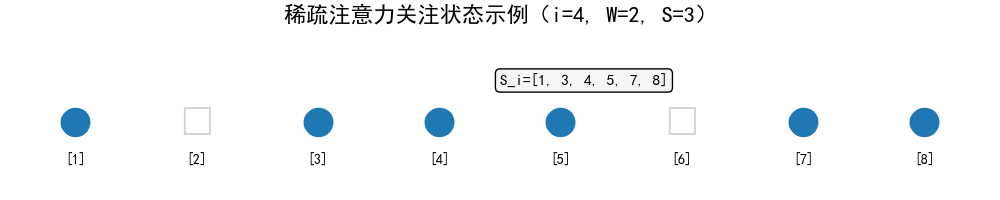
示例展示:
文本序列:[1] [2] [3] [4] [5] [6] [7] [8] i=4,W=2,S=3 → S_i={1,3,4,5,7,8} 关注情况:● □ ● ● ● □ ● ● (●=关注,□=不关注)
五、示例展示
1. 滑动窗口 + 稀疏注意力
import torch
import torch.nn.functional as F
import matplotlib.pyplot as plt
import numpy as np
plt.rcParams['font.sans-serif'] = ['SimHei', 'DejaVu Sans']
plt.rcParams['axes.unicode_minus'] = False
# ---------------------- 核心函数 ----------------------
def sliding_window_attention(q, k, v, window_size=4):
    """滑动窗口注意力(带关注矩阵记录)"""
    seq_len, d = q.shape
    output = torch.zeros_like(v)
    # 记录关注矩阵(seq_len×seq_len,1=关注,0=不关注)
    attention_mask = torch.zeros((seq_len, seq_len))

    for i in range(seq_len):
        # 计算窗口范围:当前位置i向前看window_size个位置
        start = max(0, i - window_size + 1)
        end = i + 1
        # 标记关注的位置(从start到i)
        attention_mask[i, start:end] = 1

        q_i = q[i:i+1, :]
        k_window = k[start:end, :]
        v_window = v[start:end, :]

        scores = torch.matmul(q_i, k_window.T) / torch.sqrt(torch.tensor(d))
        weights = F.softmax(scores, dim=-1)
        output[i, :] = torch.matmul(weights, v_window)

    return output, attention_mask

def sparse_attention(q, k, v, window_size=2, stride=3):
    """稀疏注意力(带关注矩阵记录)"""
    seq_len, d = q.shape
    output = torch.zeros_like(v)
    attention_mask = torch.zeros((seq_len, seq_len))

    for i in range(seq_len):
        # 1. 局部窗口:当前位置i向前看window_size个位置
        start = max(0, i - window_size + 1)
        end = i + 1
        local_j = list(range(start, end))

        # 2. 跨步位置:从当前位置i向前按stride步长跳跃
        stride_j = []
        j = i - stride
        while j >= 0:
            stride_j.append(j)
            j -= stride

        # 3. 全局位置(首尾)
        global_j = [0, seq_len-1] if seq_len > 1 else [0]

        # 合并去重
        all_j = list(set(local_j + stride_j + global_j))
        all_j.sort()  # 排序保证顺序
        # 标记关注的位置
        attention_mask[i, all_j] = 1

        q_i = q[i:i+1, :]
        k_sparse = k[all_j, :]
        v_sparse = v[all_j, :]

        scores = torch.matmul(q_i, k_sparse.T) / torch.sqrt(torch.tensor(d))
        weights = F.softmax(scores, dim=-1)
        output[i, :] = torch.matmul(weights, v_sparse)

    return output, attention_mask

# ---------------------- 可视化函数 ----------------------
def plot_attention_comparison(sw_mask, sparse_mask, seq_len):
    """绘制注意力关注矩阵对比图(生成图片)"""
    # 创建画布(1行3列,对比原始/滑动窗口/稀疏注意力)
    fig, (ax1, ax2, ax3) = plt.subplots(1, 3, figsize=(15, 5))

    # 1. 原始注意力(全关注)
    original_mask = torch.ones((seq_len, seq_len))
    im1 = ax1.imshow(original_mask.numpy(), cmap='Blues', vmin=0, vmax=1)
    ax1.set_title('原始注意力(全关注)', fontsize=12)
    ax1.set_xlabel('关注的位置j')
    ax1.set_ylabel('当前位置i')

    # 2. 滑动窗口注意力
    im2 = ax2.imshow(sw_mask.numpy(), cmap='Blues', vmin=0, vmax=1)
    ax2.set_title('滑动窗口注意力(W=3)', fontsize=12)
    ax2.set_xlabel('关注的位置j')

    # 3. 稀疏注意力
    im3 = ax3.imshow(sparse_mask.numpy(), cmap='Blues', vmin=0, vmax=1)
    ax3.set_title('稀疏注意力(W=2+S=3)', fontsize=12)
    ax3.set_xlabel('关注的位置j')

    # 统一刻度(方便对比)
    for ax in [ax1, ax2, ax3]:
        ax.set_xticks(range(seq_len))
        ax.set_yticks(range(seq_len))
        ax.set_xticklabels([f'{i+1}' for i in range(seq_len)])
        ax.set_yticklabels([f'{i+1}' for i in range(seq_len)])
        ax.set_xlabel('关注的位置j')
        ax.set_ylabel('当前位置i')

    # # 添加颜色条(放在右侧外部)
    # cbar = fig.colorbar(im1, ax=[ax1, ax2, ax3], shrink=0.8, pad=0.95, aspect=30)
    # cbar.set_label('关注状态(1=关注,0=不关注)', fontsize=10, rotation=270, labelpad=20)

    # 保存图片(新手可改路径)
    plt.tight_layout()
    plt.savefig('attention_comparison.png', dpi=300, bbox_inches='tight')
    print("图片已保存为:attention_comparison.png")
    plt.show()

# ---------------------- 测试+生成图片 ----------------------
if __name__ == "__main__":
    # 模拟输入:序列长度=8,向量维度=2
    seq_len = 8
    d = 2
    q = torch.randn(seq_len, d)
    k = torch.randn(seq_len, d)
    v = torch.randn(seq_len, d)

    # 计算滑动窗口注意力(窗口=3)
    sw_output, sw_mask = sliding_window_attention(q, k, v, window_size=3)
    # 计算稀疏注意力(窗口=2,跨步=3)
    sparse_output, sparse_mask = sparse_attention(q, k, v, window_size=2, stride=3)

    # 生成对比图
    plot_attention_comparison(sw_mask, sparse_mask, seq_len)

    # 打印关键信息(新手验证)
    print("滑动窗口注意力关注矩阵:")
    print(sw_mask.numpy().astype(int))  # 1=关注,0=不关注
    print("\n稀疏注意力关注矩阵:")
    print(sparse_mask.numpy().astype(int))
输出结果:
滑动窗口注意力关注矩阵: [[1 0 0 0 0 0 0 0] [1 1 0 0 0 0 0 0] [1 1 1 0 0 0 0 0] [0 1 1 1 0 0 0 0] [0 0 1 1 1 0 0 0] [0 0 0 1 1 1 0 0] [0 0 0 0 1 1 1 0] [0 0 0 0 0 1 1 1]] 稀疏注意力关注矩阵: [[1 0 0 0 0 0 0 1] [1 1 0 0 0 0 0 1] [1 1 1 0 0 0 0 1] [1 0 1 1 0 0 0 1] [1 1 0 1 1 0 0 1] [1 0 1 0 1 1 0 1] [1 0 0 1 0 1 1 1] [1 1 0 0 1 0 1 1]]
- 原始注意力矩阵(8×8):
- 1 1 1 1 1 1 1 1
- 1 1 1 1 1 1 1 1
- ...(所有行都是1)
- 滑动窗口注意力矩阵(i=4,第4行):
- 0 0 1 1 1 0 0 0
- 稀疏注意力矩阵(i=4,第4行):
- 1 0 1 1 1 0 1 1
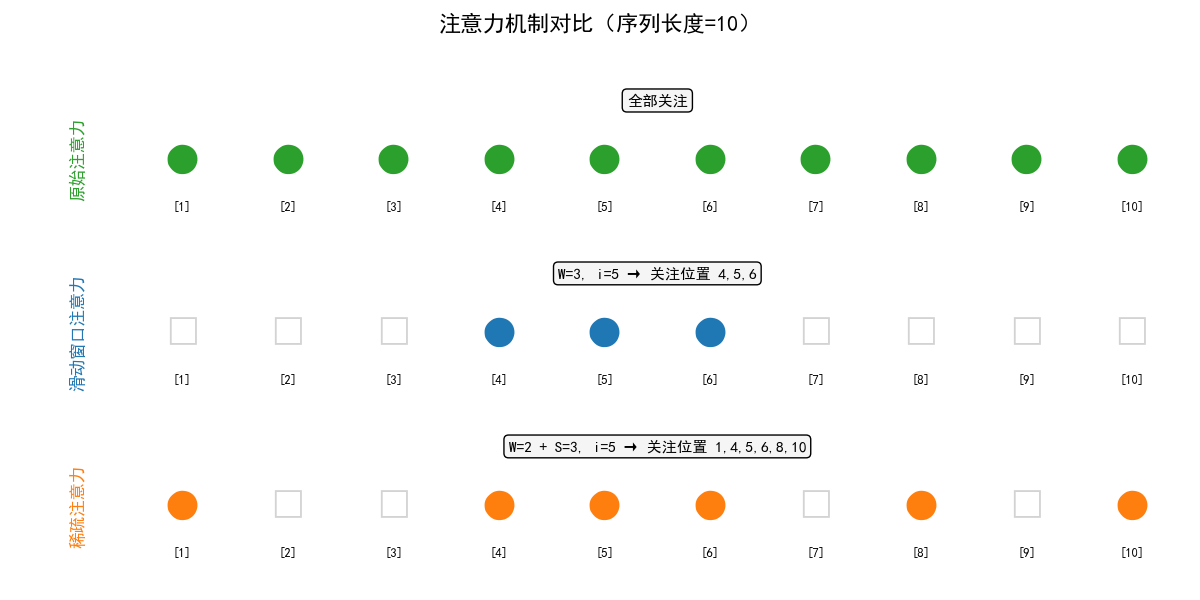
2. 三种注意力的 “关注范围” 对比
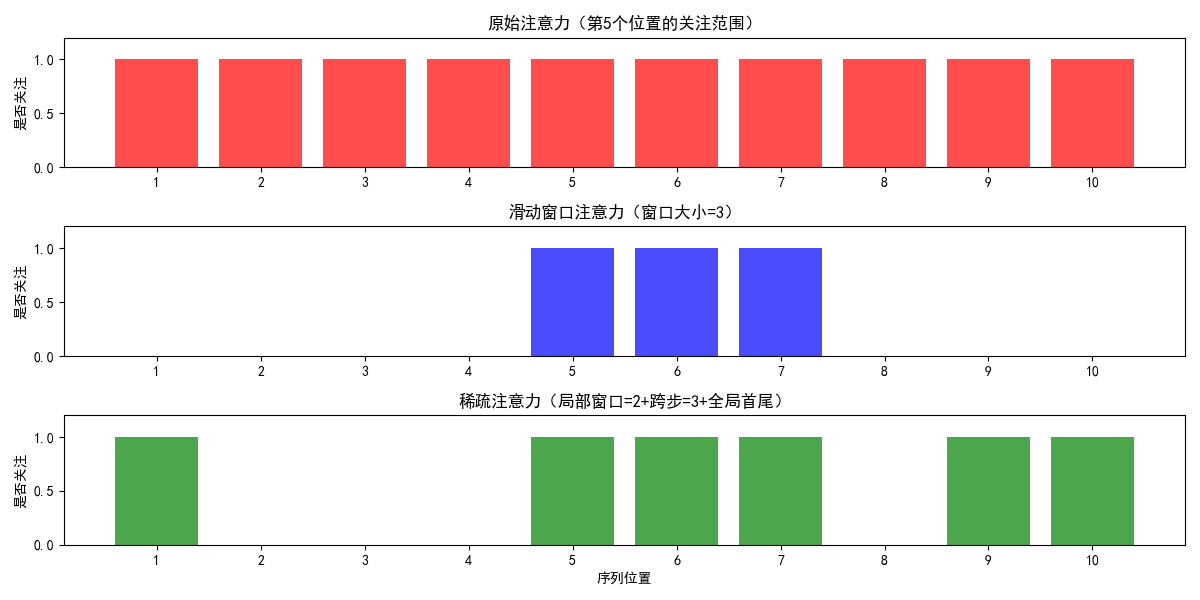
- 序列位置:1 2 3 4 5 6 7 8 9 10
- 原始注意力:●●●●●●●●●●(全部关注)
- 滑动窗口(W=3,i=5): ●●● (只关注4,5,6)
- 稀疏注意力(W=2+S=3,i=5):● ●●● ● ●(关注1,4,5,6,8,10)
import matplotlib.pyplot as plt

# 配置字体(支持中文和符号)
plt.rcParams['font.sans-serif'] = ['SimHei', 'DejaVu Sans']
plt.rcParams['axes.unicode_minus'] = False

# 序列设置
positions = list(range(1, 11))  # [1, 2, ..., 10]
n = len(positions)

# 1. 原始注意力:全部关注
original = [True] * n

# 2. 滑动窗口注意力 (W=3, i=5) → 关注 4,5,6
window = [False] * n
for idx in [4, 5, 6]:  # 位置 4,5,6(注意索引从1开始)
    window[idx - 1] = True

# 3. 稀疏注意力:关注 1,4,5,6,8,10(按你给出的结果)
sparse_set = {1, 4, 5, 6, 8, 10}
sparse = [pos in sparse_set for pos in positions]

# 所有行数据
rows = [
    {
        "title": "原始注意力",
        "desc": "全部关注",
        "attention": original,
        "color": "tab:green"
    },
    {
        "title": "滑动窗口注意力",
        "desc": "W=3, i=5 → 关注位置 4,5,6",
        "attention": window,
        "color": "tab:blue"
    },
    {
        "title": "稀疏注意力",
        "desc": "W=2 + S=3, i=5 → 关注位置 1,4,5,6,8,10",
        "attention": sparse,
        "color": "tab:orange"
    }
]

# 创建子图
fig, axes = plt.subplots(3, 1, figsize=(12, 6))
fig.suptitle("注意力机制对比(序列长度=10)", fontsize=16, weight='bold')

for ax, row in zip(axes, rows):
    # 绘制每个位置
    for j, pos in enumerate(positions):
        is_attend = row["attention"][j]
        symbol = '●' if is_attend else '□'
        color = row["color"] if is_attend else 'lightgray'
        ax.text(pos, 0.5, symbol, fontsize=24, ha='center', va='center', color=color)
        ax.text(pos, 0.2, f'[{pos}]', fontsize=9, ha='center', va='center', color='black')

    # 设置坐标轴
    ax.set_xlim(0.5, n + 0.5)
    ax.set_ylim(0, 1)
    ax.axis('off')

    # 添加左侧标题(竖排)
    ax.text(-0.05, 0.5, row["title"], transform=ax.transAxes,
            rotation=90, va='center', ha='center',
            fontsize=12, weight='bold', color=row["color"])

    # 添加顶部说明文字
    ax.text(0.5, 0.92, row["desc"], transform=ax.transAxes,
            fontsize=11, ha='center', va='top',
            bbox=dict(boxstyle="round,pad=0.3", facecolor="whitesmoke"))

# 调整布局
plt.tight_layout(rect=[0.05, 0, 1, 0.95])
plt.show()
输出结果:
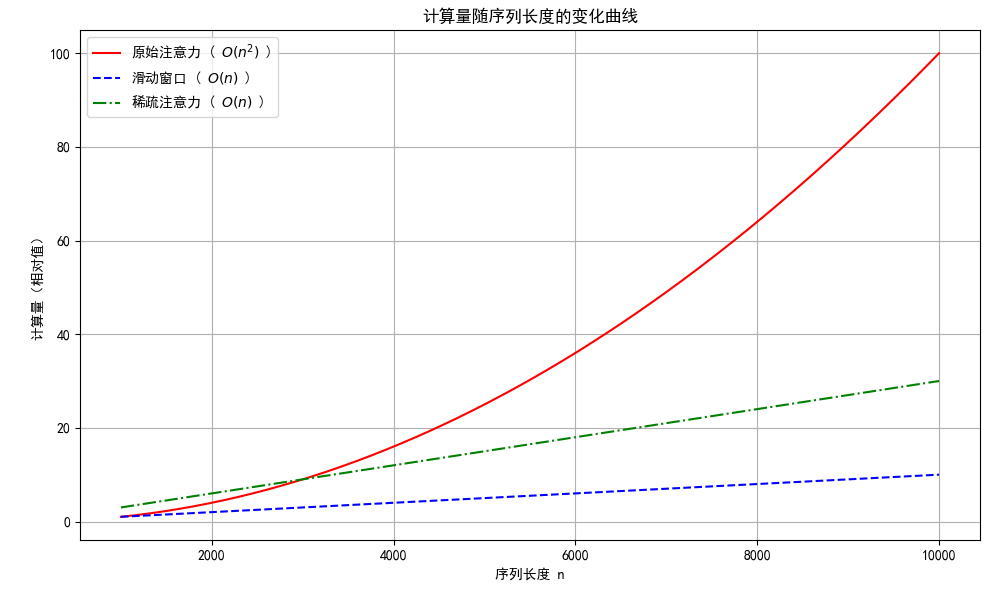
3. 计算量随序列长度变化曲线
我们将展示三种注意力机制的计算复杂度:
- 原始注意力:其计算复杂度为 O(n²) ) ,因此是二次函数。
- 滑动窗口:假设固定窗口大小 W ,其复杂度大约为 O(n),因为每个位置只与固定数量的其他位置进行交互。
- 稀疏注意力:同样大致为线性关系 O(n) ,但斜率比滑动窗口稍高。
import numpy as np
import matplotlib.pyplot as plt

plt.rcParams['font.sans-serif'] = ['SimHei', 'DejaVu Sans']
plt.rcParams['axes.unicode_minus'] = False

# 设置序列长度范围
n_values = np.linspace(1000, 10000, 500)

# 计算不同模型下的计算量(相对值)
original_attention = n_values ** 2 / (1000 ** 2)  # 归一化处理以便比较
sliding_window = n_values * 0.001  # 假设比例因子使得其在图中显示合理
sparse_attention = n_values * 0.003  # 稀疏注意力斜率稍高于滑动窗口

# 创建图表
plt.figure(figsize=(10, 6))
plt.tight_layout(pad=0)
plt.subplots_adjust(left=0.08, right=0.98, top=0.95, bottom=0.1)

# 绘制三条曲线
plt.plot(n_values, original_attention, label='原始注意力 ( $ O(n^2) $ )', color='red')
plt.plot(n_values, sliding_window, label='滑动窗口 ( $ O(n) $ )', linestyle='--', color='blue')
plt.plot(n_values, sparse_attention, label='稀疏注意力 ( $ O(n) $ )', linestyle='-.', color='green')

# 添加标题和标签
plt.title('计算量随序列长度的变化曲线')
plt.xlabel('序列长度 n')
plt.ylabel('计算量(相对值)')

# 显示图例
plt.legend()

# 展示图表
plt.grid(True)
plt.show()
输出图示:
六、对大模型的意义
我们可以把大模型的“上下文长度”理解为它的“记忆长度”,越长,能处理的文本(比如整本书、长对话、代码文件)就越长。扩窗技术的核心价值是:
1. 滑动窗口:让大模型跑得起来
- 没有滑动窗口之前,大模型处理 1 万字的文本,需要天价显卡,普通开发者根本用不起;
- 滑动窗口把计算量砍到原来的 1/100,现在用普通的显卡就能跑 1 万字的上下文;
- 比如现在很多大模型,底层就是滑动窗口,它能快速回复,但聊久了会忘事,因为超出窗口了。
2. 稀疏注意力:让大模型记得更全
- 稀疏注意力解决了滑动窗口短视的问题:比如分析一本 10 万字的小说,滑动窗口只能看到局部情节,稀疏注意力能看到开头的人物设定、中间的关键转折、结尾的结局;
- 现在的 “超长上下文大模型”,核心就是稀疏注意力,能处理整本书、整份代码库、整份法律合同;
- 它的意义:让大模型从聊天机器人升级成长文本处理工具,能做小说续写、代码全量分析、法律文书审核等复杂任务。
3. 整体意义:推动大模型更贴合实际应用
- 扩窗技术降低了大模型的使用门槛,降低硬件成本、时间成本;
- 拓展了大模型的应用场景,从短文本聊天到长文本处理;
- 是大模型从理论阶段走向实际应用的关键技术之一。
七、总结
今天我们说的滑动窗口和稀疏注意力,本质就是给大模型扩视野的两个方法,核心都是解决一个问题:原始注意力看文本越长,计算量越爆炸,普通电脑扛不住。
滑动窗口就像给大模型装了个固定大小的放大镜,看当前内容时只聚焦周围一小片,超出范围的全忽略。它最大的优点是简单、跑得快、不费内存,普通显卡都能跑,我们日常用的聊天机器人,大多靠它撑着。但缺点也明显,短视,聊久了、处理长文本时,前面的关键信息超出窗口就忘了,只能顾着眼前。
稀疏注意力就聪明多了,走的是聪明跳读路线:既保留滑动窗口的局部视野,又每隔一段挑几个远处位置看看,还必抓首尾关键信息。虽然比滑动窗口稍复杂、计算量略高,但能兼顾局部细节和全局重点,像分析整本书、超长代码这种活儿,全靠它撑场面。
总结下来就是:追求快、处理中短文本,选滑动窗口;要兼顾全面性、搞定超长文本,就用稀疏注意力。但技术没有好坏,都是为了让大模型既能看得更远,又能跑得动,把以前只能靠天价显卡才能做的长文本任务,可以实际落地具体的应用场景。
原创声明:本文系作者授权腾讯云开发者社区发表,未经许可,不得转载。
如有侵权,请联系 cloudcommunity@tencent.com 删除。
原创声明:本文系作者授权腾讯云开发者社区发表,未经许可,不得转载。
如有侵权,请联系 cloudcommunity@tencent.com 删除。
评论
登录后参与评论
推荐阅读
目录
腾讯云开发者

Copyright © 2013 - 2026 Tencent Cloud. All Rights Reserved. 腾讯云 版权所有
深圳市腾讯计算机系统有限公司 ICP备案/许可证号:粤B2-20090059 ![]() 粤公网安备44030502008569号
粤公网安备44030502008569号
腾讯云计算(北京)有限责任公司 京ICP证150476号 | 京ICP备11018762号